5 GEOS Programming
Because GEOS implements its own messaging and object system, standard C programming must be supplemented with GEOS-specific programming. This chapter describes the syntax and commands available to GEOS programmers in the Goc preprocessor.
This chapter will not endeavor to teach C or object-oriented programming concepts-you should be familiar with both before continuing. Additionally, you should have read both “System Architecture,” Chapter 3 and “First Steps: Hello World,” Chapter 4.
5.1 Basic Data Types and Structures
In addition to the standard data types available in C, the Goc preprocessor handles several other types specific to GEOS. These are all defined in the file geos.h. Some of these types were carried over from the world of assembly language and (along with the standard C types) are shown in Table 5-1.
Table 5-1 Basic Data Types
| Type Name | Description |
|---|---|
| byte | An unsigned, 8-bit field. |
| sbyte | A signed, 8-bit field (same as char). |
| word | An unsigned, 16-bit field. |
| wchar | An unsigned, 16-bit field (same as word). |
| sword | A signed, 16-bit field (same as short). |
| dword | An unsigned, 32-bit field. |
| sdword | A signed, 32-bit field (same as long). |
| Boolean | A type (16 bits) used for Boolean functions. |
Additional basic types supported by GEOS. The standard types defined in the C programming language are also supported.
The Boolean type behaves as most Boolean types-any nonzero value represents a true state, and zero represents the false state. Throughout the documentation, true and false are taken to be these meanings. Note that the constants TRUE and FALSE are defined and may be used as return values from your functions and methods. Do not compare Boolean variables, however, against these constants. A Boolean may be true without actually equaling the TRUE value.
5.1.1 Records and Enumerated Types
GEOS objects and routines make extensive use of flag records and enumerated types. A flag record is a byte, word, or dword in which each bit represents the state (on or off) of a particular attribute or function. An enumerated type is a byte or word in which each enumeration has a unique constant value.
There are three basic types of flag records, shown in Table 5-2. To define a flag record, you should use one of these types and then define the flags to be bits within the record. To set flags, OR them (bitwise OR) with the record; to clear them, AND their bitwise inverses (bitwise AND) with the record. Creating and working with flag records is shown in Code Display 5-1.
There are two basic enumerated types: The standard enumerated type supported by your C compiler uses word-sized values. GEOS also allows byte-sized enumerated types with the ByteEnum type. Use of this type is shown in Code Display 5-1.
Table 5-2 Flag Records and ByteEnum
| Type Name | Description |
|---|---|
| ByteFlags | An 8-bit record of bit flags. |
| WordFlags | A 16-bit record of bit flags. |
| DWordFlags | A 32-bit record of bit flags. |
| ByteEnum | An 8-bit enumerated type to complement the 16-bit type supported by standard C compilers. |
Types of GEOS flags records and ByteEnum.
Code Display 5-1 Flag Records and ByteEnums
/* Define flag records to be the optimized length for the number of flags. For
 * example, the sample type MyFlag has six flags and therefore should be a byte.
 * Flag values should be constants equivalent to having a single bit set in the
 * flag record. */

typedef ByteFlags MyFlag;
#define MF_FIRST_FLAG           0x01
#define MF_SECOND_FLAG          0x02
#define MF_THIRD_FLAG           0x04
#define MF_FOURTH_FLAG          0x08
#define MF_FIFTH_FLAG           0x10
#define MF_SIXTH_FLAG           0x20

/* In a section of code, to set a flag, bitwise OR it with the record. To clear the
 * flag, bitwise AND its inverse with the record. You can set any number of flags
 * at a time as shown in the following examples. */

    ...
    MyFlag  myFlagsRecord;  /* Set up a variable of the flag record type */

    /* Set the second and fourth flag. */
    myFlagsRecord = MF_SECOND_FLAG | MF_FOURTH_FLAG;

    /* Set the first flag and then clear the fifth and sixth flags. */
    myFlagsRecord = (myFlagsRecord | MF_FIRST_FLAG) & ~(MF_FIFTH_FLAG |
                            MF_SIXTH_FLAG);

/* The ByteEnum type can be used instead of the standard enumerated type, which
 * is implemented by most compilers as a word type. To define a ByteEnum, define
 * the type and then a unique constant value for each enumeration as in the
 * following example. */

typedef ByteEnum USCity;
#define USC_HARTFORD            0x00
#define USC_CHARLOTTE           0x01
#define USC_WICHITA         0x02
#define USC_PIERRE          0x03
#define USC_ORLANDO         0x04
5.1.2 Handles and Pointers
Handles and pointers are present everywhere in GEOS-they are the essential elements that make dynamic linking and efficient memory management possible.
GEOS pointers are all far pointers; that is, they are 32-bit addresses that reference specific locations in memory. They are normal C pointers and can be used as such. Two other pointer types are also used by GEOS: Object pointers (optrs) and segment pointers. Object pointers are described below; segment pointers are 16-bit addresses described in “Memory Management”, Chapter 15.
5.1.2.1 Handles
Handles are 16-bit, unsigned values used for several purposes. They provide abstraction when the exact address of a data structure or other item is not known or is an inconsistent state. The kernel maintains a handle table to keep track of many of the handles in the system. Each entry in the handle table is 16 bytes that contains information about the item referenced by the handle; these 16 bytes are opaque to applications and libraries and can not be accessed or altered except by the kernel. Other handle types are managed in other tables by the kernel.
Handles are used for the following primary purposes. For a full description of how handles are used, see “Handles”, Chapter 14.
Memory reference
Entries for memory handles contain pointers to memory blocks; when the blocks move, the pointers are updated. However, the handle’s integrity is preserved, and applications keep track of just the handle value.Virtual Memory reference
Entries for VM handles indirectly reference VM blocks similar to the way memory handles reference blocks of memory. VM handles may be used whether the VM block is resident in memory or not.File and disk reference
Entries for file and disk handles contain information about the location and status of the referenced file/disk. They provide indirect access to files and disks in a manner similar to memory handles.Data structure implementation
Certain frequently-used system data structures require a storage format that provides for quick and convenient access at all times. These data structures (for example, threads, event queues, messages, timers, and semaphores) are stored in Handle Table entries.Optimization
The kernel will, if space permits, sometimes use Handle Table entries for optimized temporary storage. (For example, when passing parameters on the stack with messages, the kernel will occasionally use handles for storing the parameters.)
The NullHandle value (zero) is used to indicate a null handle.
There are over a dozen different types of handles that can be used by any sort of geode. These are listed in Table 5-3, along with a brief description of each. All are 16-bit unsigned integers.
Table 5-3 Handle Types
| Type Name | Description |
|---|---|
| Handle | All-purpose handle. |
| MemHandle | References a block of memory. |
| DiskHandle | References a particular disk. |
| FileHandle | References a particular file. |
| ThreadHandle | References a thread. |
| QueueHandle | References an event queue structure. |
| TimerHandle | References a timer data structure. |
| GeodeHandle | References a geode. |
| GStateHandle | References a graphic state. |
| WindowHandle | References a window. |
| SemaphoreHandle | References a semaphore data structure. |
| EventHandle | References a particular event in an event queue. |
| ThreadLockHandle | References a thread lock data structure. |
| VMFileHandle | References a VM file. |
| VMBlockHandle | References a VM block (with a VM file handle). |
| NullHandle | The null value of any handle. |
The internal structure of every handle type is opaque and can not be accessed except by the kernel. Swat, the GEOS debugger, provides commands that allow you to access the data referenced by the various handles.
5.1.2.2 Chunk Handles and Object Pointers
Objects and small data structures are stored in small memory pieces called chunks. Chunks are stored in memory blocks known as local memory heaps, and each local memory heap can contain several chunks. Each chunk is referenced by a combination of two handles: The MemHandle handle locates the local memory heap, and the ChunkHandle locates the chunk within the block. (The ChunkHandle type is not shown in Table 5-3 because it is not a normal handle and must be used with a MemHandle.) A null chunk handle value is specified by NullChunk.
Objects are referenced in the same way as chunks, but the handle and chunk handle are combined into a single structure called an Object Pointer, or optr. Each optr uniquely identifies a particular object in the system. Note that optrs are often used to reference non-object chunks and data structures. A null value is specified by NullOptr.
GEOS provides several macros, all defined in geos.h, for creating and parsing optrs.
ConstructOptr()
This macro constructs an optr from a MemHandle and a ChunkHandle.OptrToHandle()
This macro extracts the MemHandle portion of the given optr.OptrToChunk()
This macro extracts the chunk handle portion of a given optr.
5.1.2.3 Pointers
Pointers can be used normally as in C. All Goc-generated pointers are far pointers; that is, they are 32-bits long, composed of a 16-bit segment and a 16-bit offset.
GEOS provides macros for extracting the segment and handle portions of pointers.
PtrToSegment()
This macro returns the segment portion of the given pointer (returned as type “word”).PtrToOffset()
This macro returns the offset portion of the given pointer (returned as type “word”).
GEOS automatically loads code resources when needed. However, when you call routines through pointers, you must take special measures to see to it that the routine is properly loaded into memory. This is discussed below in section 5.2.4.
5.1.3 Fixed Point Structures
When you want to represent non-integral numbers (i.e., real numbers), you can use either the standard C floating-point format or the following special structures of GEOS for fixed point math. Note that fixed-point calculations are faster than the corresponding floating-point math, so if you want to optimize your code, you should use the GEOS fixed-point structures with the GEOS math routines.
Code Display 5-2 GEOS Data Structures
/* Fixed-Point Structures
 *    The following structures are used to represent fixed-point numbers:
 *    numbers with a fractional portion and an integral portion. Notice that
 *    there are several formats of fixed-point numbers; each uses a different
 *    number of bits for the parts of the number. Choose whichever is most
 *    appropriate (for optimization). */

    /* BBFixed
     * One byte integer, one byte fraction */
typedef struct {
    byte        BBF_frac;   /* fractional portion */
    byte        BBF_int;    /* integral portion */
} BBFixed;

    /* BBFixedAsWord
     * Sometimes it is convenient to refer to a BBFixed value as type word.
     * The BBFixedAsWord type is used for this purpose. */
typedef word        BBFixedAsWord;

    /* WBFixed
     * One word integer, one byte fraction */
typedef struct {
    byte        WBF_frac;   /* fractional portion */
    word        WBF_int;    /* integral portion */
} WBFixed;

    /* WWFixed
     * One word integer, one word fraction */
typedef struct {
    word        WWF_frac;   /* fractional portion */
    word        WWF_int;    /* integral portion */
} WWFixed;

    /* WWFixedAsDWord
     * Sometimes it is convenient to refer to a WWFixed value as type dword.
     * The WWFixedAsDWord type is used for this purpose. */
typedef dword       WWFixedAsDWord;

    /* DWFixed
     * two words (one dword) integer, one word fraction */
typedef struct {
    word        DWF_frac;   /* fractional portion */
    sdword      DWF_int;    /* integral portion */
} DWFixed;

/* Three-byte structure
 * The WordAndAHalf structure is used when you need a 24-bit value and you want to
 * optimize and avoid using a 32-bit value. */

typedef struct {
    word        WAAH_low;   /* the low 16 bits */
    byte        WAAH_high;  /* the high 8 bits */
} WordAndAHalf;
Two special macros are also available to work with the WWFixed type. These are listed below:
WWFixedToFrac
This macro produces the fractional portion of a WWFixed structure.WWFixedToInt
This macro produces the integral portion of a WWFixed structure.
Three other macros are provided for use with WWFixedAsDword structures:
MakeWWFixed
This macro creates a WWFixedAsDWord value from a given floating-point number or dword number.IntegerOf()
This macro returns the integral portion of a WWFixedAsDword structure.FractionOf()
This macro returns the fractional portion of a WWFixedAsDword structure.
5.2 Goc and C
Goc is a superset of the standard C programming language. Goc actually acts as a sort of preprocessor before the code is run through a standard C compiler. There are several differences you must be aware of, though. These differences are covered in the following sections as well as throughout the documentation.
5.2.1 Goc File Types
@include, @optimize
When programming in Goc, you will use several different types of code files. Files ending in .goh are the Goc equivalent of C .h files-they contain routine headers, constants, and other included data and structures necessary for the program. Files ending in .goc are the Goc equivalent of C .c files-they contain code and data for the program. You should keep any Goc-specific code or header information strictly in the Goc files, and standard C code should be kept in C files. C code can also be put in .goc and .goh files, but for consistency, you should try to keep it separate.
Not all of your program’s header files need be .goh files-if the header file contains only C constructions (structures, routine definitions, and so on), then you may leave it as a standard C .h file, included by means of the #include directive.
The rule of thumb is that if a header file contains any Goc code or includes a .goh file, then it must be a .goh file. Note also that .goh files are allowed to contain simple standard C code; if you are not sure, then, you can make all your header files .goh.
Standard C programs use the #include directive to include header (.h) files. When using Goc, you can use this directive in standard .c and .h files; when including .goh files in .goc files, though, you have to use the @include directive, which is Goc-specific. It has the same syntax as #include.
An example of using @include comes from the Hello World application, which includes the stdapp.goh file. (All GEOS applications will need to include this file to compile properly; it must be @included before any standard C headers are #included.) The line from Hello World is
@include <stdapp.goh>
The syntax of this directive, as stated above, is the same as for the C directive *#include. One exception is that the *@include directive will include a file just once, even if it is included by an included file-there is no need to conditionally include a file (checking first to make sure it hasn’t already been included).
If you will be including a Goc file in many different applications, or if it is very long and elaborate, it is a good idea to put the keyword @optimize at the top of the file. This instructs the Goc preprocessor to generate a special stripped-down version of the file with a .poh suffix. The compiler will then automatically keep the .poh file up to date, and use it in compilations instead of the .goh file. The .poh file contains all the data of the .goh file, but is somewhat faster to compile into an application; thus, by using the @optimize keyword, you incur a longer compilation whenever you make a change to the .goh file, but a shorter compilation time when the .goh file is unchanged since the last compilation. You may choose to leave the @optimize directive out while the header is being developed, then put it in when the header is fairly stable.
5.2.2 Conditional Code in Goc
@if, @ifdef, @ifndef, @endif
Many C programs use the directives #if, #ifdef, #ifndef, and #endif to define conditional code-code that should be compiled into the program only if certain conditions are met. When working with standard C code in your GEOS applications, you should still use these directives; when working with Goc code, however (in .goh and .goc files), you should use the Goc directives @if, @ifdef, @ifndef, and @endif.
Goc conditionals are more limited than C conditionals. Conditional expressions may be based on numbers, names of macros, and the Boolean operators OR (||) and AND (&&). Some examples of Goc conditional expressions are shown below:
@ifdef (MyMacro)
    /* code compiled if MyMacro is defined */
@endif

@if 0
    /* code that will not be compiled at all */
@endif

@if defined(MyMacro) || MY_CONSTANT
    /* code compiled if either MyMacro is
     * defined or MY_CONSTANT is not zero */
@endif

@ifndef 0
    /* code always compiled */
@endif
5.2.3 Macros in Goc
@define
The C programming language allows definition and use of macros, and most programmers use macros extensively. You can use the #define directive in standard C code in your GEOS programs to define macros that use only standard C code.
Similarly, you can use the @define Goc directive to create macros in Goc. (Macros must be defined with @define; otherwise, the Goc processor will skip the #define directive and process the macro as if it were standard code to be processed normally.)
Macros in Goc have a somewhat different syntax than standard C macros though they are very similar. Some examples of simple Goc macros follow below:
@define mlply(val1,val2)        val1 * val2
@define defChunk(a)         @chunk char a[] = "text"
When using Goc macros in your code, you must preface them with the “@” Goc marker, indicating to the processor that it is a macro. If you do not preface the macro with “@”, then Goc will pass over it and will not process it, leaving it up to the C compiler-which will likely give an error. For example, using the second macro defined above (defChunk), you could create a number of chunks easily:
@defChunk(firstText)
@defChunk(secondText)
@defChunk(thirdText)
The above would equate to the following:
@chunk char[] firstText = "text";
@chunk char[] secondText = "text";
@chunk char[] thirdText = "text";
Using “defChunk” without the “@” marker would most likely result in a compilation error in the C compiler.
5.2.4 Using Routine Pointers in Goc
ProcCallFixedOrMovable_cdecl(), ProcCallFixedOrMovable_pascal()
Most GEOS code is kept in movable resources. If you call a routine explicitly from source code the Goc preprocessor generates appropriate directives to see to it that the resource is loaded into memory when it is called. However, if you call a routine with a routine-pointer, GEOS cannot take these precautions. Accordingly, when you are calling a routine with a pointer, you must either see to it that the resource is loaded, or use one of the two ProcCallFixedOrMovable routines to instruct the kernel to lock the appropriate resource.
If you know the routine is in a resource which is locked or fixed in memory, you can use the routine pointer exactly the way you would in standard C. This is usually because the calling routine is in the same resource as the routine or routines which may be called.
If you are not sure that the resource is loaded, you should call the routine with either ProcCallFixedOrMovable_cdecl() or ProcCallFixedOrMovable_pascal(). Each of these routines is passed the following arguments:
A pointer to the routine to be called
All the arguments passed to the routine, in exactly the order which the routine expects.
Both routines return whatever the called routine returns.
If the routine to be called was defined with standard C calling conventions (the default), you should use ProcCallFixedOrMovable_cdecl(). If the routine was declared with the keyword _pascal, it uses Pascal’s calling conventions; you must then use the routine ProcCallFixedOrMovable_pascal(). Most kernel and system-library routines are declared with Pascal’s calling conventions.
Code Display 5-3 Using ProcCallFixedOrMovable_cdecl()
extern int
SomeRoutineCalledViaAPointer(int anArg, int anotherArg, const char *someText);

int (*funcPtr) (int, int, const char *);    /* A function pointer */

funcPtr = SomeRoutineCalledViaAPointer;

/* We want to do
 *  SomeRoutineCalledViaAPointer(1, 2, "Franklin T. Poomm");
 * but we want to call it through the pointer, even though it's in another
 * resource:
 */

ProcCallFixedOrMovable_cdecl(funcPtr,       /* The pointer to the routine */
            1, 2, "Franklin T. Poomm");
5.3 The GEOS Object System
GEOS is almost entirely object-oriented. Its object system supports true object-oriented principles such as encapsulation, inheritance, and message dispatching through the kernel.
The following section describes the class and object structures of GEOS, how to declare and define classes and objects, and how the messaging system and the kernel’s message dispatcher work.
5.3.1 GEOS Terminology
Though you should be familiar with general object-oriented programming terms, there are quite a few for which the meaning is slightly different in GEOS, and there are others which are entirely new to GEOS. This section is divided into four categories: General Terms, Class Terms, Object Terms, and Messaging Terms.
5.3.1.1 General Terms
chunk
A chunk is a small section of memory located in a Local Memory Heap. Object instance data is stored in a chunk, one chunk per object. Local Memory and chunks are described fully in “Local Memory”, Chapter 16.
fptr
An fptr is a “far pointer”-a 32-bit pointer to a specific location of memory. It is a standard C pointer.
handle
A handle is a 16-bit index into a Handle Table and is used to reference memory blocks. For more information, see “Handles”, Chapter 14.
object block
An object block is a specific type of Local Memory block that contains object chunks.
optr
An optr is a unique identifier for an object and is therefore also referred to as an “Object Pointer.” An optr is used to locate and access any object in the system, and because it is made up of handles and chunk handles, it will always stay the same even when the object moves in memory.
thread
A thread is a single executable entity that runs either procedural code or one or more objects. If a thread is “event-driven,” it executes code for a given set of objects, receiving messages and dispatching them to the proper objects.
5.3.1.2 Class Terms
class
A class is the definition of a set of instance data structures and the methods that work on those structures. An object is called an “instance” of its class.
class tree
A class tree represents the hierarchy of inheritance from superclass to subclass. If a message is not handled by a given class, it will be automatically passed up the class tree until it is handled or the root of the tree is reached, after which the message is discarded.
inheritance
Inheritance is the term given to the way an object of a particular class has all the same instance variables and methods as an instance of the object’s superclasses.
initialize
Initialization of an object is when a master part (or master group) of the object’s instance data is filled out. This occurs whenever a class in the master group not yet initialized in the object receives its first message.
master
The term “master” is used in several cases, all related. A master class is generally considered the top class in a single class tree. Although the master class may have superclasses, it provides a conceptual break and creation of a new subtree.
master group
The section of an object’s instance data belonging to a particular master class and all its subclasses is called a master group. A master group is initialized when the master class (or one of its subclasses) receives its first message.
resolve
Resolution of a variant class occurs when the variant’s superclass is determined. Each instance of a variant class must be resolved individually.
subclass
The term “subclass” is used to show relationships between classes. A subclass is defined on another class, from which it inherits instance data and methods. This other class is known as a “superclass,” below.
superclass
The term “superclass” is used to show relationships between classes. A superclass passes on its instance data and methods to all classes defined as subclasses of it.
variant
A variant class may have different superclasses. However, an instance of a variant class may have only one superclass at any given moment. The use of variant classes can provide much the same functionality as the multiple inheritance found in some other object systems.
5.3.1.3 Object Terms
child
A child object is one that sits below another object in an object tree. The terms child, parent, and sibling are used only to show relationships between objects.
composite
A composite object is one that can have children. The composite has a “composite link” (an optr) to its first child and a “sibling link” to its next sibling. If it has no next sibling, the sibling link instead points to the object’s parent object.
instance
An instance is a particular manifestation of a class. This term is almost always interchangeable with “object,” though sometimes it specifically refers to the chunk containing the object’s instance data rather than to the object as a whole.
link
A link is typically an optr pointing to an object’s next sibling in an object tree. It is also used more generally to refer to any optr linking two objects in an object tree (parent and child, or last sibling and parent).
object
An object is a specific manifestation of a class. Typically, this term is interchangeable with “instance”; however, sometimes the term “object” refers to the combination of an object’s methods and instance data whereas the term “instance” refers to just the object’s instance data chunk.
object tree
An object tree is a means of organizing objects into a hierarchy for display or organizational purposes. Do not confuse it with the “class tree,” the structure which represents class relationships. An object tree is made up of composite objects, each of which may have children or be the child of another object. The topmost object in the tree is called the “root,” and the bottommost objects are called the “leaves” or “nodes.” Non-composite objects may be placed in the tree as leaves but may not have children.
parent
A parent object is one that has children in an object tree. The parent contains a composite link (an optr) to its first child and is pointed to by its last child.
state file
A state file is a Virtual Memory file used to store the state of objects. Typically, object blocks will be written to or extracted from the state file. Generic UI objects have this functionality built in automatically; other objects may manage their own state saving by managing the state file.
5.3.1.4 Messaging Terms
blocking A thread “blocks” when it must wait for resources or return values from messages sent to objects in another thread. Specifically, a thread blocks when one of its objects sends a message to another thread with the “call” command; if the “send” command is used, the thread will continue executing normally.
call
A message sent with the call command causes the calling thread to block until the message is handled by the recipient. If the recipient is in the calling thread, the code will be executed immediately.
dispatcher
The GEOS dispatcher is internal to the kernel and passes messages on to their proper recipients. The dispatcher will dynamically locate the proper object and method and will invoke the method.
message
A message is a directive, query, or other instruction sent from one object to another. Messages may take parameters and may return information.
method
A method, also called a “message handler,” is the code invoked by a message. A method may do anything a normal function or procedure may do, including alter instance data. It is poor style and highly discouraged for one object’s method to alter another object’s instance data directly.
send
A message sent with the send command will be placed in the recipient’s event queue and will not cause the sender to block. Messages that return information or pass pointers should never be dispatched with the send command; use the call command in those cases.
5.3.2 Object Structures
You do not need to know what data structures are used to store objects and classes; understanding them can make programming GEOS much easier, however.
Each object is implemented in two parts: the instance data chunk and the class definition. Although both are integral parts of the object and they are interconnected, they are stored in different places.
An object’s instance data is stored in an instance chunk. This instance chunk is sometimes referred to as the object itself, but this isn’t quite accurate-the instance chunk contains only the object’s data along with a pointer to its class structure. The structure of the instance chunk is given in [section 5.3.2.1] (#5321-instance-chunk-structures).
An object’s class structure contains all the code for the class. Since the class code may be accessed by many objects, the class definition resides in a geode’s fixed memory resource. Every class (except the root, MetaClass) has a pointer to its superclass so it can inherit that class’ methods and structures.
All objects of a given class use the same code-the class’ code-for their functions. They dynamically access this code so the code blocks need to be in memory only once, no matter how many objects are actively using them. Additionally, each class dynamically accesses its superclass’ code, so any class may be accessed by all the objects of the subclasses as well. Class structures are shown in section 5.3.2.3.
5.3.2.1 Instance Chunk Structures
Each object’s instance data is stored in a Local Memory chunk. Several chunks are stored in one memory block, called a local memory heap. (See “Local Memory”, Chapter 16.) This local memory heap, containing objects, is known as an object block.
Each object block has a special header type that distinguishes it from normal local memory heaps. After the header in the block is the chunk handle table: a table containing offsets to each object in the block. Following the chunk handle table are the objects.
Each object is referenced by an object pointer, or optr. The optr contains two items: the global memory handle of the object block and the chunk handle of the object. Note that because the optr is made up of handles, an object must be locked before its instance data can be accessed. The GEOS kernel takes care of this automatically when executing methods. For an illustration of how an optr references an object’s instance chunk, see Figure 5-1.
Only the object’s instance data is stored in the chunk pointed to by the optr; the method table and code used by the object are stored in the class’ data structures, not the object’s. To reconcile this separation of code and data, every object’s first four bytes of instance data are a pointer to the object’s class definition. This pointer is traversed by the kernel automatically and should not be altered or accessed by applications. A simplified diagram of how this pointer allows the kernel to traverse class trees when handling messages is shown in Figure 5-2.
Included in an object’s instance chunk are certain fields generated and filled by either Goc or the kernel. Following these fields is the object’s instance data, grouped by master part. It’s unlikely you’ll ever have to know the actual structures used in the instance chunk because the kernel automatically calculates the proper offsets to individual instance data fields. However, understanding the underlying structures may help in understanding how the object system of GEOS works.

Figure 5-1 An Object Pointer
The optr (below) references the beginning of the object block through its global handle. The chunk handle consists of an offset into the chunk handle table, where an offset to the object’s instance data is stored.
Instance data within an instance chunk is stored in “master parts” or “master groups.” A master group is simply a number of instance data fields grouped according to their appropriate master class levels. Master classes are detailed in section 5.3.2.2.
A class designated as a master class resembles a normal class in all respects save one: it determines how instance data is grouped in a chunk. Each master class is the head of a class subtree; all the classes below it in the class tree (down to the next master class) are considered to be in that master class’ group. Instance data for all classes in the master group are lumped together in the instance chunk; each master group’s instance data within the chunk is accessed via a special offset stored within the chunk.
Sample instance chunks are shown in Figure 5-3. The first four bytes of an object’s chunk contain a pointer to the object’s class structure. The class structure (described in section 5.3.2.3) resides in fixed memory. (A variant-class object has a slightly different structure; this is detailed in section 5.3.2.4.)
An object that has no master classes in its class ancestry (unusual) has its instance data directly following its class pointer. Objects belonging to master classes or their subclasses, however, are somewhat more complex. This distinction can be mostly ignored by application and library programmers (with the exception of deciding which classes should be master classes and which should not).
Each master part of the chunk is located by an offset inserted directly after the object’s class pointer in the chunk. The position of the word containing this offset is then stored in the master class structure so the class can find its instance data later. The combination of the class pointer and the various master offsets make up the object’s “base structure.” When a typical object is instantiated, the base structure is all that is created.
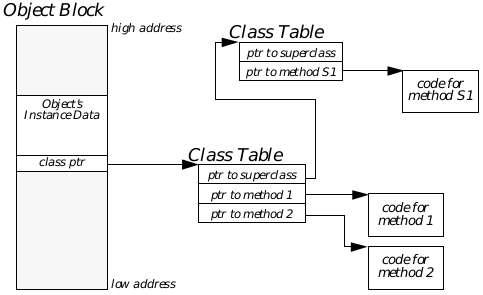
Figure 5-2 Object and Class Interaction
The kernel uses pointers internal to classes to traverse the class tree to the appropriate message handlers and data structures.
Each master part is left unallocated (for efficiency) until it is first accessed via a message sent to a class in the master group. When a class in the master group receives its first message, the entire master part of the chunk is allocated and initialized. This means that an object’s chunk remains as small as possible until it absolutely must grow larger. Some classes even detect when a master part of the object will no longer be needed and actually remove (shrink to zero) the unwanted instance data from the chunk (GenClass does this by shrinking the Vis master part to zero size when a gadget is taken off the screen).
Any object may have “variable data” instance data fields; these are fields that may be added or removed dynamically to keep from having unused space in the instance chunk. Generic UI hints are “variable data” (also called vardata)-if an object has the hint, it appears in its instance chunk, if the object does not have the hint, the chunk does not have unused space in it.
Vardata entries are stored all together at the end of the instance chunk, regardless of their master groups. An object with two master groups and three variable data fields, for example, would look like Figure 5-4. Variable data and its use are discussed in full in section 5.4.1.4.
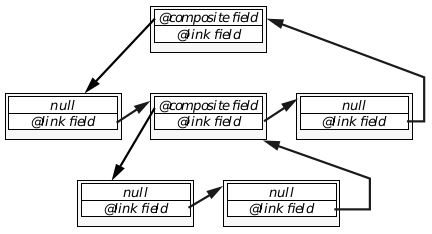
Figure 5-3 Structures of an Object
All objects have class pointers, though only those with master classes in their ancestries have master groups and master group offsets.
5.3.2.2 Master Classes
A master class provides a conceptual break between levels within a class tree. Each master class is the head of a class subtree, and all its subclasses are considered to be in its “master group.” Figure 5-5 shows a simplified diagram of a class tree and its master groups.
The purpose of making a class a master class is to separate its instance data from that of its superclass. Each master group’s instance data is lumped together in one section of the object’s instance chunk and is not initialized until a class in the master group is accessed. The initialization (allocation of extra memory within the instance chunk) occurs automatically.
As shown in Figure 5-5 and Figure 5-6, an object of RookClass would have an instance chunk with two master groups, one for the PieceClass master class and one for the GamePcClass master class. The first of the two master parts represents the instance data for PieceClass only; the second master part represents the object’s instance data for all of GamePcClass, ChessClass, and RookClass.
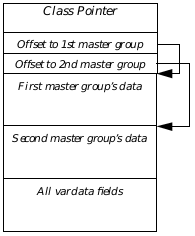
Figure 5-4 An Object with Vardata
All vardata entries are stored at the end of the instance chunk, regardless of the master group with which they are associated.
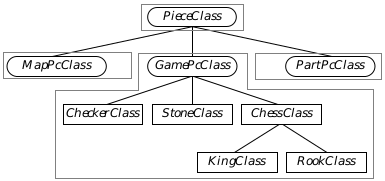
Figure 5-5 Master Classes and Master Groups
Each master class heads its own master group. The outlined classes are all in the same master group.
The functionality of master classes is required to implement GEOS variant classes (see section 5.3.2.4). A variant class allows a single class to have a version of “multiple inheritance” in that it can have different superclasses depending on the system context.
5.3.2.3 Class Structure and Class Trees
For the most part, you won’t ever need or want to know the internal structure of a class as implemented in memory. The class structure is created and partially filled by the Goc preprocessor and Glue linker; the remainder is filled by the kernel when the class is loaded. It’s unlikely you will need to know the actual class structures; you won’t ever have to manually build a class unless your program dynamically creates it (not a common procedure for typical applications).
This section will describe how the class is implemented and how class trees are structured and managed. However, it will not discuss creating new classes during execution.
Classes are implemented with special data structures and code blocks. Each class is defined within and exported by a particular geode; when the geode is loaded the class definition and its code are loaded into the geode’s fixed memory. All references to the class are then relocated by the kernel into pointers. For example, if a class is defined by a library, that library’s “core block” (the special information kept about it by the kernel) contains an absolute pointer to the class’ definition in a fixed memory resource owned by the library. Any applications then using that class load the library. The kernel examines the library’s core block for the proper pointer and uses it each time the application references that class.
Because of this, each class is loaded into memory just once; all objects that use the class use the same class structure and code. Each object has a pointer in its instance chunk directly to the class structure; each class contains a pointer to its superclass’ class structure. Using these pointers, the kernel can travel up an object’s class tree to access any appropriate code. See Figure 5-7 for a simplified illustration of how these pointers are followed by the kernel.
A class is a combination of data structure and code. The data structure (ClassStruct) contains information about the class, its superclass, its methods, and the structure and size of its instance data. The code consists of methods (message handlers). A diagram of the data structure is given in Figure 5-8; its components are detailed below.

Figure 5-6 A Sample Instance Chunk
The RookClass chunk has two master groups, each having an offset stored after the class pointer.
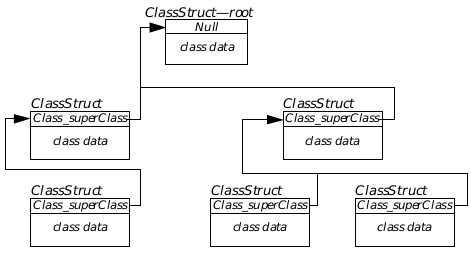
Figure 5-7 A Class Tree
It is simple to find the root of any class tree by following Class_superClass links. This is how inheritance is implemented for methods; if a class does not recognize a message, the kernel looks in the superclass.
Class_superClass
Every class has as its first four bytes a pointer to its superclass. This points to the superclass’ ClassStruct structure in all cases except two: The root of any class tree has a null superclass pointer, indicating that the root has no superclass. Variant classes have the integer 1 (one) always, indicating that the superclass is determined in a special manner. For more information on variant classes, see section 5.3.2.4.
Class trees are constructed when classes are defined; a new class is created as the subclass of some existing class, and its Class_superClass pointer is automatically set to point to the superclass. There is no need to point down the tree; messages are always passed to superclasses and never to subclasses. An example of the use of Class_superClass is shown in Figure 5-7.
Class_masterOffset
Class_masterOffset stores the offset indicating how far into the instance chunk the object’s offset to this class’ master part is. Figure 5-9 shows how this field allows a class to locate the appropriate master part. Note that use of this offset is entirely internal; individual classes do not have to figure out where their instance data is within the chunk (they may, however, have to know what master level each class is).
The master offset is used primarily because an object can have some of its master parts initialized and others uninitialized. If only one master part of the object had been initialized, the location of the instance data in the chunk may be different than if all master parts had been initialized.
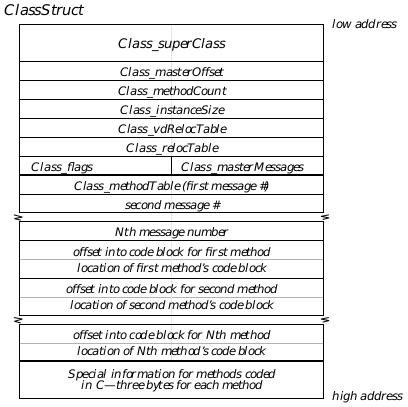
Figure 5-8 The ClassStruct Structure
This structure has two basic parts: The class information and the method table. The class information has eight fields in eight words; the method table varies in size and consists of a message number table followed by a table of pointers to the actual method code.
Class_methodCount
Class_methodCount stores the total number of methods referenced in the class’ method table. This is the total number of methods defined for this class only; other methods defined in other classes (even in the same master group) are stored in the method tables of those classes.
Class_instanceSize
Class_instanceSize holds the number of bytes to be allocated whenever an object of this class is instantiated. If the class is a master class or a subclass of a master class, this is the size of the master part. If the class has no master class above it, this is the number of bytes to allocate for the entire object (including superclass pointer).
Class_vdRelocTable
Class_vdRelocTable is a near pointer (16 bit offset) to the variable-data relocation information. The relocation information contains the type of relocation to be done for each data type. There is one entry in the variable data relocation table for each relocatable field in each particular variable-data type. Variable data (also called vardata) is described in full in “Defining and Working With Variable Data Fields”.
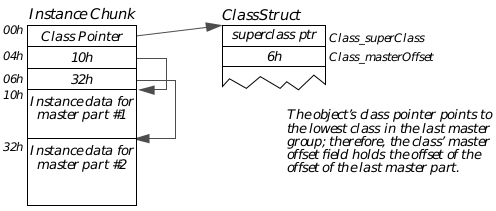
Figure 5-9 Class_masterOffset
The instance chunk holds an offset to the master group’s instance data; this offset is referenced by the class’ Class_masterOffset field.
Class_relocTable
Class_relocTable is a near pointer (16 bit offset) to the relocation information for the non-variable data instance fields of the class. The relocation information contains the type of relocation done for each relocatable instance field (other than variable-data entries). A relocatable instance field is one which must be updated when the object is loaded-pointers, offsets, etc. The entry in the relocation table is defined with the @reloc keyword, described in “Non-relocatable Data”.
Class_flags
Class_flags contains seven flags (shown below) that determine the characteristics of the class. Declarers for these flags are used in the @classdecl declaration (see section 5.4.1).
CLASSF_HAS_DEFAULT
This flag indicates that the class has a special default method to handle unrecognized messages (typically, this handler simply passes the unrecognized message on to the superclass). This flag is not implemented in C. This flag is set by declaring the class as hasDefault.
CLASSF_MASTER_CLASS
This flag is set if the class is a master class. This flag is set by declaring the class as master.
CLASSF_VARIANT_CLASS
This flag is set if the class is a variant class. This flag is set by declaring the class as variant (all variants must also be declared as masters).
CLASSF_DISCARD_ON_SAVE
This flag indicates the instance data for the class can be discarded when the object is saved. This flag applies only to master classes and will be heeded only when the master group is immediately above a variant-master group. This flag is set by declaring the class discardOnSave.
CLASSF_NEVER_SAVED
This flag indicates objects of this class are never saved to a state file or loaded in from a resource. Goc will not build a relocation table for a class with this flag set. This flag is set by declaring the class neverSaved.
CLASSF_HAS_RELOC
This flag indicates that the class has a special routine for relocating and unrelocating objects of the class when they are loaded from or written to disk. This flag is set by declaring the class hasReloc.
CLASSF_C_HANDLERS
This flag indicates the class’ methods are written in C rather than in assembly. This flag is set by the compiler and should not be set by applications.
Class_masterMessages
Class_masterMessages contains a number of flags set by Goc indicating whether this class has methods for messages defined within a given master level. It is used to optimize the search for a method to handle a message. These flags are internal and should not be used by programmers.
The Method Table
Every class has a method table, a table that indicates the location of the code to be executed when a certain message is received. The method table is in three parts and begins at the byte labelled Class_methodTable (this is simply a label, not a specific data field).
The first part of the method table is a list of messages the class can handle. Each entry in this list is two bytes and contains the message number of a message handled by the class.
The second part of the method table is a list of pointers to methods. Each entry in this list is a pointer (four bytes) which points to a specific routine in a code block. If the code is in a fixed block, the pointer will be a far pointer; if the code is in a moveable or discardable block, the pointer will be a far pointer containing a virtual segment. (A virtual segment, something you do not need to know about, is a handle shifted right four bits with the top four bits set. Since this represents an illegal segment address, GEOS recognizes it as a virtual segment and will take the necessary actions to lock the block into memory before access and unlock it after access. Manipulation of the bits in the virtual segment is completely internal to GEOS.)
The kernel searches the message list until it comes across the appropriate message number and notes the message’s position in the table. It then looks at the corresponding position in the pointer list. If the pointer there is a virtual segment and offset, it will load the appropriate code block, lock it, and execute the code. If the pointer points to fixed memory, the code will be executed immediately. (If the message number is not found in the table, the kernel will either execute the class’ default handler or pass the message on to the class’ superclass.)
5.3.2.4 Variant Classes
A variant class is one which has no set superclass. The variant’s superclass is determined at run-time based on context and other criteria. Note that objects may not be variant-only classes may be variant. An object always has a specific class to which it belongs, and its class pointer always points to that class’ ClassStruct structure. In addition, every variant class must also be a master class.
A variant class, however, may have different superclasses at different times. This functionality provides a form of “multiple inheritance”: the class may inherit the instance data and functions of different classes depending on its attributes and desired features. Note, however, that a variant class may have only one superclass at any given moment.
The most visible example of a variant class is GenClass and how a generic object is resolved into its specific UI’s appropriate representation. Each generic object (for example, a GenTrigger), is a subclass of the master class GenClass. All the instance data belonging to GenTriggerClass and GenClass, therefore, is stored in the Gen master part of the instance chunk.
GenClass, however, is a variant class, meaning that it does not know its superclass when the object is instantiated. Each generic object’s class will be linked directly to another class provided by the specific UI in use: the specific UI’s class provides the visual representation while the generic UI class provides the object’s functionality. In this way, the object can actually perform many of its generic functions without having a visual representation.
The resolution of the superclass comes when the generic object is displayed on the screen: the kernel sees that the object has no superclass and looks into its instance data and class structure. The kernel then determines what the appropriate specific UI class will be for the object’s class and provides the superclass link necessary. It also then initializes the superclass’ master part of the object (in this case, the master part belonging to VisClass), updating all the master part offsets in the instance chunk’s master offset fields.
You can see from the above discussion that GenClass must know at least something about its potential superclasses. In fact, all variant classes must know at least the topmost class of all its potential superclasses. The definition of GenClass is
@class GenClass, VisClass, master, variant;
The @class keyword declares the new class, GenClass. GenClass is to be a variant class and therefore must also be a master class. All the superclasses of GenClass will be related to VisClass; this means that all specific UI classes which may act as Gen’s superclass must be subclassed from VisClass. (Another way of looking at the definition is that GenClass is an eventual subclass of VisClass-you have no way of knowing beforehand how many class layers may be between the two, however.)
The variant must specify an eventual superclass so the kernel knows how many master offset fields it must allocate when an instance of the variant is created. For example, a GenTrigger has two master groups: that of GenClass, and that of VisClass. Because the GenClass master group is necessarily below the VisClass master group in the class hierarchy (after the superclass link has been resolved), the GenClass master offset in the instance chunk must be after the VisClass master offset. If the definition did not specify VisClass as an eventual superclass, no master offset field would be allocated for it, and the Class_masterOffset field of GenClass’ Class structure would not be able to hold any particular value.
As stated at the beginning of this section, there are no “variant objects.” Every object belongs to a specific class, and the object’s class can never change. All instances of a variant class, however, can be resolved to different superclasses due to the way the superclass of each variant is resolved. One example of this is the generic-to-specific mapping of the GenInteraction object.
All GenInteractions are of class GenInteractionClass; this never changes. GenInteractionClass, however, is a subclass of GenClass, a variant class. This means that the class tree of the GenInteraction object is only partially completed; before the GenInteraction is resolved, it looks like the simplified diagram in Figure 5-10.
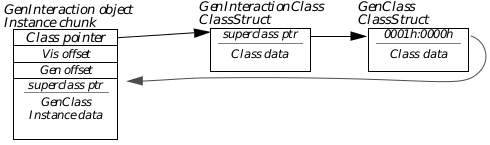
Figure 5-10 A Variant Class Object
A variant class always has the constant 0001h:0000h instead of a superclass pointer. The class pointer of the variant class is stored in the first four bytes of the variant class’ master part in the instance chunk. Until the variant class is resolved, this pointer is null and the master part of the superclass (in this case VisClass) is not initialized.
The GenInteraction object may be resolved into one of several different specific UI classes. For example, the motif.geo library has several classes for GenInteractions; among them are the classes that implement menus, dialog boxes, and grouping interactions. These classes are all specialized subclasses of VisClass, the eventual superclass of GenClass.
Notice from Figure 5-10 that the class tree of the GenInteraction is not complete. A class tree must have links all the way back to MetaClass for it to be complete; this only goes to GenClass. GenClass has a special value in its Class_superClass field, 0001h:0000h. This represents a reserved “pointer” that indicates to the kernel that the class is a master class.

Figure 5-11 A Resolved Variant Object
The GenInteraction menu object has been resolved to belong to OLMenuWinClass, thus completing the object’s class tree as shown.
The superclass of the variant can be different for every instance because the superclass pointer is actually stored in the object’s instance chunk rather than in the class’ ClassStruct structure. This also allows a class tree to have more than one variant class in its hierarchy; for example, one variant could be resolved to be the subclass of another variant. The tree must always be headed by MetaClass.
As shown in Figure 5-10, the superclass pointer for the variant is stored in the variant’s master group instance data. Not all master groups have superclass pointers; only those for variant classes. After the GenInteraction is resolved, the pointer (the first four bytes of the Gen master part) points to the proper superclass for this object (in this case, OLMenuWinClass). The object, with its full class tree, is shown in Figure 5-11.
5.3.2.5 An In-Depth Example
This section gives an example of a GenTrigger object after its variant part has been resolved. This example provides in-depth diagrams of the class and instance structures for those programmers who wish to understand them. There is no need to know them, however; you will not likely ever need to access the internals of either a class structure or an instance structure.
The GenTrigger taken as an example is the “New Game” trigger of the TicTac sample application. This trigger is the only child of the Game menu GenInteraction; it is shown in Figure 5-12. The code defining the trigger is given in Code Display 5-4.
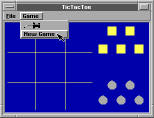
Figure 5-12 TicTac’s New Game Trigger
This trigger is used as the in-depth example object. The mouse pointer in the diagram points to the trigger.
Code Display 5-4 TicTac’s New Game Trigger
/* The TicTacNewTrigger has a moniker and an output. All its other instance data
 * is set to the GenClass defaults. The content of these fields is not important
 * for this example, however. */

@object GenTriggerClass TicTacNewTrigger = {
    GI_visMoniker = "New Game";
    GTI_destination = TicTacBoard;          /* Send the action message to the
                     * TicTac game board object. */
    GTI_actionMsg = MSG_TICTAC_NEW_GAME;    /* The action message. */
}
The GenTrigger’s Instance Chunk
The GenTrigger object has two master parts, just like the GenInteraction object shown in “Variant Classes”: the Gen master part holds the instance data for GenClass and GenTriggerClass. The Vis master part holds the instance data for VisClass and OLButtonClass. The MetaClass instance data consists only of the object’s class pointer and has no master part.

Figure 5-13 GenTrigger’s Instance Chunk
The TicTacNewTrigger trigger has a Gen and a Vis master part and no vardata entries.
Figure 5-13 shows the structure of TicTacNewTrigger’s instance chunk. The chunk’s basic structure consists of the class pointer (four bytes) followed by two words of offset into the chunk. The first offset gives the location of the Vis master part, and the second gives the location of the Gen master part. After the offsets are the master parts themselves, and if the trigger had any variable data, it would appear at the end of the chunk.
Each master part has the master class’ instance fields first, followed by those of its subclasses. All the fields that belong to VisClass begin VI_-, all those that belong to OLButtonClass begin OLBI_-, etc.
Notice also the first four bytes of the Gen master part: they contain a pointer to the “superclass” of GenClass for the trigger. Although the trigger typically does not have different forms in any given specific UI (as the GenInteraction does), it will have a different class for each specific UI it encounters. For example, the OSF/Motif class is OLButtonClass; another specific UI will use a different class for GenTriggers.

Figure 5-14 TicTacNewTrigger’s Class Tree
TicTacNewTrigger is of GenTriggerClass, a subclass of GenClass. GenClass is a variant and is resolved to OLButtonClass at run-time. OLButtonClass is subclassed off VisClass, which is subclassed off MetaClass.
The GenTrigger’s Full Class Tree
Figure 5-14 shows TicTacNewTrigger’s full class tree in a simplified diagram. Since GenClass is a variant, it has a superclass pointer of 0001h:0000h. This special value (with an illegal segment address) indicates to the kernel that this object’s GenClass superclass is stored in the instance chunk itself. The superclass is stored in the first four bytes of the Gen master part, as shown in the previous section.
GenTriggerClass’ ClassStruct Structure
Because all classes have the same class structure, only GenTriggerClass will be examined here. The class structure and the instance chunk structure are closely linked in several ways, as shown in Figure 5-15.
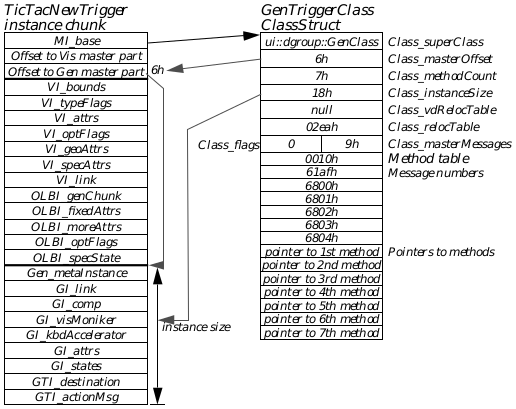
Figure 5-15 GenTriggerClass Subclassed
The class structure and instance structure are linked in several ways. Advanced Topic
As shown in the diagram, the instance chunk points directly to the class. The class points to its superclass, thereby providing inheritance of all the methods and structures of classes higher in the class tree such as GenClass.
The class structure contains some information about the instance chunk’s format, specifically Class_masterOffset and Class_instanceSize. Class_masterOffset gives the offset into the instance chunk where the offset to the master part is stored. Class_instanceSize contains the size of the master part so the kernel can quickly allocate the needed space when the master part is initialized.
The method table resides at the end of the class, and it has entries for each message handled by the class. GenTriggerClass handles seven messages (stored in Class_methodCount); any message received by this trigger and not recognized by GenTriggerClass is passed up the class tree for handling. Thus, a MSG_GEN_SET_NOT_ENABLED sent to the trigger will be passed on to GenClass and will be handled there.
The method table has two parts: The first part is a listing of message numbers, and the second part is a listing of pointers to the method code. When the object receives a message, the kernel scans the first part to see if the class handles the message. If it does, the kernel then scans the second part of the table to get the pointer to the code. It then executes the code there as if that code were a function called by the object’s code.
How a Message Is Handled
Most aspects of messages and messaging are described in the following section. This section, however, describes how the kernel finds and executes the code when a message is sent to the GenTrigger. The message is MSG_GEN_SET_USABLE (handled by GenClass).
Messages are sent directly to an object using its optr. That is, when you send a message to this particular GenTrigger, you send it directly to TicTacNewTrigger, not to some monolithic “case” statement run by your application. Since the object’s optr uniquely identifies the location of the object’s instance chunk in memory, the kernel can quickly access the code for the handler.
When MSG_GEN_SET_USABLE is sent to the TicTacNewTrigger, for example, the kernel looks in the object’s instance chunk for its class pointer. It follows this pointer and then looks in GenTriggerClass’ ClassStruct structure. It scans the first part of the class’ method table for MSG_GEN_SET_USABLE. If the message is not there (and it isn’t), the kernel will then follow the class’ Class_superClass pointer and look in GenClass’ ClassStruct structure. It then scans the first part of GenClass’ method table for the message. GenClass has an entry for MSG_GEN_SET_USABLE, and therefore the kernel checks the second part of the method table for the code pointer. It follows this pointer to the method’s entry point and begins executing the code there.
5.3.3 The GEOS Message System
Because objects are independent entities, they must have some means of communicating with other objects in the system. As shown in the example of the calculator and requestor objects in “System Architecture,” Chapter 3, communication is implemented through the use of messages and methods.
5.3.3.1 The Messaging Process
When an object needs to notify another object of some event, retrieve data from another object, or send data to another object, it sends a message to that object. Sending a message is similar to calling a function in C in that the message can take parameters (including pointers) and give return values. However, messages are also quite different from function calls in the multithreaded environment of GEOS.
Each object block in the system is associated with a single thread of execution. Each thread that runs objects (some run only procedural code) has an event queue, a queue in which messages are stored until they can be handled. Every message sent to an object from another thread gets put in the object’s thread’s event queue. (Messages sent between objects within the same thread are not handled via the queue unless forced that way.) Thus, a single thread’s event queue can have messages for many different objects. For most single-thread applications, the programmer will not have to worry about synchronization issues.
The sender of a message has to be aware of synchronization issues raised by having multiple threads in the system. Essentially, you can send a message two ways: The first, “calling” the message, allows the use of return values and acts almost exactly like a function call in C. This places the message in the recipient’s event queue and then halts the sender until the return values are received. The sender “goes to sleep” until the message has been processed and is then awoken by the kernel, thus ensuring the message is handled before the sender executes another line of code. The call option should also be used when passing pointers; otherwise, the item pointed to may move before the message can be handled, invalidating the pointer.
The second, “sending” the message, is used primarily when synchronization is not an issue. For example, if the message merely notifies the recipient of some condition or event, or if it sends data with no expectation of a return value, the send option can be used. Essentially, the sender will send off the message and then forget about it, continuing on with its own business. (The exception to this is an object sending a message to another object in the same thread; then the message is handled immediately, as if it had been called.)
When an object sends a message, the message actually first gets passed to the kernel (this is all automatic). The kernel will put the message into the proper thread’s event queue and, if necessary, put the sender’s thread temporarily to sleep. When the recipient’s thread is ready to handle the message, the kernel pulls it from the event queue.
The kernel then locates and loads the recipient object into memory (if necessary). The recipient’s object block will be loaded and locked, and the object will be locked while processing the event. (Note, however, that it is possible for the object to move if the recipient makes a call to LMemAlloc() or does something else that can cause shuffling of the object chunks.) The kernel will follow the object’s class pointer to its class and will scan the method table. If the class can handle the message, the proper method code will be executed. If the class can not handle the message, the kernel will follow the superclass pointer and check the method table there. The message will continue up the class tree like this until either it is handled or it reaches the root and returns unprocessed.
After the method code has been executed, the kernel collects any return values and wakes up the caller thread again if necessary. To the caller, it’s as if the message were handled instantaneously (with the call option). Senders are never blocked; only messages called (with the call option) may block the caller’s thread. If a message is sent to an object in the same thread, however, it will be executed as a call and will be handled immediately, unless the sender explicitly states that it should go through the message queue.
Be careful, though, if you are writing code in multiple threads (for example, if you subclass UI objects and write new method code for them). You have to make sure that two threads never call each other; this can lead to deadlock if the calls happen to overlap. The easiest way to deal with this is to have one thread always send a message requesting a return message with any needed return values. The other thread will then send off a return message with the data. For example, a UI object may require information from an application’s object. The UI object sends MSG_REQUEST_INFORMATION (or something similar). The application’s object then receives that message and responds with a MSG_RETURNING_REQUESTED_INFORMATION (or something similar). With this scheme, the application’s object is free to use call whenever it wants, but the UI object must always use send.
5.3.3.2 Message Structures and Conventions
A message is simply a 16-bit number determined at compile time. Specifically, it is an enumerated type-this ensures that no two messages in the same class can have the same number.
An event is an opaque structure containing the message number and information about the recipient, the sender, parameters, and return values. When an object sends a message, the kernel automatically builds out the event structure (generally stored in the handle table for speed and efficiency). You will never have to know the structure of an event.
5.4 Using Classes and Objects
The previous sections dealt with the internals of the GEOS object system. This section describes how you can create classes and objects and manage them during execution using Goc keywords and kernel routines. Almost all Goc keywords begin with “@” (one notable exception is gcnList).
All the most useful keywords available in Goc are shown in Code Display 5-5. This display is for initial reference; all the keywords are detailed in depth in the following sections of this chapter and in the Routines Book.
Code Display 5-5 Goc Keywords
    /* Including .goh files */
@include <fname>;

    /* Defining New Classes and Subclasses */
@class  <cname>, <super> [, master [, variant]];
@endc

    /* Declaring a class */
@classdecl <cname> [, <cflags>];

    /* Defining messages for a class */
@message <retType> <mname>([@stack] <param>*);
@reserveMessages <num>;
@exportMessages <expName>, <num>;
@importMessage <expName>, <messageDef>;
@alias(<protoMsg>) <messageDef>;
@prototype <messageDef>;

    /* Defining instance data fields for a class */
@instance <insType> <iname> [ = <default>];
gcnList(<manufID>, <ltype>) = <oname> [, <oname>]*;
@instance @composite <iname> [ = <linkName>];
@instance @link <iname> [ = <default>];
@instance @visMoniker <iname> [ = <default>];
@instance @kbdAccelerator <iname> [ = <default>];
@reloc <iname>, [ (<count>, <struct>), ] <ptrType>;
@noreloc <iname>;
@default <iname> = <default>;

    /* Defining vardata fields for a class */
@vardata <type> <vname>;
@vardataAlias (<origName>) <newType> <newName>;
@reloc <vname>, <fn>, [ (<count>, <struct>), ] <ptrType>;

    /* Defining methods (message handlers) */
@method [ <hname>, ] <cname> [, <mname>]+;
@method [ <hname>, ] <cname> _reloc;

    /* Defining library code and resources */
@optimize
@deflib <libname>
@endlib
@start <segname> [ , <flags> ];
@header <type> [ = <init> ];
@end <segname>
@chunk <type> <name> [ = <init> ];
@chunkArray <stype> <aname> [ = {<init>} ];
@elementArray <stype> <aname> [ = {<init>} ];
@extern <type> <name>;
@gstring;

    /* Declaring an object */
@object <class> <name> <flags>* = {
    [<fieldName> = <init>];*
    [<varName> [ = <init> ]]*;
}

    /* Sending and calling messages */
@send [<flags>,+] <obj>::[{<cast>}] <msg>(<params>*);
<ret> = @call [<flags>,+] [{<cast>}] <obj>::[{<cast2>}]<msg>(<params>*);
@callsuper();
@callsuper <obj>::<class>::<msg>(<params>*) [<flags>,];
<event> = @record <obj>::<msg>(<params>*);
@dispatch [noFree] <nObj>::<nMsg>::<event>;
<ret> = @dispatchCall [noFree] [{<cast>}] <nobj>::<nMsg>::<event>;

    /* Using conditional code */
@if <cond>
@if defined(<item>)
@ifdef <cond>
@ifndef <cond>

    /* Creating Goc macros */
@define <mname> <macro>
5.4.1 Defining a New Class or Subclass
@class, @classdecl, @endc, @default, @uses
You can create new classes in GEOS by using the Goc keywords @class and @endc. These frame the class definition as shown in Code Display 5-6; the @endc keyword takes no parameters, but @class takes the following parameters:
@class <cname>, <super> [, master [, variant]];
cname This is the name of the new class.
super This is the class name of the superclass.
master When included, this word makes the new class a master class.
variant When included, this word makes the new class a variant class. All variant classes must also be declared master classes.
Every class must have a class structure (ClassStruct) in memory. This is created and filled automatically by Goc and the kernel; however, you must use the @classdecl keyword to make sure the structure gets built. Only one @classdecl statement may be used for each class, however-Goc will give an error if the class is declared twice. This is also shown in Code Display 5-6, and its parameters are as follows:
@classdecl <cname> [, <cflags>];
cname This is the name of the class being declared.
cflags These are optional flags, described below.
The optional flags that can be used with a class declaration determine how objects of the class get shut down (see [“Class_flags”] (#5323-class-structure-and-class-trees)). The flags you can use with @classdecl are
neverSaved
This flag indicates that objects of this class will neither be written to a state file nor be loaded in from a resource. This flag should only be used for classes whose objects will only be created at run-time (not declared in the .goc file) and for process classes.
discardOnSave
This flag applies only to master classes. Objects of this class will never be saved to a state file and must be re-initialized each time they are loaded. If you want an object simply to revert to its default configuration each time it is loaded, use the flag ignoreDirty instead in the object’s declaration (see @object, below).
In addition, any variant class can have a default superclass. The variant is resolved at compile-time to have the default superclass as its superclass. To set a default superclass for a variant class, add a line with the following structure in the class definition:
@default <varRoot> = <super>;
varRoot The name of the variant class with “Class” removed. (For example, GenClass would be specified as “Gen.”)
super The name of the superclass to set as the default.
Sometimes a variant class will know that it will be the subclass of a specific class, though it doesn’t know (at compile time) just how that ancestry will be traced. You can use the @uses directive to let the compiler know this; that way, the variant class can define handlers for the “used” class. For example, if you know that variant class MyVariantClass will always be resolved as a descendant of MyAncestorClass, you can put the directive
@uses MyAncestorClass;
in the definition of MyVariantClass. The general format is
@uses <class>;
class The class which will always be an ancestor to this class.
Code Display 5-6 Defining Classes
/* The @class keyword defines a new class or subclass. @endc ends the class
 * definition, and @classdecl must be put somewhere in the code to make sure Glue
 * will link the class structure into the compiled geode.*/

@class  MyNewClass, VisClass;
    /* Message declarations would go here. See @message.
     * Instance data field declarations would go here. See @instance
     *                      and @vardata. */
@endc
@classdecl MyNewClass, neverSaved;

@class  MyTriggerClass, GenTriggerClass;
    /* New messages for this subclass are defined here. */
    /* New instance data fields for this subclass are defined here. */
@endc
@classdecl MyTriggerClass;

/* When defining a variant class (which must also be a master class), you can
 * set a superclass for the variant at compile-time using @default. */

@class  MyNewVariantClass, MetaClass, master, variant;
    @default        MyNewVariant = VisClass;
@endc   MyNewVariantClass
@classdecl MyNewVariantClass;
5.4.1.1 Defining New Messages for a Class
@message, @stack, @reserveMessages, @exportMessages, @importMessage, @alias, @prototype
As discussed in section 5.3.3, messages are simply 16-bit numbers allocated as an enumerated type. When a new class is defined, a constant is automatically created representing the first message number for the class. This constant is then used as the first number in the enumeration of messages.
The constant is built off the class’ superclass. MetaClass has the first 16384 messages reserved for its use. Each master level gets 8192, and the first master class of a level gets 2048 of these. All other classes are allocated 512 message spots. Thus, a master class subclassed directly off MetaClass would have 2048 messages beginning with number #16384 (since the numbering is zero-based). A subclass of this would have 512 messages beginning with number #18432.
This numbering scheme ensures that no two classes at different levels in the class hierarchy will have the same message number. Specifically, a class will never have the same message number as one of its sub- or superclasses.
New messages must be defined in the class definition between the @class and @endc keywords (see above). They are defined much like normal function calls and follow the normal C calling conventions (see Code Display 5-7 for examples). If your class uses messages from its superclass, you do not have to declare these messages in your class definition-they are inherited automatically. This is true even if you are subclassing the method to alter its functionality.
To define a new message, use the @message keyword. This keyword takes the following parameters:
@message <retType> <mname>(<param>*);
retType This is the data type of the return value of the message. It can be any standard C or GEOS data type (excluding structures), or a pointer to a structure. If this message has multiple return values, you must do as in C function calls and pass pointers to buffers for the return information.
mname This is the name of the message. By convention, it will be MSG_ followed by a shortened version of the name of the class and then some useful name (e.g., MSG_META_INITIALIZE).
param This represents one or more parameters. Messages may have no parameters, one parameter, or several parameters. Parameter definition is essentially the same as definition of function parameters; see Code Display 5-7 for examples.
NOTE: When defining a function with no parameters, it is best to declare it with “void” between the parentheses. This will make sure Goc gives an error if the function is called with arguments.
Messages for Use with Assembly Code
The @stack keyword indicates that parameters are passed on the stack; it is important to note that because of calling conventions, parameters passed on the stack must be listed in the message definition in reverse order from the way the handler pops them from the stack. This keyword is used only when the message may be handled by an assembly language method; its format is shown below:
@message <retType> <mname>(@stack <param>*);
All the parameters shown in the formats are the same as in the normal @message format.
Code Display 5-7 Defining Messages
    /* Each message is defined for a class within the class definition. */
@class  MyTriggerClass, GenTriggerClass;
    /* All the new messages MyTriggerClass can handle are defined here. */
@message void MSG_MYTRIG_SET_COLOR(colors colorIndex);
@message optr MSG_MYTRIG_RETURN_OPTR( void );
@message void MSG_MYTRIG_COLLECT_PARAMS(byte bParam, word wParam, char * string);
    /* Instance data fields would be defined here. */

@endc
@classdecl MyTriggerClass;
Exporting, Importing, and Reserving Message Ranges
As discussed above, message numbers are assigned based on the class’ location in the class tree. No message number will ever conflict with messages defined in the class’ superclasses. However, the assignment scheme opens up the possibility that classes on the same level in the class tree could have conflicting message numbers (see Figure 5-7).

Figure 5-16 Conflicting Message Numbers
Although no class’ message numbers will ever conflict with its superclasses’, it is possible, and even likely, for classes of the same level to have conflicting message numbers. For example, MSG_S2_C and MSG_S3_C both have the message number.
Normally, this is not a problem. If subclasses are to receive the same message and handle it differently, the message can typically be defined in the superclass and simply be intercepted by the subclasses. Sometimes, however, different subclasses will need to have different definitions for the same messages. For example, a class supplied by a library may be used by several applications; if the applications each create a subclass, these subclasses can import particular messages that will be the same for all the subclasses in all the applications.
Goc therefore allows a class to export a range of message numbers which subclasses can import and create specific definitions for. This allows you greater control over what aspects of the class you can define.
To export a range of messages, use the @exportMessages keyword. This will set aside several message numbers which can then be imported by subclasses using the @importMessage keyword.
Another potential problem is upgrading your program from release to release. If you create classes that may grow in the future, you may want to reserve a number of message spots to ensure that those spots can be filled in later. Nothing is done with the spots; they are simply place holders for future upgrades. You can use the @reserveMessages keyword to reserve a range of any size. The parameters of these three keywords are shown below:
@reserveMessages  <num>;
@exportMessages   <expName>, <num>;
@importMessage    <expName>, <messageDef>;
num This is the number of messages in the exported range.
expName This is the name of the exported range. This is used when importing messages to ensure that the proper numbers are used.
messageDef This is a standard message definition line, the same as would be found with the @message keyword (though @message is left out).
Note that you do not need to reserve messages for upgrades; any class can always have messages tacked on to the end of its class definition. If you want to group the messages logically, however, you should reserve ranges where you expect additions to be made.
Aliasing Messages
The @alias keyword allows a single message to have more than one pass/return format. The @prototype keyword allows quick, clean, and convenient repetition of a single format for many different messages; it also allows a class to create a prototype so users of a message can have their own messages with the same format.
@alias is used when a single method takes conditional parameters. For example, a method may take a word value in a certain case and a dword value in another (dependent upon a passed flag). Each condition must be accounted for in its own message format. Rather than create a message and a method for each case, you can create a single assembly-language method for all the different pass/return formats; then, you can use @alias to make several messages refer to the same method, each using a different format.
@alias(<protoMsg>) <msgDef>;
protoMsg The name of the original message. The new message may have different pass/return values but will invoke the same method code and will have the same message number.
msgDef The new message definition. It follows the same format as messages defined with the @message keyword (with @message left off).
In addition, if you have a single pass/return format for many messages, you can use the @prototype keyword as coding shorthand. For example, if an object has ten messages that all take two parameters and return a single value, you can set up the format with the @prototype keyword and then use a simpler format for definition of your messages. An example is shown in Code Display 5-8, and the parameters of this keyword are shown below.
@prototype <msgDef>;
msgDef This is the standard message definition. For the message name, use something like “MY_PROTOTYPE” that you can insert later into the definitions of your real messages. All other parts of the message definition are the same as would be declared with @message (with @message left off).
Code Display 5-8 Aliasing Messages
    /* MyClass in this example uses both prototype and aliased messages. */
@class MyClass, MetaClass;
    /* The following is a normal message declaration. The register that this
     * parameter uses is specified because the handler (method) is written in
     * assembly language. */
@message void MSG_MESSAGE_WITH_WORD(byte flag = cl, word value = dx);

    /* The following message invokes the same method as the alias above.
     * It has the same message number but passes a different sized parameter
     * in different registers. */
@alias(MSG_MESSAGE_WITH_WORD) void MSG_MESSAGE_WITH_DWORD(byte flag = cl,
                            dword value = dx:bp);

    /* The following message is not used. Its pass and return values can
     * be used elsewhere, however, to ensure that all handlers of this message
     * type are given the same format. */
@prototype int MSG_MYCLASS_PROTO(int a, int b);

    /* The following have the same return values and parameters
     * as the prototype above. */
@message(MSG_MYCLASS_PROTO) MSG_MY_CLASS_ADD;
@message(MSG_MYCLASS_PROTO) MSG_MY_CLASS_SUBTRACT;
@message(MSG_MYCLASS_PROTO) MSG_MY_CLASS_MULTIPLY;

@endc
@classdecl MyClass;
5.4.1.2 Defining Instance Data Fields
@instance, @composite, @link, @visMoniker, @kbdAccelerator, @activeList
Instance data fields are all defined with the @instance keyword. Other keywords may be included in the @instance declaration for special types of data. All instance data definitions must appear between the class’ @class and @endc keywords (see above under class definition).
The @instance keyword is used to define normal instance data. If you have data that must be added or removed dynamically (such as hints), use the @vardata keyword, described in [section 5.4.1.4] (#5414-defining-and-working-with-variable-data-fields). Also, if you have data that requires relocation (such as pointers to fixed data) when the object is loaded, use the @reloc keyword.
The format of the @instance keyword is as follows:
@instance <insType> <iname> = <default>;
insType A standard C or GEOS data or structure type representing the data type of the instance field.
iname The name of the instance field.
default The default value of the instance field if it is not filled in when an object of this class is instantiated. The value must, of course, be appropriate for the data type.
Goc has several special types of instance data fields that you can declare along with @instance to make object definition easier. The format for using one of the special types is shown below (with examples in Code Display 5-9). Each of the types is also described below.
@instance <specType> <iname>;
specType This is the keyword (one of those shown in the list below) that defines the special type of this field.
iname This is the name of the instance field.
The special types are given here:
@composite This field is used when objects of the class being defined are allowed to have children. The @composite field will actually contain an optr to the first child object in an object tree. Since most objects in object trees are subclassed from VisClass or GenClass, you will most likely never use the @composite keyword. Both VisCompClass and GenClass have @composite fields predefined. The @composite type has a special format, shown below:
@instance @composite <iname> = <linkName>;
where iname is the name of the instance field and linkName is the name of the field designated as @link (below). Note that there must be a @link field in every class that has a @composite field. See section 5.4.6.4 for more information on object trees and the composite and link fields.
@link This field is used by objects that can be children in an object tree. Where the @composite field points to the first child, the @link field points to the next sibling. If there is no next sibling, this field will point back to the parent object. Since most objects in object trees are subclassed from VisClass or GenClass, you will most likely never use the @link keyword. Both VisClass and GenClass have @link fields predefined.
@visMoniker
This field is designated as holding a pointer to a visual moniker chunk for the object. It is used in GenClass-see “GenClass,” Chapter 2 of the Objects Book for information on the GI_visMoniker field. The moniker or moniker list must be in the same resource as the generic object using that moniker since only the chunk’s handle is stored. A moniker list can store full object pointers to its monikers, so monikers referenced by a list need not be in the same resource as that list; thus if an object’s moniker is specified via a list, then while the list must be in the same resource as the object, the monikers themselves need not be.
@kbdAccelerator
This field contains a character sequence that, when typed by the user, causes the object to execute its default operation. For example, a keyboard accelerator could invoke a trigger implemented as a menu item. It is used in GenClass only.
Code Display 5-9 Declaring Instance Data Fields
/* GenClass is a good example of many of the different types of fields. */

@class  GenClass, VisClass, master, variant;

    /* The GenClass messages are defined here. */

    @instance @link GI_link;
    @instance @composite GI_comp = GI_link;
    @instance @visMoniker GI_visMoniker;
    @instance @kbdAccelerator GI_kbdAccelerator;
    @instance byte GI_attrs = 0;
    @instance byte GI_states = (GS_USABLE|GS_ENABLED);

    /* Hints and other variable data fields are defined with @vardata. */

@endc
5.4.1.3 New Defaults for Subclassed Instance Data Fields
@default
Recall that when defining an instance data field you can set up a default value for that field. When creating a subclass, you may wish to specify that the subclass should have a different default value for a given field than the superclass does. Use the @default keyword to do this:
@default <iname> = <default>;
iname The name of the instance field.
default The new default value of the instance field if it is not filled in when an object of this class is instantiated. The value must, of course, be appropriate for the data type. You may use @default as part of this value; this @default will be treated as the value of the superclass. (If this seems confusing, try looking at the example.)
For example, a subclass of GenInteraction could set GIV_DIALOG as its default value for the GenInteraction instance field GII_visibility:
@default GII_visibility = GIV_DIALOG;
A generic class might want to have the same value for its GI_states field as its superclass, except with the GS_USABLE flag turned off:
@default GI_states = @default & ~GS_USABLE;
5.4.1.4 Defining and Working With Variable Data Fields
@vardata, @vardataAlias, ObjVarAddData(), ObjVarDeleteData(), ObjVarDeleteDataAt(), ObjVarScanData(), ObjVarFindData(), ObjVarDerefData(), ObjVarDeleteDataRange(), ObjVarCopyDataRange(), MSG_META_ADD_VAR_DATA, MSG_META_DELETE_VAR_DATA, MSG_META_INITIALIZE_VAR_DATA, MSG_META_GET_VAR_DATA
Most classes will have well-defined instance data fields; each object in the class will have the same data structures, and all the instance chunks will look relatively similar and will be the same size.
Many classes, however, will also use “variable data,” or instance fields that may be added or removed dynamically. This allows objects within the same class to have more or less instance data than other objects in the class. One example of variable data is the use of hints in generic UI objects. Because each object in a given class may or may not have hints, the objects can actually have different instance sizes. Variable data instance fields are defined with the use of the @vardata keyword.
Using variable data, however, is somewhat more complex than using standard instance data. You must use special kernel routines or messages to get a pointer to the data; then you can use the pointer to access the field.
Variable data is stored together at the end of the instance chunk in “data entries.” Each entry consists of a primary word and optional extra data. The primary word represents a data type defined by the keyword @vardata. This type is created automatically by Goc when the @vardata keyword is used.
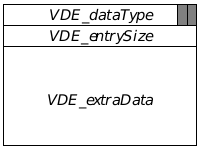
Figure 5-17 Variable Data Storage
The VarDataEntry structure contains a single variable data entry. If it has no “extra data,” the VDE_entrySize and VDE_extraData fields will not exist in the entry. Otherwise, VDE_entrySize will contain the entire size of the entry, and VDE_extraData will contain the actual data of the type found in VDE_dataType. The two shaded boxes in VDE_dataType represent the two least significant bits of that field; they are used to store two flags. Note that this structure is shown for illustration only; application programmers will never have to access it directly.
Each data entry is associated with a master class level and is considered part of the instance data for that master level (despite being stored at the end of the instance chunk). Thus, when a master part of an object is destroyed, the variable data entries associated with that master class will also be destroyed. For example, when a UI object is set not usable (taken off the screen), its Vis master part is removed from the instance chunk; any variable data entries associated with VisClass will also be destroyed.
Variable data may also be tagged for saving to the state file. That is, you can set up individual data entries to be saved to a state file and to be reinstated when the object is loaded from the state file. For more information about state saving, see section 5.4.6.6.
Variable data may be defined in an object’s declaration in your .goc file or may be added and removed during execution. This gives the potential for using variable data as temporary storage in an object’s instance chunk; however, temporary data used in this manner should be kept small to avoid slowing down the system-constantly resizing instance chunks to add and remove vardata fields makes more work for the memory manager.
To define a variable data type in a given class, use the @vardata keyword as follows (an example is given in Code Display 5-11):
@vardata <type> <vname>;
type This is the data type of any extra data associated with the variable data. It must be a standard C or GEOS data type. If the type void is specified, no extra data will be added to the data entry when it is created. (An instance data field may be declared as an array, just as in standard C.)
vname This is the name of the variable data type. This name is used whenever referring to the vardata entry. Note that no two variable data types should have the same name, even if they’re in different classes. Doing so will cause a compilation error. It’s a good practice to put the class name within the data type name.
Code Display 5-10 Examples of Instance Data Declarations
/* These are some data fields for MyDataClass.
 */

    @instance       ChunkHandle     MDI_aChunk;
    @instance       HelloInfoFlags      MDI_flags;
    @instance       byte        MDI_lotsOfNumbers[32];
Some vardata types may have varying amounts of extra data. For example, one type may have either a word or a dword of extra data. To allow this, you can set up an alias with the new type attached using the keyword @vardataAlias:
@vardataAlias (<origName>) <newType> <newName>;
origName This is the name of the original variable data field already defined with @vardata.
newType This is the data type of the new variable data field, a standard C or GEOS data type.
newName This is the name of the new variable data field. In essence, the original and new fields will have the same data type word but will have different extra data size.
As noted earlier and as shown in Figure 5-17, the data type field in the data entry has two flags associated with it. These flags are each one bit:
VDF_EXTRA_DATA
This flag indicates that this data type carries extra data.
VDF_SAVE_TO_STATE
This flag indicates that this particular data entry should be saved along with all the other object’s instance data when the state is saved. It should likewise be restored when the object is restored from the state file. Unless set off explicitly, this flag will be set for every data type defined in a .goc or .goh file.
The bitmask VDF_TYPE is a bitwise OR of VDF_EXTRA_DATA and VDF_SAVE_TO_STATE. You can use it to mask out all but those bits.
Code Display 5-11 Defining Variable Data
/* Hints are defined with the @vardata command, as is shown in GenClass. Only a
 * small portion of the hints for GenClass are shown here. Those with structures
 * or data types (not "void") have extra data fields associated with them. */

@class GenClass, VisClass, master, variant;
    /* Messages are defined here. */
    /* Followed by instance data defined with @instance. */
    @vardata void HINT_CENTER_MONIKER;
    @vardata SpecSizeSpec HINT_CUSTOM_CHILD_SPACING;
    @vardata char[] ATTR_GEN_INIT_FILE_KEY;

    /* Relocatable instance fields (see the next section) are defined with
     * @reloc. This field contains an object pointer that must be resolved
     * when the GenClass object is loaded. */
    @instance @link GI_link;
    @reloc GI_link, optr;
    @vardata DestinationClassArgs ATTR_GEN_DESTINATION_CLASS;
    @reloc ATTR_GEN_DESTINATION_CLASS, 0, optr;
@endc
The kernel provides a number of routines an object may use to add, remove, and change its own vardata entries. Note that all these routines must be called from within the object containing the variable data entries; since variable data is instance data, it is against OOP doctrine for one object to alter another object’s variable data directly.
Instead, MetaClass provides vardata messages that can be sent by one object to another to add, remove, change, or retrieve vardata entries of another object. The kernel routines and MetaClass messages are outlined below:
ObjVarAddData() This routine adds an new entry for the passed data type or replaces the extra data associated with a particular data type entry.
ObjVarDeleteData() This routine deletes the entry for a particular data type when passed the data type.
ObjVarDeleteDataAt() This routine deletes a particular data entry when passed the entry’s pointer as returned by ObjVarAddData(), ObjVarFindData(), or ObjVarDerefData().
ObjVarScanData() This routine causes the kernel to scan all data entries in an object’s variable data and call any “handler routines” listed for them. This process is described below.
ObjVarFindData() This routine searches for and returns (if possible) a pointer to a data entry of the passed data type.
ObjVarDerefData() This routine returns a pointer to a data entry when passed the object’s optr and the data type. If the entry does not exist, this routine will call on the object to create and initialize the entry. Such variable data then behaves much like instance data. The object containing the vardata is responsible for creating the entry and then initializing it upon receipt of a MSG_META_INITIALIZE_VAR_DATA, described below.
ObjVarDeleteDataRange() This routine deletes all data entries with types in the passed range.
ObjVarCopyDataRange() This routine copies all data entries within the passed range from one object’s instance chunk to another`s. If any entries are copied, the destination object will be marked dirty for saving. This routine must be called by the destination object; it is bad policy for one object to alter another object’s instance data. This routine is primarily for copying hints from one UI object to another and is not commonly used by applications.
The four messages (in MetaClass) that can be used to add, delete, and alter variable data entries remotely are listed below. Classes will never need to intercept and subclass these messages because the proper functionality is implemented in MetaClass.
MSG_META_ADD_VAR_DATA
Adds a new vardata type to the recipient object. If the type already exists, the passed type replaces the old one.
MSG_META_DELETE_VAR_DATA
Deletes a vardata type from the recipient’s instance data. If the type does not exist, nothing is done.
MSG_META_INITIALIZE_VAR_DATA
Used when something is trying to access an object’s vardata field remotely but the field has not yet been added to the object or initialized. The object must create and/or initialize the vardata field at this point.
MSG_META_GET_VAR_DATA
Returns the extra data set for the passed data type.
In addition to supporting variable data structures, GEOS allows you to set up “handlers” for different variable data types. Handlers are routines that process a given data entry; for example, each generic UI object stores a number of hints. Specific UI classes, when attached to the generic object, have a specific routine to handle each hint supported. Some specific UIs do nothing with certain hints; these specific UIs do not have handlers for those hints.
Handlers are associated with data types through the use of a VarDataCHandler table. This is a table that you set up in your .goc file that contains pairings of routine names with @vardata field names. An example of the VarDataCHandler table is shown in Code Display 5-12.
A handler is simply a normal C routine or function and is defined as such. The handler should be declared as an _pascal routine.The table pairs the handler with the @vardata data type, and when ObjVarScanData() is called, all handlers for all data types are called in order. This is true for the object’s class and all its superclasses since variable data is inherited just as normal instance data is. The handler can do almost anything appropriate with the exception of destroying the object or adding or deleting variable data from the object.
Code Display 5-12 Variable Data Handlers
/* This example is taken from the C VarData sample application. */

/* This is a VarDataCHandler. It is called by the ObjVarScanData() routine when
 * the data type corresponding to this routine in the VarDataCHandlerTable
 * is encountered. The parameters indicated are passed.
 *
 * This particular handler is actually used for several different data types
 * (see VarDataCHandlerTable below). The data type can be distinguished by
 * the `dataType' parameter.
 *
 * NOTE: VarDataInteractionHintHandler, like any handler used in a
 * VarDataCHandler structure, must be declared _pascal. */

void _pascal VarDataInteractionHintHandler(MemHandle mh, ChunkHandle chnk,
        void *data, word dataType, HandlerData *handlerData) {

    if (dataType == HINT_ORIENT_CHILDREN_HORIZONTALLY) {
    handlerData->HD_flags.has_horiz = 1;
    } else if (dataType == HINT_ORIENT_CHILDREN_VERTICALLY) {
    handlerData->HD_flags.has_vert = 1;
    } else if (dataType == HINT_ALLOW_CHILDREN_TO_WRAP) {
    handlerData->HD_flags.has_allow_wrap = 1;
    } else if ((dataType == HINT_WRAP_AFTER_CHILD_COUNT) &&
        (((WrapAfterChildCountData *) data)->WACCE_childCount == 2)) {
    handlerData->HD_flags.has_wrap_after = 1;
    }
}

/* This is the VarDataCHandler Table. It consists of data type/VarDataCHandler
 * pairs. The VarDataCHandlers are far routines. */

static VarDataCHandler varDataInteractionHandlerTable[] = {
    {HINT_ORIENT_CHILDREN_HORIZONTALLY, VarDataInteractionHintHandler},
    {HINT_ORIENT_CHILDREN_VERTICALLY, VarDataInteractionHintHandler},
    {HINT_ALLOW_CHILDREN_TO_WRAP, VarDataInteractionHintHandler},
    {HINT_WRAP_AFTER_CHILD_COUNT, VarDataInteractionHintHandler}
};
5.4.1.5 Defining Relocatable Data
@reloc
Some objects and classes may have instance data fields that must be resolved when the object is loaded and linked at run-time. For example, if the object contains an optr to another object, that optr must be updated when the object is loaded and resolved since the global memory handle can’t be known at compile-time.
For some special instance fields, this happens automatically. For example, the @composite and @link fields as well as optrs are automatically resolved. However, if you add your own instance fields requiring relocation, you will have to set them up with the @reloc keyword. This is true for both static and variable data.
This keyword uses two formats. The first listed here is for normal, static instance data, and the second is used with variable data.
@reloc <iname>, [(<count>, <struct>)] <ptrType>;
iname This is the name of the relocatable instance field.
count If the instance variable is an array of relocatable data or structures containing relocatable fields, this is the number of elements in the array.
struct If the relocatable data is an array of structures, this represents the name of the field within each structure that requires relocation.
ptrType This is the type of relocatable data contained in the field. It may be one of optr, ptr, or handle.
@reloc <vname>, <fn>, [(<count>, <struct>)] ptrType;
vname This is the name of the variable data type.
fn This is the name of the field within the variable data’s extra data. If there is no extra data with this data type, put a zero rather than a name.
count If the instance variable is an array of relocatable data or structures containing relocatable fields, this is the number of elements in the array.
struct If the relocatable data is an array of structures, this represents the name of the field within each structure that requires relocation.
ptrType This is the type of relocatable data contained in the field. It may be one of optr, ptr, or handle.
5.4.2 Non-relocatable Data
@noreloc
To force an instance data field which would normally be relocatable (e.g., an optr) to not be relocatable, use the @noreloc keyword. Use this keyword together with the name of the field to be marked non-relocatable directly after defining the instance field itself as shown in Code Display 5-13.
Code Display 5-13 Use of the @noreloc Keyword
    @instance optr MCI_ruler;  /* Normally MCI_ruler would be reloc- */
    @noreloc MCI_ruler;        /* -but now it isn't. */
5.4.3 Defining Methods
@method, @extern
Methods are the routines executed when an object receives a message. Each class understands a certain set of messages; each of these has a place in the class’ method table and corresponds to one method.
Although methods are class-specific, they are not defined between the @class and @endc of class definition. Instead, their declaration line links them to a single class and to a specific message. Goc, Glue, and GEOS build each class’ method table automatically; you do not have to create the table yourself.
To define a method, use the @method keyword. This has the following structure:
@method [<hname>,] <cname>, <mname>+;
hname The handler name, if any. If you wish to use the method as a function, it must have a handler name. If you do not provide a handler name, Goc will create one for you. This name is useful for setting breakpoints when debugging. If you do not provide a name, Goc constructs the name by concatenating the class name (with the -Class suffix, if any, removed) with the message name (with the MSG_- prefix, if any, removed). For example, Goc would call MyClass’ handler for MSG_DO_SOMETHING “MyDO_SOMETHING”.
cname The name of the class to which this method belongs. Each method may belong to only one class.
mname The name of the message that invokes this method. The plus symbol indicates that one method may be invoked by more than one message as long as they all have the same parameters and return values. At least one message must be specified.
Note that the name of the method (the handler name) is optional. Parameters and return values are not put in the method declaration-these are defined with @message as discussed in section 5.3.3.
If you will wish to call the method as a routine occasionally, your compiler will probably require that you provide a prototype for the routine. If your @message declaration looks like
@message word MSG_MC_DO_SOMETHING(word thing);
and your @method declaration looks like
@method DoSomething, MyClass, MSG_MC_DO_SOMETHING {
/* Code Here */ }

Then your protoype should look like

extern word _pascal DoSomething(optr oself,
            MyMessages message,
            word thing);
The name of the type MyMessages is constructed automatically by taking the name of the class, removing the “Class” suffix, and replacing said suffix with “Messages”.
Normally, all of a class’ methods will be coded in the same code file in which the class is declared with @classdecl. If, however, you find you need to declare a class’ methods in a different file, you can use the @extern keyword to indicate a method is defined and/or used in a different object file. Goc will give no error if @extern is used and the method exists nowhere; Glue, however, will give a linking error in such a case. There is no such requirement, however, if you are putting only the class definition (the definitions between @class and @endc) in a different file. In this case, you can put the class definition in a .goh header file and the method code in the same .goc file as the @classdecl statement; you must @include the .goh file, but you won’t need to use the @extern directive (as long as the method code is in the same file as the @classdecl directive).
The format for using @extern is as follows:
/* In the file in which the class is declared with
 * @classdecl:
 */
    @extern method <cname>, <mname>+;

/* In the file containing the method code: */
    @extern method <cname>, <mname>+ {
        ...method code goes here...
    }
cname The name of the class for which the method is defined.
mname The name of the message which invokes the method. Note that external method definitions, like normal method definitions, can handle more than one message.
Three parameters are passed automatically with messages and do not have to be declared in the @message definition. They are important to know when writing methods, however, because they can greatly simplify your code. These are standard parameters for all classes except ProcessClass and its subclasses below:
pself A far pointer to the object’s instance data. pself points to the master group for the class for which the handler is defined. Note that this pointer may be invalidated by message calls, variable data operations, or LMem allocations.
oself An optr to the object’s instance data. It contains the global memory handle and chunk handle of the instance chunk. This can be used for routines that act on the object’s instance data.
message The message number of the message being handled.
As mentioned, ProcessClass is a special type of class. It has no true instance data because it uses the standard PC structure of an application (idata, udata, etc.). It only has one standard parameter to each of its methods: the message that was sent to it. This is because the “instance data” of ProcessClass includes all the global variables of your program. Because they are accessed automatically, no oself or pself is required.
Code Display 5-14 A Class Definition
/* The class ValClass defines four messages that invoke four different methods. The
 * entire class is shown in this example; it will function properly if coded this
 * way. Note that the methods have the class name in their declaration line
 * and thus do not appear within the class definition. */

@class ValClass, MetaClass;

@instance int value;            /* instance data value: an uninitialized integer */

    /* message declarations
     * All four messages will be handled by this class. They return
     * the types shown and take the parameters defined. */
@message int MSG_VAL_GET_VALUE();
@message void MSG_VAL_SET_VALUE(int newValue);
@message void MSG_VAL_NEGATE_VALUE();
@message Boolean MSG_VAL_IS_VALUE_BIGGER_THAN(int newValue);

@endc
@classdecl ValClass;            /* the class structure must be put in memory */

    /* Method Declarations
     * Each of the four methods is a single line of code. Note that the
     * parameters are automatically defined in the message definition and do
     * not need to be restated in the method definition. The same is true of
     * the return type. Note also that the class and message names appear in
     * the @method line. */

@method ValGetValue, MyClass, MSG_VAL_GET_VALUE {
    return(pself->value);
}

@method ValSetValue, MyClass, MSG_VAL_SET_VALUE {
    pself->value = newValue;
}

@method ValNegateVal, MyClass, MSG_VAL_NEGATE_VALUE {
    pself->value *= -1;
}

@method  ValClass, MSG_VAL_IS_VALUE_BIGGER_THAN {
    /* This handler's name will automatically be created to be
     * ValVAL_IS_VALUE_BIGGER_THAN. You can use this name as a
     * C function call from within the same thread. */
    return(pself->value > newValue);
}
You may sometimes wish to call a method with normal C call-and-return conventions, rather than by sending a message. To do so, you will have to declare the method as a routine as well as a method. The declaration should have the following format:
extern <type> _pascal <MethodName>(
    optr                oself,
    <TruncatedClassName>Messages    message,
    <type1>             <arg1>,
    <type2>             <arg2>)
type
This is the type returned by the method. It may be any data type.
MethodName
This is the name of the method. If you will be calling a method as a routine, you must give the method a name when you declare it (see “Defining Methods”). Use the same name here.
TruncatedClassName
This is the name of the class, without the word “Class”. The type of this argument is the truncated class name followed (with no space) by the word “Messages”. Thus, for “HelloCounterClass”, the truncated class name would be “HelloCounter”, and the type of this field would be “HelloCounterMessages”.
typen, argn Use these fields to declare each of the arguments passed to the message. Be sure to use exactly the same arguments, and in the same order, as in the message declaration.
Code Display 5-15 Declaring a Method As a Routine
@message int MSG_HELLO_COUNTER_RECALCULATE_VALUE(
        HelloPriority   priority,
        word        randomDatum,
        char        aLetter);

extern int _pascal HelloCounterRecalculateValue(
        optr            oself,
        HelloCounterMessages    message,
        HelloPriority       priority,
        word            randomDatum,
        char            aLetter);

@method HelloCounterRecalculate, HelloCounterClass,
        MSG_HELLO_COUNTER_RECALCULATE_VALUE {

    /* method code goes here... */
}
5.4.4 Declaring Objects
In GEOS programs, you can instantiate objects in two ways: You can declare them in your source code with the @object keyword, or you can instantiate them and fill in their instance data during execution. In most cases, you will probably do the former, especially with generic UI objects.
Additionally, you can create resources and chunks with the @start, @end, @header, and @chunk keywords. GEOS libraries also need an additional set of declarations in their definition (.goh) files; these declarations (@deflib and @endlib) indicate that the code contained between them is part of the specified library.
5.4.4.1 Defining Library Code
@deflib, @endlib
If your geode is a library, it will likely have a number of .goh files. Each of these files contains some portion of the library’s code and is included by applications that use the library. The library code must be delimited by the two keywords @deflib and @endlib, which have the following formats:
@deflib <libname>
@endlib
libname The permanent name of the library with the extender stripped off. For example, the UI library’s name is ui.lib, and the format would then be
@deflib ui
    /* library code here */
@endlib
Note that these two keywords are only necessary in files that define classes in the library. Files that have just code or data used in the library do not require them (though they are allowed).
5.4.4.2 Declaring Segment Resources and Chunks
@start, @end, @header, @chunk, @chunkArray, @elementArray, @extern
There are essentially three types of resources in GEOS: code resources containing routines and methods, object blocks containing object instance chunks (and often data chunks), and data resources containing only data chunks. Code resources are created automatically, and no declaration is required for them (unless you require special segments; then you should use the pragmas appropriate for your C compiler).
Object blocks or other LMem resources are declared with @start and @end. You can set a special header on a local memory resource with the @header keyword. These are described below, and an example of declaring the resource block is given in Code Display 5-16. Note that the @header keyword must come between the @start and @end delimiters.
@start    <segname> [, <flags>];
@header   <type> [= <init>];
@end     <segname>
segname This is the name of the resource segment.
flags These are optional flags that determine two characteristics of the resource. If the flag data is set, the block will be set to a data resource-the default is an object block. If the flag notDetachable is set, the resource block will never be saved to a state file.
type This is the name of a structure type that will act as the header structure for the resource block. It must be some permutation of either LMemBlockHeader (for non object blocks) or ObjLMemBlockHeader (for object blocks).
init This is an initializer for the new header type. Typically, some data fields will be added on to the end of one of the standard LMem block headers. These fields may be filled in with initializer data with this optional argument.
The resource elements (objects or chunks, for example) are also declared within the @start and @end delimiters. The @chunk keyword declares a data chunk and is shown below. For the @object keyword, see the next section.
@chunk <type> <name> [= <init>];
type This is the data type that will be held in the chunk.
name This is the name of the chunk. You may use this name as you would a variable name to reference the chunk.
init This is initializer data in the standard C format. If initializing a structure, make sure you put the data within curly braces.
Two other types of resource elements may also be defined, both of which are array types. The @chunkArray keyword defines a chunk array structure, and the @elementArray keyword defines an element array structure. See “Local Memory”, Chapter 16, for information on the structure and usage of chunk and element arrays. The formats for the keywords are described below:
@chunkArray <stype> <aname> [= {<init>}];

@elementArray <stype> <aname> [ = {<init>} ];
stype This is the type of structure stored in the array.
aname This is the name of the array.
init This is any initializer data. Initializer data is optional.
One other keyword, @extern, allows you to use chunks from a different compilation session. The @extern keyword can be used to reference remote (external) chunks, objects, and visual monikers. If the item referenced by @extern is not actually defined anywhere, Glue will return an error when it tries to link the item. (Note also that Glue can not link through an external item; only one layer of external linkage is allowed. Thus, one object could not have an @extern to a chunk that had an @extern to a visMoniker.) Children in object trees may not be defined with @extern; Goc will produce an error in this case. The format of this keyword is as follows:
@extern chunk <cname>;
@extern object <oname>;
@extern visMoniker <vmname>;
cname This is the name of a chunk.
oname This is the name of an object.
vmname This is the name of a visMoniker chunk.
Code Display 5-16 Declaring Data Resources
/* This example declares a data block with three different chunks in it and
 * its own header type. */

typedef struct {
    LMemBlockHeader         MLMBH_meta;       /* basic header structure */
    int         MLMBH_numEntries;  /* the number of entries in the block
*/
} StudentBlockHeader;

@start StudentBlock, data;                  /* data flag indicates LMem block */
@header StudentBlockHeader = 1;                 /* initialize new header fields */

/* The three chunks are defined below. Each represents a single field associated
 * with a single student; that is why the header's MLMBH_numEntries field contains
 * one (rather than three). */

@chunk  char    firstName[] = "John";
@chunk  char    lastName[] = "Student";
@chunk  int grade = 6;

@end StudentBlock                   /* end of resource block */
5.4.4.3 Declaring an Object
@object, @default, @specificUI, gcnList
The @object keyword is much like the @chunk keyword in its use. It allocates a chunk in a resource segment and fills it with initializer data. However, it also does much more in that it creates an object of a specified class and fills it with default data if no initializer data is specified.
The @object keyword, like @chunk, must be used between the delimiters @start and @end (see above). However, it must be used in an object block (it can not be used in a data resource segment). Its format is below, and several examples are shown in Code Display 5-17.
@object   <class> <name> = <flags>* {
    <fieldName> = <init>;*
    <varName> [= <init>];*
};
class The class of the object. It must be a valid class defined either by GEOS or by your own code.
name The name of the object. The object’s name will be used when sending messages to it.
flags Currently only one flag is allowed for objects: ignoreDirty. When set, it will cause the object to ignore when changes have been made to its instance data; this means it will always be restored from a state file in the same way as it is defined in the code file. This flag should not be set for any generic objects.
fieldName The name of an instance data field defined for the class.
varName The name of a variable data instance field. If the variable data field has extra data, you can initialize it with the optional argument.
init This is initializer data for the instance data field. If you want default values in the field, you can either leave the field out of the @object declaration or use the keyword @default for the initializer. When declaring variable data, though, be aware that if the extra data is a structure, the initializer must be enclosed in curly braces.
GEOS supports special instance data fields as described in [section 5.4.1.2] (#5412-defining-instance-data-fields). These are declared as normal fields and are described below. Also, generic hints are implemented as variable data, so they are added to an object in the same way as other variable data types.
Object Trees
All objects declared in a static tree (e.g., your application’s generic tree) should be in the same source file. If they are in different files, then they may be joined into a single tree only by dynamically adding objects from one file as children to objects of the other.
Note that if one file contains a tree of objects, then you may incorporate the whole tree by simply dynamically adding the top object in the file to the main tree. You won’t have to add each object individually.
If an object declared in one source file will send a message to an object in another source file, you must include an @extern line in the source file containing the sending object:
@extern object ReceivingObjectName;
The message itself should be sent in the following manner (with variations possible if you will be using @call, passing arguments, or what have you):
optr ROOptr;
ROOptr = GeodeGetOptrNS(@ReceivingObjectName);
@send ROOptr::MSG_DO_SOMETHING(0, 0);
Declaring Children
If an object is to be part of an object tree, its class (or one of its superclasses) must have at least an @link instance data field as does GenClass. If the object is to be allowed to have children, it must also have a field of type @composite. These allow Goc to automatically and correctly link the tree together.
As described in section 5.4.1.2, the @composite field points to the first child of an object, and the @link field points either to the object’s next sibling or back to the parent if there is no next sibling. However, all child declaration is done completely in the composite field when using @object. The format is as follows:
<fname> = <childName> [, <childname>]* ;
fname This is the name of the field defined with @composite in the class definition.
childName
This is the name of an object to be a child of this object. The star symbol indicates that one or more children may be included in the declaration line-they should be separated by commas, and each child must also be declared with an @object declaration.
There are many examples of this in the sample applications. Some simple examples are shown below.
GI_comp = @TicTacPrimary;

GI_comp = @TicTacView, @TicTacGameMenu;

VCI_comp = @TTX1, @TTX2, @TTX3, @TTX4, @TTX5, @TTO1,
         @TTO2, @TTO3, @TTO4, @TTO5;
Declaring Visual Monikers
For an object to have a visual moniker, it must have an instance data field of type @visMoniker as GenClass does (see [section 5.4.1.2] (#5412-defining-instance-data-fields)). If you are in fact working with GenClass’ GI_visMoniker field, you might want to consult its description in “GenClass”, Chapter 2 of the Objects Book.
Visual monikers may take many forms, and the declaration line changes depending on which form you are using. The form ranges from a simple text field to a complex list of possible monikers based on video resolution. Each of these forms and the declaration line for it is given below.
The following form is used for simple text strings (shown with example):
<fname> = <string>;
GI_visMoniker = "One";
fname The name of the moniker’s instance data field.
string A string of text enclosed in quotation marks. This string is the visual moniker for the object.
The following form is used for text strings that have a keyboard navigation character. A keyboard navigation character can be a character enclosed in single quotation marks, a numerical constant, or a text string representing some constant defined with #define. If it’s a text string, the string is passed on for the C compiler to parse. The form is shown below with an example.
<fname> = <nav>, <string>;
GI_visMoniker = 'V', "View";
fname The name of the moniker’s instance data field.
nav A keyboard navigation character represented as described above.
string A text string enclosed in quotation marks.
The following form is used when a list of monikers is required. Most frequently, this form is used when defining an application’s icons; one moniker for each potential screen resolution will be included in the list. The form is shown below, along with an example.
<fname> = list { <nameList> };
GI_visMoniker = list {
 @DocDirButtonSCMoniker,
 @DocDirButtonSMMoniker,
 @DocDirButtonSCGAMoniker
}
fname This is the name of the moniker’s instance data field.
nameList This is a list of resource data chunk names separated by commas. Each chunk can be defined with the @chunk or @visMoniker keyword.
It is possible when declaring a list of visual monikers to have each moniker within a chunk or to declare each moniker with the @visMoniker keyword. If used on its own line, this keyword takes the form
@visMoniker <fname> = <init>;
The fields are the name of the moniker (same as that specified in the moniker list) and the moniker data. The visual moniker will be put in its own chunk just as if the moniker had been declared with the @chunk keyword, but using @visMoniker often is clearer and easier.
Declaring GCN List Assignments
GEOS employs a “General Change Notification” (GCN) system which allows objects to register for notification of certain types of events. For example, some applications may want to notify for changes in the file system (file deletes, moves, copies, etc.); some objects may require notification each time the selection changes (e.g., a PointSizeControl object needs to know when the user changes a text selection). For further information, see “General Change Notification”, Chapter 9.
While many objects will add themselves to and remove themselves from GCN lists dynamically, others will need to be placed on certain GCN lists in their definitions. For this, the gcnList keyword (the only one not preceded by the marker @) is used. Its format is shown below:
gcnList(<manufID>, <ltype>) = <oname>,+;
manufID This is the manufacturer ID of the manufacturer responsible for creating the particular list type. It is used to differentiate different manufacturers who may use the same list type enumerator. In many cases, this will be the type MANUFACTURER_ID_GEOWORKS.
ltype This is the name of the GCN list. Most that you will use are defined by GenApplication and begin GAGCNLT_-. All the list types are defined in the GenApplication chapter in the Objects book.
oname This is a list of objects that should be on the GCN list. The objects are separated by commas.
Declaring Keyboard Accelerators
A keyboard accelerator acts as a “hot key,” invoking the object’s default action when pressed. The accelerator character is defined in an instance field declared with @kbdAccelerator as shown in section 5.4.1.2. The form of declaration follows.
<fname> = [@specificUI] <mod>* <key>;
fname This is the name of the @kbdAccelerator instance data field.
@specificUI This is a Goc keyword that, when used in this declaration, allows your program to use a key combination reserved for the specific UI. This can have undefined consequences and is strongly discouraged.
mod This is a modifier key. You may put any or all of the modifiers here, separated by spaces. The four modifiers are alt, control, ctrl, and shift.
key This is either a character enclosed in single quotes (e.g., `k’) or a numeric key constant (e.g., C_CTRL_A or 0x41).
Using Default Values
Often an object will be declared with the default values of an instance data field. Other times, especially with generic UI object attributes, an object will have the default values with one or two modifications. In the first case, the instance data field does not need to be addressed at all; the default value will be used if no declaration is made.
In the second case, however, you must use the @default keyword to get the default values. If modifications are made and @default is not used, all default values will be lost. This is normally used only with bitfield-type attributes, and modifications are made with bitwise operators. The use of @default is shown below.
<fname> = @default [<op> [~]<attr>]*;
fname This is the name of the instance data field.
op This is a bitwise operator. If adding an attribute to the default, use the bitwise OR operator (|); if removing an attribute, use the bitwise AND operator (&) with the inverse of the attribute (see below). One operator is required for each attribute added or removed. The priorities of the operators are the same as in the standard C programming language.
~ This is the bitwise operator NOT. If removing an attribute using the bitwise AND operator, you should include the NOT symbol in front of the attribute.
attr This is the name of the attribute being added or removed.
Code Display 5-17 Declaring Objects with @object
    /* This example shows the use of @start, @object, @visMoniker, and @end.
     * It is taken from the TicTac sample application. */

@start AppResource;
    /* The AppResource resource block contains the TicTacApp
     * object and its visual moniker chunk. */

@object GenApplicationClass TicTacApp = {
    GI_visMoniker = list { @TicTacTextMoniker };
    GI_comp = @TicTacPrimary;
    gcnList(MANUFACTURER_ID_GEOWORKS,GAGCNLT_WINDOWS) = @TicTacPrimary;
}

@visMoniker TicTacTextMoniker = "TicTacToe";
@end AppResource

@start Interface;
    /* The Interface resource declares TicTac's primary window and other UI
     * gadgetry. Only the GenView from this application is shown. */
@object GenViewClass TicTacView = {
    GVI_content = @TicTacBoard;                 /* A relocatable optr field */
    GVI_docBounds = {0, 0, BOARD_WIDTH, BOARD_HEIGHT};
                    /* A Rectangle structure */
    GVI_color = { C_BLUE, 0, 0, 0 };                    /* A ColorQuad structure */
    GVI_horizAttrs = @default | GVDA_NO_LARGER_THAN_CONTENT
                | GVDA_NO_SMALLER_THAN_CONTENT
                & ~GVDA_SCROLLABLE;
        /* The NO_LARGER and NO_SMALLER attributes are set in the
         * field, and SCROLLABLE is cleared. The SCROLLABLE attribute
         * is not set by default for the GenView; it is shown here
         * for illustration. */
    GVI_vertAttrs = @default | GVDA_NO_LARGER_THAN_CONTENT
               | GVDA_NO_SMALLER_THAN_CONTENT;
}

@end Interface
5.4.5 Sending Messages
@send, @call, @callsuper, @record, @dispatch, @dispatchcall
Often you will have to send messages to objects throughout the system. You can send messages in several ways, but the two most basic and most frequently used involve the keywords @call and @send.
If a message is being sent across threads, you must be aware of synchronization issues. If the message does not cross thread boundaries, the kernel will link the code directly as if it were a function call. (This is an implementation difference only; you do not have to specify anything different in your code.)
The @send keyword causes the kernel to put the specified message into the recipient’s event queue. Messages sent with @send may not give return values and may not take pointers to locked memory as arguments. The sender then continues executing without ever knowing whether the message was properly handled or not.
The @call keyword is used when the message being sent must return information to the sender. It is also used when the message must be handled immediately, before the sender is allowed to continue executing. In essence, the sender is “put to sleep” until the message has been processed, at which time the sender is woken up and may continue executing. If the message sent with @call is not handled (passed up the recipient’s class tree and still not handled), it will return as if it had been; no error message will be returned.
The formats for @send and @call are similar. Use them like function calls. Their format is given below:
@send [,<flags>]+ \
        <obj>::[{<cast2>}]<msg>(<params>*);

<ret> = @call [,<flags>]+ [{<cast>}] <obj>::\
            [{<cast2>}]<msg>(<params>*);
flags This is a list of flags separated by the commas. The allowed flags are shown below.
obj This is the name of the object to which the message will be sent. It can also be an optr variable.
msg This is the name of the message being sent.
params This is a list of parameters, built exactly as it would be for a standard C function call.
ret This is a variable that will hold the return value, if any. Note that this is valid only with @call because @send does not return anything.
cast If a message name is put here, Goc will automatically cast the return type to whatever type is returned by cast.
cast2 If a message name is put here, Goc will assume that the message is passed the same arguments as message cast2.
The flags allowed for these keywords are listed below. They are rarely used but are available.
forceQueue This flag will cause the message to be placed in the recipient’s event queue, even if it could have been handled by a direct call. Do not use this flag with @call.
checkDuplicate
This flag makes the kernel check if a message of the same name is already in the recipient’s event queue. For this flag to work, forceQueue must also be passed. Events are checked from first (next-to-be-processed) to last.
checkLastOnly
This flag works with checkDuplicate, causing it to check only the last message in the event queue.
replace This flag modifies checkDuplicate and checkLastOnly by superseding the duplicate (old) event with the new one. The new event will be put in the duplicate’s position in the event queue. If a duplicate is found but the replace flag is not passed, the duplicate will be dropped.
insertAtFront
This puts the message at the front of the recipient’s event queue.
canDiscardIfDesperate
This flag indicates that this event may be discarded if the system is running extremely low on handles and requires more space immediately.
The @call command can also be used within an expression in the same way a function call could. For example, the following conditional expression is valid:
if (@call MyObj::MSG_MYOBJ_TEST()) {
    /* conditional code */
}
The result of the message call will be evaluated in the if statement. Note that this may not be done with @send because it returns nothing.
Nested Message Calls
Because of the way Goc processes message calls, it is impossible to nest messages on a single line. For example, this call is illegal:
@send Obj1::MSG_THATS_PASSED_AN_INT(\
        @call Obj2::MSG_THAT_RETURNS_INT());
Any such call will generate a compile-time error. Instead, you should use temporary variables to break this up into several lines, e.g.:
int i;

i = @call Obj2::MSG_THAT_RETURNS_INT();

@send Obj2::MSG_THATS_PASSED_AN_INT(i);
Sending a Message to an Object’s Superclass
Often you may wish to send a message directly to an object’s superclass to ensure that default behavior is implemented. Use the @callsuper keyword with the following format:
@callsuper <obj>::<class>::<msg>(<pars>*) [<flgs>+];
obj This is the object to send the message to, as in @call and @send. The object block must already be locked, and must be run by the current thread of execution. (Usually an object uses @callsuper() to send a message to itself.)
class This is the class whose superclass should receive the message.
msg This is the message name.
pars This is the parameter list, same as @call and @send.
flgs This is the flags list, same as @call and @send.
When used on a line by itself (with no parameters or return values), @callsuper() passes a received message on to the superclass. This is used quite often when a subclass wants to alter existing behavior rather than replace it.
Encapsulating a Message
By encapsulating messages, you can set up events to be sent out at a later time. An encapsulated message can include the message to be sent, the object it should be sent to, and the parameters that should be passed. Using encapsulated messages can sometimes simplify coding.
Messages can be encapsulated with the @record keyword and later dispatched with @dispatch and @dispatchcall. (Though the use of @record does not necessitate a later @dispatch-instead, the recorded event can be passed as a parameter to another class for dispatching.) In addition, when the event is dispatched, you can override the values set in the encapsulated event to change the destination or the message. You can also cast the return value to another type if necessary. The formats of these three keywords are as follows:
<event> = @record <obj>::[{<cast>}]<msg>(<params>*);
event The handle of the recorded event, of type EventHandle.
obj The object set to receive the message when it is dispatched. This field may be set to null if the destination is determined when the message is dispatched.
cast The name of a message; if this is present, the event will have the same argument types as the specified message.
msg The message set to be sent when the event is dispatched. This field may be set to null if the message is determined when it is dispatched.
params The parameter list (same as in @call and @send) that will be sent with the dispatched message.
The @dispatch keyword is used to dispatch an encapsulated event to its destination. This is similar to @send in that it can have no return values. If the event has return values, use @dispatchcall (below).
@dispatch [noFree] <nObj>::[{<cast>}]<nMsg>::<event>;
noFree This flag indicates that the event’s handle should not be freed after the event has been dispatched. This is useful if the same encapsulated event is to be used more than once.
nObj This is an override destination. If the destination in the encapsulated event is null, then an object must be set here. Any object set will override that in the encapsulated message. If no override object is desired, set this to null.
nMsg This is an override message. If set, this message will be sent rather than that in the encapsulated event. If no override message is desired, set this to null. Any override will be sent with the same parameters as set in the encapsulated event.
event This is the handle of the encapsulated event.
The @dispatchcall keyword works exactly like the @dispatch keyword above except that it allows the use of return values. The sender will be “put to sleep” if necessary while the recipient processes the message and will be “woken up” when the message returns.
<ret> = @dispatchcall [noFree] [{<cast>}] <nObj>::<nMsg>::<event>;
ret This is a variable that will contain the return value of the message.
other parameters
All the other parameters are the same as those in @dispatch.
Using Expressions with Messages
All message-sending keywords described in the previous sections-@call, @send, @record, @dispatch, and @dispatchcall-can take expressions in place of a destination object’s name. Additionally, the @dispatch and @dispatchcall keywords can take expressions in place of the message name. However, if an expression is used for the message, you must use a cast type to make sure Goc knows the return and parameter types. Note, however, that casts in this case use curly braces rather than parentheses.
Casting Message Call and Return Types
Goc allows you to cast a message’s pass and return values. This is best explained by example:
{
 int swapInt;
 char c;

 c = @call {MSG_1} object:: {MSG_2} MSG_X(swapInt);
}
In this case, MSG_2 takes an integer argument and MSG_1 returns a char. The casts tell Goc how MSG_X will receive parameters and return results. Goc needs the casts in those cases where MSG_X doesn’t appear explicitly (perhaps it has been stored as an integer), and thus Goc would not be able to parse the parameters or return values.
When Goc tries to determine proper parameters and returns, it will look to the following sources when available. When trying to figure out parameters, it will look first for MSG_2, then MSG_X, and MSG_1 last. The first one Goc finds will determine the parameters.
@send and @record don’t support return values, but on a @call, Goc will figure out return values by looking at MSG_1, MSG_X, and finally MSG_2.
In this case, Goc will pass to fn’s method like MSG_CAST_2 but will return values as MSG_CAST_1 does:
Message fn = GetMessageToCall();
c = @call {MSG_CAST_1} myObj:: {MSG_CAST_2} fn(x);
Now we pass to MSG_B like MSG_CAST_2, but return like MSG_B:
c = @call myObj:: {MSG_CAST_2} MSG_B(swapInt);
Message Shortcuts
All messages, when received, contain three basic parameters: the message number (message), the optr of the recipient (oself), and a far pointer to the recipient’s locked instance chunk (pself). This allows several shortcuts and shorthand formats for use within methods:
@callsuper;
When used in a method as above, the @callsuper keyword passes the received message up to the object’s superclass. Use this whenever subclassing a message when the default functionality must be preserved.
<ret> = @call self::<msg>(<params>*);
Any object can send a message to itself using @call and “self” as the destination. The remainder of the command is the same as a normal @call.
<ret> = @call process::<msg>(<params>*);
Any object can send a message to its Process object with @call and “process” as the destination. (The Process object is the object of class ProcessClass.) The remainder of the command is the same as a normal @call.
<ret> = @call application::<msg>(<params>*);
Any object can send a message to its Application object (of class GenApplicationClass) with @call and “application” as the destination. The remainder of the command is the same as a normal @call.
<ret> = @call @visParent::<msg>(<params>*);
Any object in a visible tree can use @visParent as the destination of an @call command. The message will be sent to the object’s parent in the visible object tree. The remainder of the command is the same as a normal @call.
<ret> = @call @genParent::<msg>(<params>*);
Any object in a generic tree can use @genParent as the destination of an @call command. The message will be sent to the object’s parent in the generic object tree. The remainder of the command is the same as a normal @call.
@send @visChildren::<msg>(<params>*);
Any composite object in a visible object tree (therefore a subclass of VisCompClass) can send a message that will be dispatched at once to all of its children. Any message sent with @visChildren as the destination must be dispatched with the @send keyword and therefore can have no return value.
@send @genChildren::<msg>(<params>*);
Any composite object in a generic object tree (therefore a subclass of GenClass) can send a message that will be dispatched at once to all of its children. Any message sent with @genChildren as the destination must be dispatched with the @send keyword and therefore can have no return value.
In addition to the above shortcuts, you may also pass the optr of an object using **@
5.4.6 Managing Objects
In addition to knowing how to declare objects and classes, you need to know how to manage objects during execution. This includes instantiating new objects, deleting objects, saving object state, and moving objects around object trees.
Both the kernel and MetaClass (the topmost class in any class hierarchy) have routines and methods to create, manage, and destroy objects. You will probably not have to or want to use all these routines and methods, but understanding what they do and how they work can help you understand the object system as a whole.
5.4.6.1 Creating New Objects
ObjDuplicateResource(), ObjInstantiate(), MSG_META_INITIALIZE, MSG_GEN_COPY_TREE
You can introduce objects to the system in four basic ways. Each of these has benefits and drawbacks, and each has an appropriate place and time for use. It is unlikely, however, that you will use all four different means.
Storing Objects in a Resource Block
This is a common and simple way to introduce objects to the system. The Hello World sample application uses this method of creating and loading objects. Resource blocks are contained in your geode’s executable file (the .geo file) and are automatically loaded when accessed. These resources may also be tagged for saving to state files automatically.
Setting up an object resource is simply a matter of defining the resource and using the @object keyword to define each object in the resource. The object resource block is automatically created and put in your executable file. Each object defined with @object is allocated a chunk and a chunk handle within the resource block. Because both the chunk handle and the handle of the resource block are known, accessing individual objects in the resource is simple. In essence, when you set up an object resource, you don’t need to worry about bringing the objects into the system or shutting them down.
Using a resource for objects has limitations. Objects loaded from resources are always loaded with the same characteristics. This can be a problem if you need to have several different copies of a certain set of objects, and each copy can be changed. In this case, you would duplicate the resource (see below) before accessing the objects within it.
For an example of objects defined by means of declaring them with the @object keyword within an object resource, see Code Display 5-17.
To define an object resource, you must know what objects you’ll require before your geode is launched. Some complex programs will dynamically instantiate individual objects or entire trees without knowing previously what objects will be required. To do this, you’ll need to use ObjInstantiate() (see below) for instantiating individual objects.
Duplicating an Object Block Resource
This is another common method employed by both the User Interface and applications. It provides the simplicity of the object resource model (above) while allowing you to have several different copies of the resource. Thus, it’s perfect if you want to use templates for your object blocks (this is what the Document Control object does, as shown in the Tutorial application (see APPL\TUTORIAL\MCHRT4\MCHRT.GOC)).
First, you must set up an object resource in your code file with @start, @end, and @object. The objects in such a “template” resource should not be linked to any object outside the block. Generic object branches created in this manner should have their topmost object marked as not usable (~GS_USABLE); this is because it is illegal for a generic object to be usable without having a generic parent. Instead of accessing these objects directly, you should duplicate the resource block. (A resource can not be both duplicated and used directly.) This is done with ObjDuplicateResource(), which allocates a new block on the heap, sets it up properly, and copies the resource directly into it.
You are returned a handle to the new object block, which you can then modify any way you like. Because all the chunk handles of all the objects will be the same as in the source block, you can easily access any object in the duplicate. Once copied, the duplicate objects may be added to your generic tree and then set GS_USABLE. And, by using ObjDuplicateResource() more than once on the same resource, you can have several different, possibly modified versions of the resource at once.
As with using resource blocks, however, you must know the configuration of all your template objects beforehand. You may still need to add new objects to the resource or dynamically create other objects. This is the primary drawback of this method.
Additionally, if you duplicate resource blocks, you should also free them when they’re not needed any more. Generic objects in the block should be set not usable and then removed from the tree before the resource is freed. Freeing should be done by sending MSG_META_BLOCK_FREE to any object in the block or by calling ObjFreeObjBlock(). Use of the kernel routine ObjFreeDuplicate() is not recommended as it requires all objects in the block to be thoroughly clean of any ties to the system. (MSG_META_BLOCK_FREE and ObjFreeObjBlock() ensure that the objects have had adequate time to relinquish these ties first.)
Instantiating an Individual Object
The most complex of these three options, this can provide the flexibility needed for all cases. The actual act of instantiating an object is not difficult or very complex. However, it is time and labor intensive and requires several steps that are not necessary when using object resources. In addition, cleaning up after objects created in this manner is more complex.
To create a new object on the fly, you first must set up a place to put it. To do this, allocate a memory block on the global heap (you can instead use an existing object block, of course) and set it up with the proper flags and header to be an object block. Then, lock the chosen block on the heap with ObjLockObjBlock(). The block is now set up to receive the new object.
To actually create the new object, call the kernel routine ObjInstantiate(). This will create a chunk in the object block and zero the instance chunk. If the object is of a class with master parts, the instance chunk will remain uninitialized until the first time a class in the master group receives any message. If the class is a direct descendant of MetaClass, the instance chunk will be immediately initialized to default values with MSG_META_INITIALIZE. If you want to change or add to the default data of this type of object, subclass MSG_META_INITIALIZE; be sure to call the superclass first. To initialize any master group of an object, send it a classed event that will be handled by a class in that master level.
After calling ObjInstantiate(), unlock the object block with MemUnlock(). An example of instantiating a new object is shown in Code Display 5-18. Generic objects created this way may then be added to a generic tree and set usable. They may be destroyed using MSG_GEN_DESTROY.
Code Display 5-18 Instantiating an Object
/* This sample of code belongs to a sample GenInteraction object (the object would
 * have to be a subclass of GenInteractionClass). It does several things:
 *  1.  It instantiates a new GenTrigger object. The new
 *      GenTrigger will be added to the same object block
 *      containing the GenInteraction handling the message.
 *  2.  It adds the new GenTrigger as a child of the
 *      SampInteraction (the handling object).
 *  3.  It sets the GenTrigger usable and enabled. */

@method SampInteractionClass, MSG_SAMP_INTERACTION_CREATE_TRIGGER {
    optr        newTrig;

    newTrig = ObjInstantiate(OptrToHandle(oself),
                (ClassStruct *)&GenTriggerClass);
    /* The two parameters are the handle of an object block and the
     * pointer to a class definition. The object block is the same
     * one containing the GenInteraction, whose optr is contained in
     * the standard oself parameter. The class structure pointer points
     * to the class definition of GenTriggerClass. */

    /* Now it is necessary to dereference our pself parameter. Because
     * the ObjInstantiate() call could move this object block (it must
     * allocate new space in the block, and this can cause the block to
     * move), we have to reset our pointer based on our optr. This is
     * done with one of the dereference routines. */
    pself = ObjDerefGen(oself);

    /* Now set the trigger as the last child of the GenInteraction. */
    @call self::MSG_GEN_ADD_CHILD(newTrig, (CCO_MARK_DIRTY | CCF_LAST);

    /* Now set the trigger usable and enabled. */
    @call newTrig::MSG_GEN_SET_USABLE(VUM_DELAYED_VIA_UI_QUEUE);
    @call newTrig::MSG_GEN_SET_ENABLED(VUM_NOW);
}
Copying a Generic Tree
The fourth way to create new objects is by using the message MSG_GEN_COPY_TREE. This, when sent to a generic object in a generic tree, copies an entire generic tree below and including the object into another, pre-existing object block.
This is an easy way to copy generic trees, one of the more common purposes of creating new objects. However, it only works with the generic objects (with a superclass GenClass). Trees created using MSG_GEN_COPY_TREE can be destroyed with MSG_GEN_DESTROY.
For an example of MSG_GEN_COPY_TREE use, see the SDK_C\GENTREE sample application.
5.4.6.2 Working With Object Blocks
ObjIncInUseCount(), ObjDecInUseCount(), ObjLockObjBlock(), ObjFreeObjBlock(), ObjFreeDuplicate(), ObjTestIfObjBlockRunByCurThread(), ObjBlockSetOutput(), ObjBlockGetOutput()
Once you have an object block created, either with ObjDuplicateResource() or with the memory routines, there are several things you can do with it. It may be treated as a normal memory block, but there are also several routines for use specifically with object blocks:
ObjIncInUseCount() and ObjDecInUseCount() increment and decrement an object block’s in-use count (used to ensure the block can’t be freed while an object is still receiving messages). ObjLockObjBlock() locks the object block on the global heap. ObjFreeObjBlock() frees any object block. ObjFreeDuplicate() is the low-level routine which frees an object block created with ObjDuplicateResource(). ObjTestIfObjBlockRunByCurThread() returns a Boolean value indicating whether the calling thread runs a given object block. ObjBlockSetOutput() and ObjBlockGetOutput() set and return the optr of the object set to receive output messages (i.e., messages sent with travel option TO_OBJ_BLOCK_OUTPUT) from all the objects within the object block.
5.4.6.3 Working With Individual Objects
ObjIsObjectInClass(), ObjGetFlags(), ObjSetFlags(), ObjDoRelocation(), ObjDoUnRelocation(), ObjResizeMaster(), ObjInitializeMaster(), ObjInitializePart()
The kernel supplies several routines for working with and modifying individual object chunks and object data. These are all described fully in the Routine Reference Book; most are not commonly used by applications.
ObjIsObjectInClass() takes a class and an optr and returns whether the object is a member of the class. ObjGetFlags() returns the object flags for a given object instance chunk; ObjSetFlags() sets the flags to passed values. ObjDoRelocation() processes any passed instance data fields in the object declared as relocatable; ObjDoUnRelocation() returns the passed relocatable fields to their index values.
ObjInitializeMaster() causes the system to build out a particular master group’s instance data for an object. ObjInitializePart() causes the system to build all master groups above and including the passed level. (This will also resolve variant classes.) ObjResizeMaster() resizes a given master part of the instance chunk, causing the chunk to be resized.
5.4.6.4 Managing Object Trees
ObjLinkFindParent(), ObjCompAddChild(), ObjCompRemoveChild(), ObjCompMoveChild(), ObjCompFindChildByOptr(), ObjCompFindChildByNumber(), ObjCompProcessChildren()
Many objects will be part of object trees. Nearly all generic UI and visible objects exist as members of trees for organizational purposes. Object trees can be useful, powerful, and convenient mechanisms for organizing your objects.
An object tree is made up of “composite” objects-objects which may or may not have children. The distinguishing characteristic of a composite object is that it has one instance data field declared with the @composite keyword and another declared with the @link keyword. The @composite field contains a pointer to the object’s first child in the tree, and the @link field contains a pointer to the object’s next sibling. This representation is shown in Figure 5-18.
If you set up an object resource block containing composite objects, it’s very easy to set up an object tree. Your generic UI objects are declared in a tree with the GenApplication object at its head. Additionally, it’s easy to alter an object tree once it’s been created. The kernel provides several routines, and MetaClass uses several messages for adding, removing, and moving objects to, from, and within trees.
ObjLinkFindParent() This routine finds the optr of the calling object’s direct parent. The kernel traverses the link fields until it returns to the parent object.
ObjCompFindChildByOptr() This routine returns the number of the child (first, second, third, etc.) whose optr is passed. The child must exist and must be a child of the calling object.
ObjCompFindChildByNumber() This routine returns the optr of the child whose number (first, second, etc.) is passed.
ObjCompAddChild() This routine takes an object’s optr and adds it to the caller’s list of children. Depending on the flags passed, the child may be inserted in any child position (first, second, etc.).
ObjCompMoveChild() This routine takes a child object and moves it to a new position. However, it will still remain a child of the calling object. If you want to move the child to be a child of a different object, you must first remove it from the tree altogether and then add it to the other parent.
ObjCompRemoveChild() This routine removes a child object from the object tree.
ObjCompProcessChildren() This routine calls a callback routine for each child of the calling object in turn. The callback routine may do virtually anything (except destroy the object or free its chunk or something similar).
By using the above routines, you can fully manipulate any object tree and the objects within it.

Figure 5-18 Structure of an Object Tree
An object’s composite field points to its first child, and its link field points either to its next sibling or back to the parent. You can see that, by following these links, any object is accessible from any other object in the tree.
5.4.6.5 Detaching and Destroying Objects
MSG_META_DETACH, MSG_META_DETACH_COMPLETE, MSG_META_ACK, MSG_META_OBJ_FLUSH_INPUT_QUEUE, MSG_META_OBJ_FREE, MSG_META_FINAL_OBJ_FREE, ObjInitDetach(), ObjIncDetach(), ObjEnableDetach(), ObjFreeChunk()
While creating objects is actually quite simple, detaching and destroying them can be quite involved. For this reason, GEOS does most of the work for you, and in most cases you won’t have to worry about what happens when your application is shut down or saved to a state file. However, if you instantiate individual objects of your own classes, you should be very careful about how your objects are detached from the system and destroyed.
Detaching objects involves severing all of the object’s ties with the rest of the system. Destruction of an object entails actually removing the object’s instance chunk and related structures, making sure that it has handled all its waiting messages.
Throughout its life, an object is likely to become involved with a number of other things-other objects, drivers, files, streams, the memory manager, the kernel-and each of these things may send the object messages from time to time. The task, when detaching an object from the system, is to sever all the object’s ties with the outside world, to make sure that no other entity will ever try to contact the object again.
To those unfamiliar with these problems, they can be overwhelming. However, GEOS takes care of them for you in most situations. All generic and visible objects, all objects in object trees, and all objects that maintain an active list will automatically (in nearly all cases) have the detach functionality built in by MetaClass.
The Detach Sequence
When an object receives MSG_META_DETACH, it begins the detach sequence to sever all its ties with other entities in the system. It must first notify all its children and all the objects on its various notification lists that it will be going away (most often, all its children, by association, will also be detached). It then must clear its message queues. Finally, it must acknowledge its detachment to the object that originally sent MSG_META_DETACH. Each of these phases is described in detail below and is implemented by MetaClass. You have to do none of this work unless your object is truly a special case.
Detaching in conjunction with destruction is somewhat intricate because not only must the object notify all other interested parties, but it must also receive acknowledgment of the notice. Otherwise, the notification and some other message could be sent at the same time, and the object could be destroyed before the notification can be handled. (Destruction is discussed in the following section.)
Because any object may be put in the position of being detached and then immediately destroyed, it must send out notification and then wait until all the notices have been acknowledged before continuing with other tasks. The kernel and MetaClass implement a mechanism for this using four kernel routines. Again, you do not need to do this since all classes have MetaClass as their root.
First the object being detached (in its MSG_META_DETACH handler) calls the routine ObjInitDetach(). This tells the kernel that the object is initiating a detach sequence and that the acknowledgment mechanism must be set up. The kernel will allocate a variable data entry to hold a count of the number of notices sent and acknowledgments received.
After this, the object must send a MSG_META_DETACH or its equivalent to each of its children and each of the objects on its active list. With each notice sent, the object must call ObjIncDetach(), which increments the notice count.
After sending all the notices, the object then calls the kernel routine ObjEnableDetach(). This notifies the kernel that all the notices have been sent and that the object is waiting for the acknowledgments.
Acknowledgment comes in the form of MSG_META_ACK and is received by the object being detached. MSG_META_ACK is handled by MetaClass and will decrement the notice count, essentially saying there are one fewer notices left to be received. When the final MSG_META_ACK is received (setting the notice count to zero) and ObjEnableDetach() has also been called, the kernel will automatically send a MSG_META_DETACH_COMPLETE to the object. This assures the object that it will never receive another message from another entity in the system.
The final step in the detach sequence is acknowledging that the object has been detached. In its MSG_META_DETACH_COMPLETE handler, the object should send a MSG_META_ACK to the object that originated the detach sequence. This will allow that object to continue with its detach sequence if it was involved in one; without this step, only leaves of object trees could ever be detached. This final step is provided in default handlers in MetaClass and is inherited by all objects.
The Destruction Sequence
The destruction sequence must be initiated from outside and will begin when the object receives a MSG_META_OBJ_FREE. Often, the MSG_META_OBJ_FREE will be sent by the object to itself.
The destruction sequence consists of three steps: First, the object must clear out its message queues; even though it is detached and can not receive new messages, there may be some left over in the queue (an error if it occurs). Second, it must finish executing its code and working with its instance data. Third, it must free its instance chunk. Each of these steps is described below.
Even though the object has notified the rest of the system that it is going away, it still must flush its message queues of any unhandled messages. These messages could have been received between the time the original MSG_META_OBJ_FREE was received and notification was sent out (due to interrupts or context switching). To clear its message queues, the object must send itself a MSG_META_OBJ_FLUSH_INPUT_QUEUE, which will ensure that any messages in the queues are handled appropriately before the object shuts down. This step is handled automatically by the MSG_META_OBJ_FREE handler in MetaClass. You should never have to send this message, and indeed its use is discouraged.
To the outside world, the second and third steps seem like a single step. However, MSG_META_OBJ_FREE can not simply free the instance chunk after the queues are cleared; it must be able to access the instance chunk until all the method code has been executed. So, MSG_META_OBJ_FREE sends the final message to the object, MSG_META_FINAL_OBJ_FREE, and then exits. MSG_META_FINAL_OBJ_FREE waits a short while and then frees the object’s chunk. This ensures that MSG_META_OBJ_FREE has finished and the chunk is not being used by any code.
Possible Pitfalls
If you’re not careful, you can cause the detach mechanism to fail by instantiating an object on the fly and saving that object’s optr. If the object is then detached and you don’t account for the saved optr, you could later send a message to a nonexistent object. This has undefined results and can be nearly impossible to track down.
Note that objects created within resources and by ObjDuplicateResource() will almost always automatically be taken care of by the detach mechanism. Objects you create with ObjInstantiate() are the ones to be careful with.
5.4.6.6 Saving Object State
ObjSaveBlock(), ObjMarkDirty(), ObjMapSavedToState(), ObjMapStateToSaved()
Object state saving is almost entirely contained within the system. For the most part, only UI objects are saved to state files; however, you can mark other object blocks for saving. State saving is described in full in section 6.1.4 of chapter 6.
Frist Steps: Hello World <– table of contents –> Applications and Geodes