4 First Steps: Hello World
This chapter provides you with an application shell to which you can add as you learn more about GEOS programming. It describes each portion of the introductory (and compulsory) “Hello World” sample program. All programmers new to GEOS should read this chapter for a firm understanding of the basics of a GEOS application. The source code for Hello World is given in this chapter in pieces. It is also available as the Hello3 sample application.
4.1 Application Structure
Every GEOS application and library will have at least two files: The Geode Parameters file provides the Glue linker with necessary information about the geode being compiled and linked. The source file contains the source code. Source code files may be split up into modules of source and definition files-this allows the programmer to keep large applications in a series of smaller files for easy organization and easier debugging.
Essentially there are four different types of files your application may use:
Parameters File (.gp)
The Parameters file, as stated above, provides the Glue linker with necessary information. It details specifics about the geode being compiled that will be necessary for dynamically linking at runtime. Each geode may have only one Parameters file. The Parameters file for Hello World is detailed in section 4.3. Full reference information for this file type can be found in the Routines reference book.Source File (.goc)
The Source file contains a combination of GEOS UI code and standard C code. Many source code files can be used for a single geode; this can help you organize your application’s functionality into manageable groups of routines and objects. An introduction to the basics of the source file is given in section 4.4.C Header File (.h)
C Header files may be used to hold definitions of data structures, classes, macros, routines, and other items. There are several standard GEOS header files you must include in your geode for it to compile properly. These are outlined in section 4.4.GEOS Header File (.goh)
This file is essentially the same as the C header files described above. It can contain class and routine definitions as well as constants and variables. The primary difference between these files and the C header files is that .goh files must be included before the geode is run through the Goc preprocessor. C header files do not have to go through the Goc preprocessor. Simple geodes might have none of their own header files. These files are also described in section 4.4.
4.2 Hello World
The Hello World sample application (Hello3) is very simple and yet accomplishes a great deal. With just a few simple steps, this program does the following:
Creates a complete primary window
Creates a scrollable window and scroller objects
Draws 48-point text into the scrollable window and redraws the text when the user changes a parameter
Handles scrolling and window resizes
Uses a pinnable menu to bring up a dialog box
Uses a dialog box to allow the user to change colors of the text
Uses keyboard mnemonics for both the menu and dialog box commands
The Hello World program uses some concepts and constructs with which you may not be familiar yet. This section will describe each of those constructs and will refer to other sections of the documentation for complete information.
4.2.1 Features of Hello World
To the user, the Hello World program is very simple. It consists of a primary window with a single menu and a scrollable window within the primary. In the scrollable window is a phrase of text: “Welcome to GEOS!”
The menu has a single item, “Color,” which brings up a dialog box with two buttons in it. One button is labeled “Blue” and turns the text blue, and the other is labeled “Gold” and turns the text yellow. The menu is pinnable, like all GEOS menus, and the dialog box may be moved around the screen and closed like any other independently-displayable dialog box. See Figure 4-1 for an illustration of the application on the screen.


Figure 4-1 The Hello World Sample Application
The Hello World application draws text in a scrolling View and has one menu and one dialog box. The Blue trigger changes the text to blue; the Gold trigger changes the text to yellow.
4.2.2 Strategy and Internals
The code for Hello World, as you will see, is quite simple. It consists mainly of User Interface gadgetry and uses just a few message handlers.
The main component of the application is the Process object, an instance of HelloProcessClass (a subclass of GenProcessClass). This object makes all drawing and color changes by handling messages sent from the window manager and the triggers in the dialog box. The Process object basically manages the application, keeping track of the relevant data and interacting with the UI gadgetry. (See Figure 4-2 for an illustration of the Hello World application’s structure.)
The Process object is event-driven, meaning it has no main() routine run when the program is launched. Instead, the program does nothing until an event occurs (such as the view window sending MSG_META_EXPOSED when first opened). When the event (message) is received, the Process object responds to it and then waits until the next event occurs. Note, however, that the vast majority of events a Process object will receive and handle are not generated by your code but by the kernel and the UI.
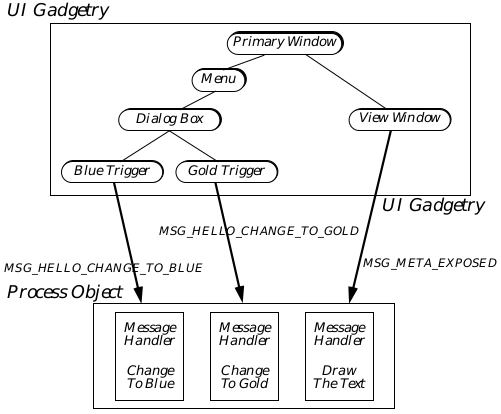
Figure 4-2 Structure of Hello World
The Process object contains message handlers (methods) for messages sent to it by the UI triggers and View. The other UI gadgets operate completely independently of the application’s code; all of their functionality is implemented within the UI.
4.2.2.1 The Menu and Dialog Box
Both the menu and the dialog box, once defined in the source code as objects, are implemented automatically by the system software. The application does not have to draw or otherwise manage these objects; they will interact directly with the UI to do the proper thing.
The triggers within the dialog, however, request actions that must be carried out by the application (changing the color to blue and gold, respectively). Although the application does not have to instantiate, draw, or otherwise modify the trigger objects, it must handle messages sent out by them when they are pressed by the user. This is discussed below, under “Changing the Text Color”.
4.2.2.2 The Scrolling View and Drawing the Text
Almost everything is handled automatically by the User Interface for the Hello World application. This includes implementation of the system menus for the primary window and the scrolling functionality of the scrollable View window.
The view object (of GenViewClass) is powerful and provides a lot of what most applications need. It automatically handles all window resizes and scrolls, and it will cause proper redrawing when another object (such as a pinned menu) is moved across it. The only thing it does not do is actually draw the application’s images.
When the view senses that some portion of its window has become invalid (through scrolling or when the view window is first opened, for example), it will send a MSG_META_EXPOSED message to the Hello World application’s Process object. The Process object will respond by drawing the text appropriately-it does not, however, have to worry about what portion of the text is visible or what portion of the screen the view window occupies. The view will automatically clip the text properly and display it within the window’s bounds.
4.2.2.3 Changing the Text Color
In all, the Process object can handle six events specific to this application: MSG_META_CONTENT_VIEW_WIN_OPENED (sent by the view when it first creates its window), MSG_META_CONTENT_VIEW_WIN_CLOSED (sent by the view when its window is being destroyed), MSG_META_EXPOSED (described above), MSG_HELLO_CHANGE_TO_BLUE (sent by the Blue trigger), MSG_HELLO_CHANGE_TO_GOLD (sent by the Gold trigger), and MSG_HELLO_REDRAW_DOCUMENT (sent by the Process object to itself).
The Process object maintains two global variables: helloTextColor contains the current color of the text, and winHan contains the window handle of the view’s window. When it draws the text, the Process object checks helloTextColor before drawing. Therefore, the handlers for the change-color messages change the value of helloTextColor.
However, changing the text’s color is not quite that easy. Because the view window does not have any way of knowing that the Process object has changed the text, the application must inform the UI of the change. Otherwise, the change will be made in the document but will not appear on the screen until the view window is moved or resized by the user.
Therefore, we must force a window invalidation when we change the color. This will cause the View window to generate a new MSG_META_EXPOSED that will force the redrawing of the text in the new color. The window handle is cached in winHan for just this purpose; when the text color changes, we must invalidate the window so the UI will redraw its contents. We invalidate the window by calling the special graphics routine GrInvalRect(), passing the window’s handle. We get the window handle when the view first creates the window-it will send out a MSG_META_CONTENT_VIEW_WIN_OPENED. When the window closes, the view will send MSG_META_CONTENT_VIEW_WIN_CLOSED in which Hello World destroys the cached window handle.
4.2.3 Naming Conventions
You might have noticed some of the names of variables, messages, and routines and seen a pattern of naming. Geoworks has developed a few naming conventions for various different items in the system. You don’t have to follow these conventions, of course; it may help, however, if you keep to our conventions until you’re familiar with most of the system. Some of the items that have special naming conventions are
Variables Typically, variables begin with a lower case letter and have each subword in the name capitalized. The variable helloTextColor is a good example. Variables with just one word in the name are all lower case.
Classes Class names should always have the suffix Class. Typically, the first portion of a class’ name will describe the particular application, library, or module it is associated with. The second portion of the name should reflect the class’ superclass. Each portion of the class name should be capitalized. Thus, HelloProcessClass conforms because it begins with the application’s name (Hello), then has the superclass’ name (Process), and finally has the suffix Class.
Constants Constants are typically all upper case with underscores to delineate the portions of the name. C_BLUE is a good example; it is a set value that does not change. The structure of the name should reflect the use of the constant. (In this case, the enumerated type Color is reflected in the C_ portion of the constant’s name.)
Routines Kernel and UI routines, as well as method names, should have each portion capitalized. They should begin with some abbreviation relating to the module they belong to. For example, GrCreateState() is a graphics system routine, as is GrInvalRect().
Messages Message names should be all uppercase and begin with MSG_. Each portion of the name should be separated with underscores, and the first portion after MSG_ should reflect the class in which the message is defined. For example, MSG_HELLO_CHANGE_TO_BLUE follows all these conventions.
Objects Object names are typically capitalized in the same manner as routines and classes. The object’s name should reflect both the object’s module and its class (or its function if not its class). HelloView is a good example.
Instance Data Instance data fields typically have as their first portion an all-caps acronym for the class name with an I tacked on for “instance.” The second portion is like a variable name, and the two portions are separated by an underscore. For example, GI_visMoniker is a field of GenClass (hence the GI_), and visMoniker is the variable name of the field.
4.3 Geode Parameters File
Code Display 4-1 shows the Geode Parameters (hello3.gp) file for the Hello World sample application. Each of the components of the parameters file is described in detail in the reference-style entries in the Routines book.
Code Display 4-1 The Hello World Parameters File
##############################################################################
#
#            Copyright (c) GeoWorks 1991, 1993-- All Rights Reserved
#
# PROJECT:      GEOS V2.0
# MODULE:       Hello World (Sample GEOS application)
# FILE:         hello3.gp (Hello World Application Geode Parameters File)
#
# DESCRIPTION:  This file contains Geode definitions for the "Hello World" sample
#               application. This file is read by the Glue linker to
#               build this application.
#
##############################################################################

#
#       Permanent name: This is required by Glue to set the permanent name
#       and extension of the geode. The permanent name of a library is what
#       goes in the imported library table of a client geode (along with the
#       protocol number). It is also what Swat uses to name the patient.
#
name hello3.app

#
#       Long filename: This name can be displayed by GeoManager.
#
longname "Hello World"

#
#       Specify geode type: This geode is an application, will have its own
#       process (thread), and is not multi-launchable.
#
type    appl, process, single

#
#       Specify the class name of the application Process object: Messages
#       sent to the application's Process object will be handled by
#       HelloProcessClass, which is defined in hello3.goc.
#
class   HelloProcessClass

#
#       Specify the application object: This is the object in the
#       application's generic UI tree which serves as the top-level
#       UI object for the application. See hello3.goc.
#
appobj  HelloApp

#
#       Token: This four-letter name is used by GeoManager to locate the
#       icon for this application in the token database. The tokenid
#       number corresponds to the manufacturer ID of the program's author
#       for uniqueness of the token. Eight is Geoworks' manufacturer ID for
#       sample applications.
#
tokenchars "HELO"
tokenid 8

#
#       stack: This field designates the number of bytes to set aside for
#       the process' stack. (The type of the geode must be process, above.)
#       The default stack size is 2000 bytes.
#
stack 1500

#
# Heapspace: This is roughly the non-discardable memory usage (in words)
# of the application and any transient libraries that it depends on,
# plus an additional amount for thread activity. To find the heapspace
# for an application, use the Swat "heapspace" command.
#
heapspace 3644


#
#       Resources: List all resource blocks which are used by the application.
#       (Standard discardable code resources do not need to be mentioned.)
#
resource APPRESOURCE ui-object
resource INTERFACE ui-object
resource MENURESOURCE ui-object

#
#       Libraries: List which libraries are used by the application.
#
library geos
library ui

#
#       User Notes: This field allows the geode to fill its usernotes field
#       (available to the user through GeoManager's File/Get Info function)
#       with meaningful text.
#
usernotes "Sample application for GEOS version 2.0."
4.4 The Source File and Source Code
The Hello World program’s source code resides in a single file, hello3.goc. Portions of this file are presented throughout this section.
This sample application demonstrates the basics of all GEOS programs, and it’s likely you will refer to it often until you become proficient with both the system and the reference documentation. Among the concepts and implementations it demonstrates are the following:
Declaration and use of resources
Standard inclusion files
Basic UI construction
Creation of the Primary window
Creation of a scrolling view and drawing to the view
Creation of a menu
Creation of a simple dialog box
Declaration of subclasses and messages
Definition of message handlers
Sending messages to another object
This discussion assumes you have a solid understanding of general programming concepts and C constructions. If you don’t, you should most likely get to know the C programming language before continuing.
4.4.1 Inclusions and Global Variables
As Code Display 4-2 shows, the first thing in a .goc file is a list of other files and libraries that must be included. These are designated in the standard C protocol, with one exception (described below). All the inclusions and libraries a basic application will need are shown in the sample, and only the following inclusions is required of every GEOS application:
@include <stdapp.goh>
Other inclusions may be required for more complex applications and libraries, and these inclusions will be listed in the topics that require them. Goc accepts both the standard C #include for .h files and the GEOS @include for .goh files. The difference between them is that .h files may not include Goc constructs (e.g. @object) whereas .goh files can.
After the inclusions are listed, you should declare any global variables used throughout your application. Be aware that global variables, though accessible by any object, are owned by the application’s Process object and by the application’s primary thread. Objects running in other threads (such as UI objects) should not access these global variables directly because this can cause synchronization problems between threads.
Whenever possible, you should avoid using too many global variables. Global variables are typically put in a fixed-block resource, and having too many can bog down a low-memory machine.
The Hello World application uses only two global variables. The first, helloTextColor, holds the value of the currently-displayed text color and is initialized to the value C_BLUE (dark blue). The second, winHan, contains the window handle of the scrollable view into which we draw our text. How these variables are used will be shown later.
Code Display 4-2 Inclusion Files and Global Variables
This is the first portion of the hello3.goc file.

/***********************************************************************
 *           Copyright (c) GeoWorks 1991, 1993-- All Rights Reserved
 *
 * PROJECT:             GEOS
 * MODULE:              Hello World (Sample GEOS application)
 * FILE:                hello3.goc (Code file for Hello World Sample Application)
 *
 * DESCRIPTION:
 *      This file contains the source code for the Hello World application.
 *      This code will be processed by the goc C preprocessor and then
 *      compiled by a C compiler. After compilation, it will be linked
 *      by the Glue linker to produce a runnable .geo application file.
 *
 ***********************************************************************/

/***************************************************************************
 * Include files
 *      These files are the standard inclusion files to use the basics of
 *      the GEOS system and libraries. All applications should include
 *      at least the following files. Note that all inclusion files
 *      have the suffix .h or .goh indicating they are header files.
 ***************************************************************************/

@include <stdapp.goh>                           /* Standard GEOS inclusion file */

/***********************************************************************
 * Global Variables
 ***********************************************************************/

word            helloTextColor = C_BLUE;
WindowHandle    winHan;
4.4.2 The Process Object
Every GEOS application has an object called the Process object. This object is run by the application’s primary thread and is an instance of a subclass of GenProcessClass. Because the Process is an event-driven object, there is no main() routine that is executed when the program is launched. Instead, the object will wait until it receives messages (events), at which time it will execute the proper methods.
Applications can be of two basic models: The procedural model puts the entire functionality of the application within the Process object, not using any other objects in the application’s thread (UI objects are run by the UI thread). All messages sent to the application are handled by the Process object, and most OOP issues can be avoided. The object-oriented model allows for other objects to be run by the application’s primary thread; each of these objects will have its own instance data and be located in an object block (a resource) associated with its own message queue.
There is no command or directive that determines which model is used-the distinction is inherent within the format of message handlers and therefore can be virtually ignored. Hello World, for example, is simple enough to use the procedural model, handling all functionality with the Process object.
The Process object of Hello World is shown in Code Display 4-3.
Code Display 4-3 Hello World’s Process Object
This code display is part of hello3.goc and follows the previous display directly.

/***********************************************************************
 *                      Class & Method Definitions
 * This section contains the definition of the application's Process
 * class and its methods. Other classes can also be defined here,
 * along with the message each handles.
 ***********************************************************************/

/*
 * Here we define "HelloProcessClass" as a subclass of the system-provided
 * "GenProcessClass". As this application is launched, an instance of this class
 * will be created automatically to handle application-related events (messages).
 * The application thread will be responsible for running this object,
 * meaning that whenever this object handles a message, it will be executing
 * in the application's thread.
 */

/* You will find no object in this file declared to be of this class. Instead,
 * this class is bound to the application thread in hello3.gp.

@class HelloProcessClass, GenProcessClass;

/* The messages HelloProcessClass objects can handle that are not
 * system-defined are enumerated here. Each of these messages is sent
 * by one of the triggers in the dialog box. This is where class-
 * specific messages for this application (not system-defined messages)
 * are defined. */

@message void MSG_HELLO_CHANGE_TO_BLUE(); /* sent by Blue trigger */
@message void MSG_HELLO_CHANGE_TO_GOLD(); /* sent by Gold trigger */
@message void MSG_HELLO_REDRAW_DOCUMENT(); /* sent by Process to itself */

@endc /* signifies end of class definition */

/* Because this class definition must be stored in memory at runtime,
 * we must declare it here along with a flag indicating how it should
 * be loaded. The "neverSaved" flag is used because Process classes
 * are never saved to state files and therefore no relocation tables
 * need be built. */
@classdecl HelloProcessClass, neverSaved;
4.4.3 UI Objects
As stated earlier, the bulk of the Hello World application consists of User Interface objects. These objects are defined just after the Process object in your application’s code, and they are given certain attributes and instance data. Once they have been defined, in general you will not have to bother with them again.
UI objects are organized into a hierarchy. The hierarchy for Hello World is shown in Figure 4-3, and the objects required for all applications are boxed. UI objects are also arranged into resources. Each resource is allocated a block on the global heap when the program is launched; therefore, resources should be kept to reasonable sizes whenever possible.
The application object resides within its own resource so the application takes up very little memory when iconified (minimized). Menus for complex applications are usually put in a menu resource. Most other UI gadgetry is put in a resource called “Interface” (though this name is not required).
4.4.3.1 The Application Object
Every application must have an application object, an instance of the class GenApplicationClass. The application object handles and manages many application-related things such as dispatching input sent by the input manager to the application. The application object must be the top-level generic object in every application. The name of the application object is also stated in the geode parameters file line appobj (see Code Display 4-1).

Figure 4-3 Generic Tree of Hello World
Seven objects make up the generic tree of the Hello World application. Those outlined by the box are required of all applications; the others are specific to Hello World.
Code Display 4-4 shows Hello World’s application object definition. The comments in the code are extensive and explain the purpose of each line.
Code Display 4-4 Hello World’s Application Object
This display is part of hello3.goc and follows the previous display directly.

/*
 *                      Application Object
 * The very top-level generic object of an application MUST be a GenApplication
 * object. The hello3.gp file contains an "appobj" statement which indicates
 * that this "HelloApp" object is in fact the top-level UI object.
 * This object should be in its own resource so it takes up very little memory
 * when minimized. Note that the name of the resource may be whatever you choose;
 * it does not have to be AppResource.
 */

@start  AppResource;                    /* Begin definition of objects in AppResource. */

@object GenApplicationClass HelloApp = {
    GI_comp = @HelloPrimary;
                        /* The GI_comp attribute lists the generic children
                         * of the object. The HelloApp object has just one
                         * child, the primary window of the application. */

    gcnList(MANUFACTURER_ID_GEOWORKS, GAGCNLT_WINDOWS) = @HelloPrimary;
                        /* This GCN list determines which of the application's
                         * window objects must be made visible when the
                         * application first starts up. */
}

@end    AppResource                     /* End definition of objects in AppResource. */
4.4.3.2 The Primary Window and the View Window
Every application must have a primary window object of class GenPrimaryClass. This object will draw and manage the primary window and will work with the UI and the geometry manager to arrange all the children of the window properly. It will also automatically put up the system-controlled gadgets (such as the system window menu, the minimize/maximize buttons, and the Express menu).
The Hello World primary window has only two children, one of which is a menu. The other is the view object, which occupies the remaining space within the primary. The view object, as stated earlier, automatically handles all scrolling and clipping of documents. Its scrollable area is eight and a half inches by eleven inches. A description of what the view window does and how it interacts with the Process object to draw the text is given in [section 4.2.2.2] (#4222-the-scrolling-view-and-drawing-the-text).
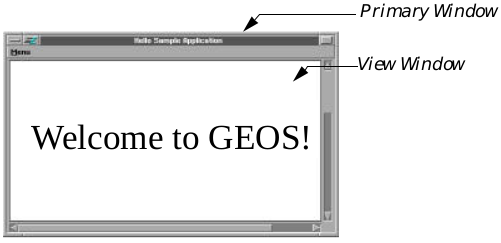
Figure 4-4 Hello Primary and View Windows
The Primary window groups other UI objects and automatically is given the system window menu, the Express menu, and the maximize button. The menu bar is also created automatically. The View object is automatically given scrollers and a window for painting by the application.
Code Display 4-5 shows the definition and attributes of each of these two objects. See Figure 4-4 for a diagram of the two objects implemented under the OSF/Motif specification.
Code Display 4-5 Hello World’s Primary and View Objects
This display is part of hello3.goc and directly follows the previous display.

@start  Interface;              /* This resource is for miscellaneous UI objects. */

@object GenPrimaryClass HelloPrimary = {
    GI_visMoniker = "Hello World Sample Application";
                        /* This title will appear at the top of the primary
                         * window as the name of the application. */

    GI_comp = @HelloView, @HelloMenu;
                        /* This window has two children, the GenView object
                         * and the GenInteraction menu object. */

    /* For simplicity, this application is not given an icon. Therefore, we must
     * prevent the user from being able to minimize the application. This is
     * done by applying the following attribute to the GenPrimary object. Note that
     * GenPrimaryClass is a subclass of GenDisplayClass, in which this attribute
     * is actually defined. */

    ATTR_GEN_DISPLAY_NOT_MINIMIZABLE;

    /* The following hint allows the primary window object to size itself
     * according to its children (the view object). */
    HINT_SIZE_WINDOW_AS_DESIRED;

   /*
    * When the specific UI permits, let's not show the menu bar on
    * startup. Some applications would find the extra space this leaves
    * helpful, in particular on the small screens of pen-based devices,
    * though for this simple application it doesn't really matter.
    */
    ATTR_GEN_DISPLAY_MENU_BAR_POPPED_OUT;
    HINT_DISPLAY_MENU_BAR_HIDDEN_ON_STARTUP;
}

/*              GenView object
 * This GenView object creates a window where the application can display portions
 * of a document as necessary. We want it to be scrollable, so the specific UI
 * (OSF/Motif) will create scroll bars which the user can interact with. Whenever a
 * portion of the window needs to be redrawn, the GenView object will invalidate
 * a portion of the window, causing a MSG_META_EXPOSED to be sent to the
 * application. The application will draw the document into the window. The
 * window keeps track of a mask which is used to clip the application's
 * drawing operations so only the invalid portion of the window is drawn. */

@object GenViewClass HelloView = {
    GVI_horizAttrs = @default | GVDA_SCROLLABLE | GVDA_NO_LARGER_THAN_CONTENT;
                                /* This makes the View scrollable in the
                                 * horizontal dimension and keeps it from
                                 * growing larger than our document. */

    GVI_vertAttrs = @default | GVDA_SCROLLABLE | GVDA_NO_LARGER_THAN_CONTENT;
                                /* This makes the View scrollable in the
                                 * vertical dimension and keeps it from
                                 * growing larger than our document. */

    GVI_docBounds = { 0, 0, 72*17/2, 72*11 };
                                /* This sets the document size (scrollable
                                 * bounds) of the GenView. */

    GVI_content = process;      /* This sets the output of the View--where it will
                                 * send its MSG_META_EXPOSEDs--to be the
                                 * application's Process object. */

 /*
  * This view will not take text input, so specify that no floating
  * keyboard should come up. Otherwise, we would get a floating
  * keyboard by default on pen-based systems.
  */
 ATTR_GEN_VIEW_DOES_NOT_ACCEPT_TEXT_INPUT;
}

@end    Interface               /* End definition of objects in this resource. */
4.4.3.3 The Hello World Menu
The Hello World program has one menu, called “Menu” and located in the primary window’s menu bar. Menus are instances of GenInteractionClass with the GIV_POPUP attribute set in the GII_visibility field. The moniker of the menu object appears on the menu bar (see Code Display 4-6 for the definition of Hello World’s menu).
The menu should have one child for each entry in the menu. In Hello World, the only child is the dialog box, whose moniker appears as the text of the menu item that brings up the box.
Code Display 4-6 The Hello World Menu
This display is part of hello3.goc and follows the previous display directly.

/*                      HelloMenu Menu
 * Menus are of GenInteractionClass. The moniker of a menu is used to show the menu
 * on the primary's menu bar (thus, "Menu" will show up in Hello World's menu bar).
 * Each of the menu's children (in the GI_comp field) will be an entry or a
 * collection of entries in the menu. To separate a menu from a dialog
 * box GenInteraction, you must apply the visibility GIV_POPUP. A dialog box will
 * have the visibility GIV_DIALOG. */

@object GenInteractionClass HelloMenu = {
    GI_visMoniker = 'M', "Menu";        /* The moniker of the menu is used in
                                 * the primary window's menu bar. */

    GI_comp = @HelloColorBox;           /* The only child of the menu (the only
                                 * item in the menu) is the dialog box. */

    GII_visibility = GIV_POPUP;         /* This attribute designates the GenInteraction
                                 * as a menu or a submenu. */
}
4.4.3.4 The Dialog Box and Its Triggers
Code Display 4-7 shows the code for the dialog box and its triggers.
Dialog boxes in GEOS may be of GenInteractionClass, or dialogs may be called up and instantiated during execution with kernel routines. Hello World uses a GenInteraction in order to have a “floating” dialog box that may be retained and moved around the screen.
When a dialog box is brought up by a menu item, the moniker of the dialog box object will be used as the text of the menu item. Thus, the word “Color” will appear both at the top of the dialog box and in the menu.
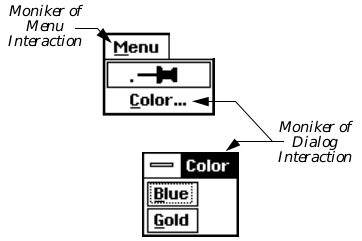
Figure 4-5 Hello World’s Menu and Dialog Box
The menu consists of a GenInteraction object; its moniker will appear as the menu’s title in the menu bar. The dialog consists of another GenInteraction object; its moniker will appear as both the title of the dialog box and the name of the menu item that brings the box up.
Children of a dialog box are arranged by the geometry manager. In general, children will be arranged top to bottom (or left to right, depending on the specific UI) as they are defined. Thus, the two triggers will appear “Blue” first and “Gold” second (on bottom). The dialog box will automatically size itself to fit all its children properly. Dialog boxes, unlike windows, are generally not resizable.
Each of the triggers will appear as a simple button big enough to hold its moniker. Each trigger, when pressed, sends a specified message to a specified object. The Blue trigger sends MSG_HELLO_CHANGE_TO_BLUE to the application’s Process object, and the Gold trigger sends the message MSG_HELLO_CHANGE_TO_GOLD to the Process object. These messages are placed in the Process object’s message queue and require no return values.
Code Display 4-7 The Hello World Dialog Box and Its Triggers
This display is part of hello3.goc and follows the previous display directly.

/*                      HelloColorBox Dialog Box
 * Dialog boxes are of GenInteractionClass. The moniker of the dialog box will
 * appear at the top as the box's title. Additionally, if the GenInteraction
 * is a child of a menu interaction, the moniker will also serve as the text that
 * appears in the menu item that brings up the dialog box. The dialog will
 * automatically size itself to be large enough to hold all its children. Thus,
 * this dialog will be small (with just two children, each a trigger with a short
 * moniker). */

@object GenInteractionClass HelloColorBox = {
    GI_visMoniker = 'C', "Color";       /* The moniker will be displayed both as the
                                 * dialog's title and as the menu item that
                                 * brings the dialog up. */

    GI_comp = @HelloBlueTrigger, @HelloGoldTrigger;
                                /* The two triggers are the only gadgets
                                 * in the dialog box. */

    GII_visibility = GIV_DIALOG;        /* In order for this interaction to be
                                 * a dialog box, this attribute must be set. */
}

/*                      GenTriggers
 * Buttons are implemented by GenTriggerClass. When a trigger is pushed by the user
 * (clicked on with the mouse), it will send the specified message to the specified
 * output object. In both cases below, the trigger will send an application-defined
 * message to the application's Process object. A trigger's moniker is displayed
 * within the trigger. In this case, both are text, but any graphics could be used
 * instead to create graphical triggers easily. (E.g. a blue flag and a gold flag
 * rather than the words "Blue" and "Gold.") */

@object GenTriggerClass HelloBlueTrigger = {
    GI_visMoniker = 'B', "Blue";        /* The 'B' indicates the keyboard navigation
                                 * character for this trigger. */
    GTI_destination = process;          /* Send the message to the Process object. */
    GTI_actionMsg = MSG_HELLO_CHANGE_TO_BLUE;   /* Send this message. */
}

@object GenTriggerClass HelloGoldTrigger = {
    GI_visMoniker = 'G', "Gold";        /* The 'G' indicates the keyboard navigation
                                 * character for this trigger. */
    GTI_destination = process;          /* Send the message to the Process object. */
    GTI_actionMsg = MSG_HELLO_CHANGE_TO_GOLD;   /* Send this message. */
}
4.4.4 Code and Message Handlers
One of the first things a C programmer might notice when looking at the Hello World program is that it has no main() routine. This illustrates the primary distinction between an object-oriented system and a system that emulates object-orientedness.
Applications in GEOS consist of a Process object and, optionally, other objects in the same or different threads. The Process object of an application is event-driven. This means that until it receives a message, it does nothing; when it receives a message, however, it will automatically be woken up with the instruction pointer pointing at the proper routine’s entry point.
GenProcessClass, the superclass of every Process object, handles many messages that most applications may never need to know about. For example, when the program is first launched, the Process object will receive a series of messages from the UI and the kernel telling it how it should start up. It automatically responds by setting up the proper message queues and executing the proper code. These are things you, as the programmer, do not need to know about to create a working GEOS application (though they are documented in “Applications and Geodes,” Chapter 6).
Throughout the program’s life, then, the Process object will receive and respond to messages as they are received. Each message has at most one corresponding method; if no method exists for a message, the message is ignored.
The Hello World Process object can handle six different messages, each of which is sent by a UI object. It also uses one routine defined internally and not available for use by other objects. Of the six messages it handles, three are specific to Hello World and three are universal to all applications using a GenView object: MSG_META_EXPOSED, MSG_META_CONTENT_VIEW_WIN_OPENED, and MSG_META_CONTENT_VIEW_WIN_CLOSED are sent by the view, and MSG_HELLO_CHANGE_TO_BLUE, MSG_HELLO_CHANGE_TO_GOLD, and MSG_HELLO_REDRAW_DOCUMENT are defined specific to HelloProcessClass and are sent by the triggers.
The function HelloDrawText() is internal to Hello World and is called by the MSG_META_EXPOSED handler. It is declared before the handler to satisfy normal C constraints.
Additionally, two constants are defined to determine the document size. These constants, along with the declaration of HelloDrawText(), are shown in Code Display 4-8.
Code Display 4-8 Constant and Routine Definition
/*This display is part of hello3.goc and follows the previous display directly.*/

/*************************************************************************
 *                      Code for HelloProcessClass
 * Now that all the UI gadgetry has been defined, we must provide the
 * methods and routines used by the application. For simplicity, all
 * messages will be handled by the HelloProcessClass object.
 *************************************************************************/

/* Define constants used by the color-setting methods. Each of these
 * is a document size parameter in points. Therefore, the document is
 * 8.5 inches wide by 11 inches tall (one point is 1/72 of an inch). */
#define HORIZ_DOC_SIZE          (72*17/2)
#define VERT_DOC_SIZE           (72*11)

/* Declare that we will use the function HelloDrawText(), and define its
 * return and parameter values. It has no return value and has one parameter:
 * a graphics state handle called "gstate." */
void HelloDrawText(GStateHandle gstate);

/* The following constants are used by HelloDrawText(). */

#define TEXT_POINT_SIZE          48     /* point size */
#define TEXT_X_POSITION          30     /* x position, in document coords. */
#define TEXT_Y_POSITION         100     /* y position, in document coords. */
4.4.4.1 Handling the Window Messages
As stated earlier, the winHan global variable contains the window handle of the view’s window. To set the variable, Hello World must intercept and handle the message MSG_META_CONTENT_VIEW_WIN_OPENED. This message passes the window handle, which HelloProcessClass simply stuffs into its winHan variable.
When the view window is destroyed, the application must make sure it forgets its window handle. Otherwise, we could try to draw to a nonexistent window, which is an error. This will not be a problem for Hello World because the only time the view can be destroyed is when the application is being shut down. For completeness, however, Hello World handles MSG_META_CONTENT_VIEW_WIN_CLOSED and sets winHan to zero.
Both of the methods for the above messages are shown in Code Display 4-9.
Code Display 4-9 Messages from the View
This display is part of hello3.goc and follows the previous display directly.

/* NOTE:
 * Because these are simple methods, the structure and syntax of methods are not
 * handled here. See the handler for MSG_META_EXPOSED, later in this chapter. */

/***********************************************************************
 * MSG_META_CONTENT_VIEW_WIN_OPENED for HelloProcessClass
 ***********************************************************************
 * SYNOPSIS:            Record the handle of the view window when the view
 *              creates it. This allows us to more-easily update the
 *              document when the user changes the text color.
 * PARAMETERS:          void (  word viewWidth,
 *                      word viewHeight,
 *                      WindowHandle viewWin)
 * SIDE EFFECTS: winHan is set to viewWindow
 ***********************************************************************/

@method HelloProcessClass, MSG_META_CONTENT_VIEW_WIN_OPENED {
        /* Get the window handle of the View. We need this handle in order to
         * force a window invalidation, causing the View to send a MSG_META_EXPOSED
         * to the Process object and thereby forcing a redraw of the window. */
    winHan = viewWindow;
}

/***********************************************************************
 * MSG_META_CONTENT_VIEW_WIN_CLOSED for HelloProcessClass
 ***********************************************************************
 * SYNOPSIS:            Take note that the view is now closed, so we don't
 *              try and draw to it or invalidate it any more (at
 *              least until it reopens)
 * PARAMETERS:          void (WindowHandle viewWindow)
 * SIDE EFFECTS:                winHan is set to 0
 *
 ***********************************************************************/

@method HelloProcessClass, MSG_META_CONTENT_VIEW_WIN_CLOSED {
        /* Set our window handle variable to zero. */
    winHan = 0;
}
4.4.4.2 Handling MSG_META_EXPOSED
As discussed in our HelloView object declaration (see Code Display 4-5), the view will send a MSG_META_EXPOSED to the Hello World Process object. Receipt of this message indicates that part of the scrollable view window has become invalid and must be redrawn.
Therefore, the class of the Hello World Process object (HelloProcessClass) must know how to draw the document in response to this message. Note that this message did not have to be defined specifically in the earlier definition of HelloProcessClass-this is because the message is already defined for MetaClass, the superclass of all GEOS classes.
Code Display 4-10 shows the method that handles MSG_META_EXPOSED for HelloProcessClass. Notice that the method calls the HelloDrawText() routine rather than drawing the text directly. While this may appear inefficient at first (and is for such a small, simple application), there are two main reasons why this is done:
First, it takes advantage of the GEOS single imaging model. The method simply creates the proper GState for drawing to the view window, then calls the drawing routine. A similar message for printing (i.e. when the user clicks on a “Print” trigger, a print message may be sent to the Process object) can use the same drawing routine-its handler would simply set up a GState for drawing to a Spool file and then call the drawing routine. Thus, one function is used for two purposes, cutting down code size.
Second, it allows more modularity in the testing of your code. If you need to make sure, for example, that the message is being received and handled, but you don’t (yet) care if the drawing is done properly, you can set up HelloDrawText() as a dummy function. This would allow you to ensure the message is handled properly without having to debug all the drawing code.
Code Display 4-10 MSG_META_EXPOSED Handler
This display is part of hello3.goc and follows the previous display directly.

/***********************************************************************
 * MSG_META_EXPOSED for HelloProcessClass
 ***********************************************************************
 * SYNOPSIS:            Redraw the recently-exposed portion of the View
 * PARAMETERS:          void (WindowHandle win)
 * SIDE EFFECTS:        The invalid region of the window is cleared out
 *
 * STRATEGY:            This message is sent by the windowing system when a
 *              portion of the GenView has become invalid, either
 *              because a window that was obscuring it has been moved,
 *              or because some called GrInvalRect.
 *
 *              We redraw the entire document, after telling the
 *              graphics system we're drawing to the invalid portion
 *              of the window.
 *
 ***********************************************************************/

/* The method is declared with the goc keyword @method. This is followed by
 * the name of the class that knows how to handle the message (in this case,
 * the class is HelloProcessClass). Finally, the name of the message that
 * invokes this method is specified. Other items may also be specified (such
 * as a routine name that can be used instead of a message), but these are not
 * required. */
@method HelloProcessClass, MSG_META_EXPOSED {

    /* The local variable gstate will hold a GState handle. We will do
     * our drawing to this gstate. */
    GStateHandle gstate;

    /* Get a new, default graphics state that we can use while drawing.
     * We must allocate a new graphics state for the View window using
     * the kernel routine GrCreateState(). We pass the window handle of
     * the View window, which we received in a parameter called "win". */

    gstate = GrCreateState(win);

    /* Next, start a window update. This tells the windowing system that
     * we are in the process of drawing to this window. This is very
     * important-it ensures the window will be in a consistent state while
     * we're drawing. Specifically, it locks in the invalidated region to
     * which we'll be drawing; this makes sure that other threads drawing
     * to this window will not have any effect on our GState. A window
     * update is started by calling the kernel routine GrBeginUpdate()
     * with the GState handle. */

    GrBeginUpdate(gstate);

    /* If we had background graphics to draw, we could call the appropriate
     * graphics routines now. But we don't. */

    /* Draw our text into the window (pass the GState). This is done here
     * by calling the function HelloDrawText(), which knows how to draw
     * the appropriate document. (See below.) */

    HelloDrawText(gstate);              /* Special Hello World routine (below). */

    /* Now end the window update (unlock the GState and its window)
     * with the routine GrEndUpdate(), and free the GState handle by calling
     * the kernel routine GrDestroyState(). */

    GrEndUpdate(gstate);                /* Signal that we are done with
                                 * the window update. */
    GrDestroyState(gstate);             /* Destroy the temporary GState. */
}

/***********************************************************************
 * MSG_HELLO_REDRAW_DOCUMENT for HelloProcessClass
 ***********************************************************************
 * SYNOPSIS:            Force the document to be redrawn by marking the
 *              entire document area in the view as invalid.
 * PARAMETERS:          void (void)
 * SIDE EFFECTS:                Any drawing to the document area between this
 *              message and the MSG_META_EXPOSED that it generates
 *              will not show up, as the entire window will be invalid.
 *
 ***********************************************************************/

@method HelloProcessClass, MSG_HELLO_REDRAW_DOCUMENT
{

    /* Now create a temporary GState to use for window invalidation
     * if the window handle is valid, then redraw the window. */
    if (winHan != 0) {
        GStateHandle gstate = GrCreateState(winHan);
        /* Call GrInvalRect using the GState. Invalidate the entire
         * document. This will cause the View to redraw itself and send
         * a MSG_META_EXPOSED to the Process object. */
        GrInvalRect(gstate, 0, 0, HORIZ_DOC_SIZE, VERT_DOC_SIZE);
        GrDestroyState(gstate);         /* Free the GState. */
    }
}

/***********************************************************************
 * HelloDrawText
 ***********************************************************************
 * SYNOPSIS:            Draw a single line of text onto the document. Note
 *              that it has no concept of the screen or the view --
 *              it is given a graphics state and draws through it.
 * CALLED BY:           (INTERNAL) HelloProcess::MSG_META_EXPOSED
 * RETURN:              nothing
 * SIDE EFFECTS:                attributes in the gstate are altered
 *
 * STRATEGY:            We separate the drawing from the exposure handler
 *              so the same routine can be used for both window
 *              refresh and for printing.
 *
 *              Set the font, point size and color, then draw the text.
 *
 ***********************************************************************/

/* Functions are declared as they would be in C. Parameters are defined using
 * the ANSI calling convention: The type of the parameter is given, followed
 * by the parameter name. Multiple parameters are separated by commas. This
 * function has a single parameter. */

void HelloDrawText(GStateHandle gstate) {

    /* First change some of the default GState values such as the font
     * and point size. This is done with the routine GrSetFont(). */
    GrSetFont(gstate, FID_DTC_URW_ROMAN, MakeWWFixed(TEXT_POINT_SIZE));

    /* Set the text color to the value in helloTextColor by calling the
     * graphics routine GrSetTextColor(). */
    GrSetTextColor(gstate, CF_INDEX, helloTextColor, 0, 0);

    /* Draw the text onto the document by using the GrDrawText() routine. */
    GrDrawText(gstate, TEXT_X_POSITION, TEXT_Y_POSITION,
                        "Welcome to GEOS!", 0);
}
4.4.4.3 Handling Messages from the Triggers
When the user clicks on one of the two triggers in the Color dialog box, the pressed trigger sends off a message to the Hello World Process object. The Blue trigger sends MSG_HELLO_CHANGE_TO_BLUE, and the Gold trigger sends MSG_HELLO_CHANGE_TO_GOLD. The Process object must be able to handle both of these messages.
The methods that handle these messages are similar. Each sets the global variable helloTextColor, and each forces the view window to redraw itself (by sending MSG_HELLO_REDRAW_DOCUMENT to the Process) so the color is changed on the screen as well as in our variable. Code Display 4-11 shows the code and comments of both these methods.
Code Display 4-11 Handlers for MSG_HELLO_-
This display is part of hello3.goc and follows the previous display directly.

/***********************************************************************
 * MSG_HELLO_CHANGE_TO_BLUE for HelloProcessClass
 ***********************************************************************
 * SYNOPSIS:            Set the text color to dark blue and redraw the text.
 * PARAMETERS:          void (void)
 * SIDE EFFECTS:                helloTextColor is set to C_BLUE
 *
 ***********************************************************************/

@method HelloProcessClass, MSG_HELLO_CHANGE_TO_BLUE {
    helloTextColor = C_BLUE;    /* Set the helloTextColor variable to blue. */
    @call self::MSG_HELLO_REDRAW_DOCUMENT();
}

/***********************************************************************
 * MSG_HELLO_CHANGE_TO_GOLD for HelloProcessClass
 ***********************************************************************
 * SYNOPSIS:            Set the text color to yellow and redraw the text.
 * PARAMETERS:          void (void)
 * SIDE EFFECTS:                helloTextColor is set to C_YELLOW
 *
 ***********************************************************************/

@method HelloProcessClass, MSG_HELLO_CHANGE_TO_GOLD
{
    helloTextColor = C_YELLOW; /* Set the helloTextColor variable to gold. */
    @call self::MSG_HELLO_REDRAW_DOCUMENT();
}
4.5 Exercises and Suggestions
After studying the Hello World sample application and reading the System Architecture chapter, you may be ready to try some exercises before embarking on your application. It is strongly suggested that you spend some time modifying the Hello World program to get used to the programming environment and the Goc UI definition syntax. Some things you might try are outlined below-some are extremely easy; some are more difficult. Some will require you to read other chapters in this and the User Interface manual. In any case, you should go on to read “GEOS Programming”, Chapter 5, to understand the various keywords and constructs of the Goc programming language.
Some simple UI exercises you can incorporate into the Hello World program include the following suggestions:
Add a new menu item that brings up a dialog box letting the user select a point size for the text. In the dialog box you would use a GenValue object or perhaps a list of point sizes (or even one or more triggers) to take the user’s input. The GenValue sends out a message with a new number when the user sets it, and your Process object would handle this message and set the point size. Your HelloDrawText() routine would then have to set the point size of the text as well as the color.
Add a feature that lets the user set the position and/or rotation of the text. This exercise will help you get used to the GEOS coordinate space.
Make HelloView scalable. To do this, you will create a new menu or dialog box that lets the user specify the scale. Most likely you will create a number of GenTriggers that apply a pre-specified scale; each of these triggers will send MSG_GEN_VIEW_SET_SCALE_FACTOR to HelloView. You may even try using a GenViewControlClass object.
Add background graphics to get used to the coordinate system. Perhaps draw a colored rectangle behind the text that changes colors to be the inverse of the text (i.e. when the text turns blue, the rectangle turns yellow).
Add printing. This is not nearly as difficult as you might think. To do this, you should read “The Spool Library,” Chapter 17 of the Object Reference Book, about the spooler and the spool control object. This exercise essentially consists of adding a trigger to invoke printing and a message handler for the printing message. This handler will create a printing GState and call the drawing routine. Instead of drawing to the screen, it draws to the Spooler’s input.
Some of the exercises may have been implemented in the sample programs provided. You should look through the samples for insight into how the exercises may be completed. You are also encouraged to make up your own exercises to build on Hello World.
If you are new to GEOS programming, you should work through the Tutorial; otherwise, you will likely be overwhelmed by the complexity and depth of the system and not know where to begin.
System Architecture <– table of contents –> Geos Programming