11 Input
Nearly all applications will in some way handle user input. User input can come from a keyboard, a mouse, or a stylus. (Other types of input are generally considered data input.) For the most part, GEOS hides the actual mechanics of input from the application; at the same time, it allows extreme flexibility of input handling.
Input to generic UI objects is handled by these objects-unless you have very specific needs and will subclass a generic gadget, you can leave its input handling up to GEOS. The same is true with most specialized system-provided objects such as the GrObj, the VisText, the Spreadsheet, and others. Other objects (such as basic visible objects you subclass yourself) will need more attention depending on the behavior you want them to have.
Read this chapter if your application will handle user input. Before reading this chapter, however, you should be relatively familiar with the GEOS system architecture, Goc syntax, and the GEOS object model and message passing. It is also suggested that you spend some time programming with generic and visible objects and getting used to the rest of the system before handling input events.
11.1 Input Flow
User input must flow in an orderly way from the user’s device to the proper GEOS object. In a multithreaded environment, just determining the appropriate input recipient can be a monumental task.
GEOS uses several layers of indirection to process user input and to distribute it to its proper destination so applications don’t have to. The scheme used not only isolates applications from dealing with devices directly, but it provides convenient and easy ways to control input flow, both within an application and throughout the entire system.
Figure 11-1 shows the flow of input from the user’s device to its destination. User input is managed primarily by device drivers acting in concert with the UI, and several threads are involved in the input flow. For example, the kernel provides a thread solely for input management that has a high priority; this insures that the pointer image always moves immediately with the mouse.
Input is registered by a device such as a keyboard, stylus, or mouse. The device sends signals to GEOS device drivers, which take the signals and translate them into raw input messages the UI understands. These raw messages are translated by the UI’s Input Manager, which refines the events even further. The Input Manager then sends the events on to the topmost UI object in the system, the GenSystem object.
The GenSystem examines the events and their contexts and determines which window or application should receive them. Typically, events you will be interested in will flow from the GenSystem through your GenApplication object, its GenPrimary window, and finally through the appropriate GenView or GenDisplay. These window objects will pass the event on to a visible tree (through a VisContent), which will handle the events.

Figure 11-1 Input Flow
A device driver translates input signals and passes raw events to the Input Manager, which refines them and passes them to the GenSystem object. The GenSystem passes them to the active application object, which then dispatches them to the appropriate window or object.
It is highly unlikely you will ever need to know anything about an input event before it gets to your GenApplication object. Typically, you will only handle mouse, pen, or keyboard events in custom visible objects and can ignore them in all other cases.
Input events take the form of standard GEOS messages. These messages are defined by the UI but are actually part of MetaClass (they are allocated in MetaClass and exported to the UI). The reference entries for these events can therefore be found under MetaClass (see “System Classes,” Chapter 1 of the Object Reference Book).
Input events give information about the type of event (e.g. a mouse event), the action taking place (e.g. the right mouse button was pressed), and additional information (e.g. the location of the mouse at the time). Each device has its own set of events-for example, keyboard presses induce MSG_META_KBD_CHAR, and mouse moves induce MSG_META_MOUSE_PTR.
11.1.1 Devices and Drivers
GEOS supports a number of input devices through the use of device drivers. The basic GEOS system software supports mouse, keyboard, and stylus input. Other input devices may be supported by the system software in the future by the addition of new device drivers. Other devices may provide data input in one form or another-a scanner, for example-but these devices are not considered user input devices. These are considered data input devices and do not generate input events through the Input Manager.
The use of device drivers isolates your application and libraries from the specifics of the user’s machine. GEOS includes drivers for most mice and keyboards (pen input uses a derivative of the mouse drivers), and drivers for new hardware may be added without requiring changes to your application.
A device driver takes raw input signals from the input device and translates it into raw input events that the Input Manager will understand. Your objects will never receive these events; they are only sent to the Input Manager for translation into pointer, button, or keyboard events.
11.1.2 Input Manager and GenSystem
The Input Manager is part of the User Interface and primarily assesses input events in the context of the system. It takes a raw input event from the device driver, passes it through various pre-set monitors (for the UI), and then adds contextual information if necessary. The Input Manager passes the refined input event on to the topmost system object, the GenSystem object.
The GenSystem object determines where the event should be passed. Typically, it will send the event on to whichever application is designated as the active application.
11.1.3 Input Events
GEOS uses three basic types of input events. These three types make up all the events necessary for mouse, keyboard, and pen input. They are pointer events, button events, and keyboard events.
Pointer and button events deal with mouse and pen input. Keyboard events provide keyboard key press information. Pointer and button events are often referred to as “mouse” events and are dealt with together because most objects interested in one type will also be interested in the other.
A Pointer event details motion of the mouse pointer. If the user moves the mouse, a MSG_META_MOUSE_PTR will be generated by the Input Manager and sent to the proper application. The type of pointer event (not always MSG_META_MOUSE_PTR) is affected by the current keyboard state, mouse state, and other context information.
A Button event details the press or release of a particular mouse button. Because different Specific UIs have different meanings for each mouse button, the function of the button determines which message is sent out. In the OSF/Motif specific UI, the left mouse button is used for selection; therefore, presses on that button cause MSG_META_START_SELECT, and releases cause MSG_META_END_SELECT. The exact message sent out, like pointer events, can also be affected by input state information.
Mouse events also carry with them several flags indicating various statistics about the event: whether the click is actually a double-click, whether any keys on the keyboard are being held down, etc.
A keyboard event details the press or release of a particular key on the user’s keyboard. Usually, objects interested in keyboard events will only be interested in presses and can ignore releases. MSG_META_KBD_CHAR is the basic keyboard event, and it carries flags detailing the state of the various modifier keys (e.g. Shift, Ctrl, Alt, NumLock). This message is always sent to the current focus.
Pen input comes in the form of a special data structure called Ink. Ink input is instigated in the same manner as button events, but it is handled in a completely separate manner. An object expecting Ink input must be aware when Ink events are being passed as opposed to normal mouse events. Special flags are used for this; see section 11.4.
11.1.4 Input Hierarchies
Because the entire User Interface of GEOS is implemented as a hierarchy (tree) of objects, input messages naturally flow from the topmost object in the tree down to the object that should receive the input. At each level in the tree, the object decides whether to handle the event or pass it on to one of its children. Typically, the event will be passed all the way down the tree to a leaf node, where it will be handled or ignored.
To simplify and shorten this process, the UI maintains several special hierarchical input flow channels where special input should always flow. These hierarchies include the focus, the target, and the model. All three are described in full in section 11.5.
The Focus is the object that should receive all keyboard events. For example, a modal dialog box always has the focus; if the user presses Enter, the dialog box will take its default action. A text object into which the user is typing has the focus as long as the user does not click outside its bounds.
The Target is what is selected by the user: the object on which actions should be performed. Controller objects (of GenControlClass) typically operate on the target. An example is a text object with selected text. When you set the text’s style using a menu item (a style control object), that menu item sends its message to the current target object. The text object, set as the current Target, receives the message and sets the style of the selection.
An object is said to “have the focus” or “have the target” if it is the object specified by the hierarchy to receive that type of input. The system provides special travel options to allow you to send messages directly to the focus or target without knowing in advance which object is the destination.
The Model represents the non-visible model of the application’s data. For example, a secondary selection in a database will not be acted on like the normal target, but it may still need to have similar properties. The Model hierarchy can be used to maintain this type of secondary or non-visible selection.
11.2 Mouse Input
GEOS is built around the user’s use of a mouse for most input. Although the system has extensive keyboard navigation capabilities, the mouse is still the preferred input tool for a GUI. Therefore, most applications will in some way accept and handle mouse input directly.
Typically, you will handle mouse input if you are using visible objects (VisClass, etc.) that will react to the mouse. If you are using only generic objects in your application, you will not need to handle mouse events.
Mouse input comes in the form of pointer and button events. Each event describes the mouse’s location, the type of event (move, button press, etc.), whether any buttons on the mouse are pressed, and whether any modifier keys on the keyboard are pressed.
Objects can “grab” the mouse exclusive, taking all mouse events for themselves. This is useful when one object needs to get all mouse input for a period of time; when it no longer needs all mouse input, it releases the exclusive. Mouse events are dispatched directly to whichever object has the “active grab” (the exclusive).
If no object has the active grab, the event will be passed to the application under the pointer. The application will pass the event to the window or GenView under the pointer, and the window or view will pass it to its content. If the view displays a visible tree, the event will eventually reach the visible object under the mouse pointer, where it should be handled. Thus, the object under the mouse pointer is said to have the “implied grab.”
The default behavior of the VisContent (passing the event to its first child with the appropriate bounds) is adequate for most input needs. If you are using large documents or visible layers, you will have to subclass the VisContent to handle these special cases.
11.2.1 Mouse Events
Each time the user moves the mouse or clicks a mouse button, GEOS generates a mouse event and passes it to the proper object. Mouse events are actually MetaClass messages that any object may intercept. Default handlers for these messages typically do nothing, so if you do not handle a particular event, it will likely be ignored.
GEOS uses three basic types of mouse events: button, pointer, and drag events. Button events indicate when the user has either pressed or released any mouse button (double-clicks are considered button events). Pointer events indicate that the mouse has been moved. Drag events indicate the user has clicked and dragged the mouse. All of these types pass information about the mouse context and the operations currently in progress.
The Input Manager checks both the button state and the mouse movement before deciding on an event’s type. For example, it the user clicks twice quickly, the Input Manager decides whether the user intended a double-click or a click-move-click. Objects receiving the events do not have to differentiate between the two; the events automatically contain the required information.
Pointer events are fairly straightforward; when the mouse is moved, the Input Manager generates the proper MSG_META_MOUSE_PTR indicating the move. This message also indicates the state of the mouse buttons and keyboard modifier keys.
Button events are quite a bit more complex. With each button press or release, the Input Manager generates a MSG_META_MOUSE_BUTTON which gets translated into the proper press/release/drag event before being passed on to the application. The final message generated depends on which button was pressed, whether large graphics coordinates are being used, and whether the event is being sent pre-passive or post-passive.
Among button events, there are two basic types: the press and the release. All press events are of the form MSG_META_START_-, and all release events are of the form MSG_META_END_-. The last portion of the message name is the function of the button pressed or released. The various buttons are referred to by their meaning to the Specific UI, as follows:
SELECT
The button used for making selections. In OSF/Motif and many other Specific UIs, this is the left mouse button.
MOVE_COPY
The button used for quick-copies and quick-moves of data. In OSF/Motif, this is the right mouse button. For single-button mice, a key sequence plus a mouse click is often used.
FEATURES
The button used to bring up a “features” pop-up menu or dialog box. In some Specific UIs, this is the middle or the right mouse button. For single- or two-button mice, a key sequence plus a mouse click is often used.
OTHER
Any button not designated one of the three categories above. This category can also be used to indicate when the user presses more than one button at time (often referred to as “chording”).
A press event indicates the user pressed down on the particular button. A release event indicates the user released the button. If the user presses a button and moves the mouse, a drag event will be sent after the initial press event. If the user double-clicks, a special flag will be sent with a single press event; it is up to the application to handle double-clicks differently.
Drag events are of the form MSG_META_DRAG_-, similar to button events. Each of the above button types has a corresponding drag message. If the user presses a mouse button and quickly moves the mouse more than a specified distance, or if he holds a particular mouse button down more than a specified time, the Input Manager will send a drag event after the press event. A single release event signifies the user released the mouse button, just as with normal presses.
There is also a complete set of events used for large documents. If an object has large bounds, or if a GenView is set up to display a large content, large mouse events will be generated instead of normal mouse events. Large events take the form MSG_META_LARGE_-. For example, the large version of MSG_META_MOUSE_PTR is MSG_META_LARGE_PTR.
Below are listed all the standard mouse events your objects may be interested in handling. Most objects will be interested in only a small subset of these.
MSG_META_MOUSE_PTR
The standard pointer event, generated whenever the mouse moves without a button down.
MSG_META_START_SELECT
Generated when the user presses the select button.
MSG_META_END_SELECT
Generated when the user releases the select button.
MSG_META_START_MOVE_COPY
Generated when the user presses the move/copy button.
MSG_META_END_MOVE_COPY
Generated when the user releases the move/copy button.
MSG_META_START_FEATURES
Generated when the user presses the features button.
MSG_META_END_FEATURES
Generated when the user releases the features button.
MSG_META_START_OTHER
Generated when the user presses a button combination not recognized as select, move/copy, or features.
MSG_META_END_OTHER
Generated at the release of the combination that generated the MSG_META_START_OTHER.
MSG_META_DRAG_SELECT
Generated between a press and release of the select button if the user holds the button down or if the user moves the mouse.
MSG_META_DRAG_MOVE_COPY
Generated between a press and release of the move/copy button if the user holds the button down or if the user moves the mouse.
MSG_META_DRAG_FEATURES
Generated between a press and release of the features button if the user holds the button down or if the user moves the mouse.
MSG_META_DRAG_OTHER
Generated between a press and release of a button not specified above if the user holds it down or if the user moves the mouse.
Listed below are the large equivalents of the above messages.
MSG_META_LARGE_PTR
MSG_META_LARGE_START_SELECT
MSG_META_LARGE_END_SELECT
MSG_META_LARGE_START_MOVE_COPY
MSG_META_LARGE_END_MOVE_COPY
MSG_META_LARGE_START_FEATURES
MSG_META_LARGE_END_FEATURES
MSG_META_LARGE_START_OTHER
MSG_META_LARGE_END_OTHER
MSG_META_LARGE_DRAG_SELECT
MSG_META_LARGE_DRAG_MOVE_COPY
MSG_META_LARGE_DRAG_FEATURES
MSG_META_LARGE_DRAG_OTHER
All the normal (as opposed to large) mouse events pass and return the same values. Each event differs based on the message itself; an object knows that MSG_META_START_SELECT is inherently different from MSG_META_START_MOVE_COPY, even though they may pass the exact same values.
11.2.1.1 Structure of Mouse Events
Each mouse event passes three items of data and one pointer to a return structure. The three parameters are listed below; the fourth, the return structure, is detailed in the next section.
xPosition
The horizontal position of the pointer in document coordinates in the window when the event was generated.
yPosition
The vertical position of the pointer in document coordinates in the window when the event was generated.
inputState
A word of flags indicating the state of the mouse buttons and the UI functions (such as quick-transfer) that were active when the event was generated.
The first two indicate the position of the mouse in the document. The third, inputState, consists of two bytes of flags. The first byte indicates the type of button event and the state of the mouse buttons during the event. It is a record of type ButtonInfo and has seven flags:
BI_PRESS
Set if this is a press event rather than a release or drag.
BI_DOUBLE_PRESS
Set if this is actually a double-press (GEOS automatically detects double presses).
BI_B3_DOWN
Set if button number three is being held down.
BI_B2_DOWN
Set if button number two is being held down.
BI_B1_DOWN
Set if button number one is being held down.
BI_B0_DOWN
Set if button number zero is being held down.
BI_BUTTON
Set if this is a button event, clear if a pointer event.
The second byte of inputState is a record of UIFunctionsActive, which describes which of several UI functions are currently underway. The flags set in this byte are used primarily by the UI, and you will probably not have to check them. The flags allowed, however, are listed below.
UIFA_SELECT
Set if the basic mouse function is underway.
UIFA_MOVE_COPY
Set if a move/copy (quick-transfer) operation is underway.
UIFA_FEATURES
Set if the features popup menu or dialog is open.
UIFA_CONSTRAIN
Set if a modifier key set as a “constraint” key is pressed (e.g. the user holds the shift key while grabbing an object control point).
UIFA_ADJUST
This is the same bit as UIFA_MOVE and UIFA_POPUP, below. When UIFA_SELECT is also set, this flag indicates that the select event should act as a toggle event.
UIFA_EXTEND
This is the same bit as UIFA_COPY and UIFA_PAN, below. When UIFA_SELECT is also set, this flag indicates that the select event should extend any selection already made (add the area/objects to the current selection).
UIFA_MOVE
This is the same bit as UIFA_ADJUST and UIFA_POPUP. When UIFA_MOVE_COPY is also set, this flag indicates that the operation should be considered a move rather than a copy.
UIFA_COPY
This is the same bit as UIFA_EXTEND and UIFA_PAN. When UIFA_MOVE_COPY is also set, this flag indicates the operation should be considered a copy rather than a move.
UIFA_POPUP
This is the same bit as UIFA_ADJUST and UIFA_MOVE, above. When UIFA_FEATURES is also set, this flag indicates the “features” button brings up a popup menu or dialog box.
UIFA_PAN
This is the same bit as UIFA_EXTEND and UIFA_COPY, above. When UIFA_FEATURES is also set, this flag indicates the “features” button has initiated pan-style scrolling.
11.2.1.2 Return Values for Mouse Events
One of the parameters of every mouse event is a pointer to a MouseReturnParams structure. This structure is passed empty; it is up to the event handler to fill it with the proper return values. The MouseReturnParams structure’s definition is given below:
typedef struct {
    word                unused;  /* for alignment */
    MouseReturnFlags    flags;
    optr                ptrImage;
} MouseReturnParams;
Every time you handle a mouse event, you must fill in the flags field. This describes how the event was handled so the UI knows whether to pass it on to another object, change the pointer image, or treat the event as having been handled. The flags you can return are
MRF_PROCESSED
The event was handled. If you do not set this flag upon return, the window will think the event was not handled and may pass it on to another child.
MRF_REPLAY
The event may or may not have been handled, but it should be rebroadcast as if it had not been. This is used primarily when an object gives up the mouse grab because the mouse has strayed outside its bounds.
MRF_PREVENT_PASS_THROUGH
The event should not be passed through to the active or implied grab object. This is set only by pre-passive handlers which want to filter the event and keep the active or implied grabs from receiving it.
MRF_SET_POINTER_IMAGE
The pointer should be set to a new image. If this flag is returned, you must also return an optr in the ptrImage field (see below).
MRF_CLEAR_POINTER_IMAGE
The pointer image will be reset to the default. See “Setting the Pointer Image”.
If you return MRF_SET_POINTER_IMAGE, you must specify the new image to be set. An object may want to set the pointer to a new image when it is over the object’s bounds or during a drag operation. For example, if the user selects a drawing tool, the tool might set the pointer to cross-hairs instead of the default arrow.
To set the pointer’s image, you must return the handle and chunk handle of a chunk containing a PointerDef structure. Return it in the form of an optr in the ptrImage field of the return structure. For full information on PointerDef and defining pointer images, see section 11.2.4.
If you are not setting the pointer image, return a NullOptr in ptrImage. You do not have to return anything in the unused field.
11.2.2 Gaining the Mouse Grab
When no object has the active mouse grab, mouse events are passed to whichever object is directly under the pointer’s image. If any object has the grab, however, mouse events will be passed only to the object with the grab, no matter where the pointer is on the screen.
When the user clicks inside a view, the GenView automatically grabs the mouse while the user holds the mouse button down. This allows the view to know when drag scrolling takes place (the user drags the pointer outside the view’s bounds, but the mouse event is still passed to the GenView). Process objects acting as a GenView’s content therefore do not have to worry about grabbing the mouse. If you are displaying visible objects within the GenView, however, your objects will likely want to grab the mouse for themselves.
Typically, a visible object will grab the mouse on a MSG_META_START_- event and release it on a MSG_META_END_- event. To grab the mouse, a visible object has to send itself the message MSG_VIS_GRAB_MOUSE; to release the grab, it must send itself MSG_VIS_RELEASE_MOUSE.
The TicTac sample application shows an example of visible objects grabbing the mouse and handling several mouse events. This sample application is described in detail in “The GEOS User Interface,” Chapter 10.
There are two other types of mouse grabs besides the active grab. With very rare exceptions, application programmers can ignore these. They are the pre-passive and post-passive grabs.
If an object has a pre-passive grab, it will receive copies of all button events before the events are passed on to their true destinations. Pre-passive grabs are used by window objects to bring themselves to the front when the user clicks in them. Any number of objects may have pre-passive grabs. To gain a pre-passive grab, a visible object must send itself MSG_VIS_ADD_BUTTON_PRE_PASSIVE; to release it, the object must send itself MSG_VIS_REMOVE_BUTTON_PRE_PASSIVE.
If an object has a post-passive grab, it will receive copies of all button events after the events have been handled. Any number of objects may have post-passive grabs. To gain a post-passive grab, a visible object must send itself MSG_VIS_ADD_BUTTON_POST_PASSIVE; to release the grab, the object must send itself MSG_VIS_REMOVE_BUTTON_POST_PASSIVE.
GEOS uses different messages to indicate that the event is a pre-passive or a post-passive event. All the normal button events have pre-passive and post-passive counterparts which take the form MSG_META_PRE_PASSIVE_- and MSG_META_POST_PASSIVE_-. For example, the pre-passive version of MSG_META_START_SELECT is MSG_META_PRE_PASSIVE_START_SELECT.
Below are listed the pre-passive equivalents of the above messages. Note that the drag events and large events do not have pre-passive equivalents.
MSG_META_PRE_PASSIVE_START_SELECT
MSG_META_PRE_PASSIVE_END_SELECT
MSG_META_PRE_PASSIVE_START_MOVE_COPY
MSG_META_PRE_PASSIVE_END_MOVE_COPY
MSG_META_PRE_PASSIVE_START_FEATURES
MSG_META_PRE_PASSIVE_END_FEATURES
MSG_META_PRE_PASSIVE_START_OTHER
MSG_META_PRE_PASSIVE_END_OTHER
Listed below are the post-passive equivalents of the above messages. Note that the drag events and large events do not have post-passive equivalents.
MSG_META_POST_PASSIVE_START_SELECT
MSG_META_POST_PASSIVE_END_SELECT
MSG_META_POST_PASSIVE_START_ADJUST
MSG_META_POST_PASSIVE_END_MOVE_COPY
MSG_META_POST_PASSIVE_START_FEATURES
MSG_META_POST_PASSIVE_END_FEATURES
MSG_META_POST_PASSIVE_START_OTHER
MSG_META_POST_PASSIVE_END_OTHER
11.2.3 Large Mouse Events
Applications and visible objects that use large documents (32-bit coordinate spaces) receive special versions of the mouse input messages. These special messages pass the pointer position differently; otherwise, they pass the same flags as passed by their normal counterparts.
Large mouse messages take the form MSG_META_LARGE_-. There is one large mouse event for each of the normal pointer, button, and drag events; note, however, that no large events exist for pre-passive or post-passive grabs. For the full list of large mouse events, see section 11.2.1.”Mouse Events”.
One special note about large events: Any object that handles large mouse events should also be prepared to handle normal mouse events. The visible parent of the large object can only send out one type (large or normal) of event at a time to its children; if it has any normal children at all, it will send out the normal event. If the large object should handle the normal event and doesn’t, the event will be lost or passed on to another child.
For full information on handling large mouse events within a visible object tree, see “VisClass,” Chapter 23 of the Object Reference Book. (This information also applies to Process objects acting as the contents of GenViews.)
11.2.4 Setting the Pointer Image
The GEOS User Interface uses several default settings for the mouse pointer, all defined by the Specific UI.
Some applications will want to modify the mouse pointer’s image in order to provide certain feedback to the user. For example, a chess game may set the pointer to an image of the piece being moved and then reset it to an arrow after the move is completed; a graphics application could set the pointer to an image of whatever tool is currently in use. Another time an application may change the mouse pointer is when a quick-transfer is in progress.
11.2.4.1 Defining the Pointer Image
The pointer is defined as a bitmap 16 pixels on each side. It has a “hot spot” of five pixels that acts as the active point of the image. When the user clicks, the area affected is the hot spot, not the entire image. See Figure 11-2 for a diagram of the pointer and the hot spot.
The pointer is stored in a PointerDef16 structure. This structure defines the image bitmap, the horizontal and vertical offsets to the hot spot, and the definition of how the image should mix with the background. This definition is known as the pointer’s mask; how it affects the image is shown in Table 11-1.
The definition of PointerDef16 is given below. When setting the pointer image, you will typically pass an optr (a combination handle and chunk handle) to a PointerDef16 structure; the structure can be set up in a sharable chunk beforehand, or it can be set in a local or global variable. Typically, you will set the entire pointer image in a resource chunk and compile it into your geode; this is much easier and faster to use than building it at run-time.
typedef struct {
        byte       PD_width;
        byte       PD_height;
        sbyte      PD_hotX;
        sbyte      PD_hotY;
        byte       PD_mask[STANDARD_CURSOR_IMAGE_SIZE];
        byte       PD_image[STANDARD_CURSOR_IMAGE_SIZE];
} PointerDef16;
The PD_hotX field defines the horizontal offset from the upper-left corner of the image to the center of the hot spot. Similarly, PD_hotY defines the vertical offset from the upper-left corner to the hot spot. Both are in pixels and must be less than 16 (since the image is only 16 pixels in each dimension).
The PD_mask field contains the 16 by 16 bitmap of the mask, while PD_image holds the bitmap of the image. Both are stored as 32-byte arrays, two bytes per row. For example, if the first line of the image was all black and the second all white, the first four bytes of PD_image would be 0xFF, 0xFF, 0x00, and 0x00.
Table 11-1 The Pointer Image Mask
| Image Pixel | Mask Pixel | Drawing Result |
|---|---|---|
| 0 | 0 | Screen Pixel Unchanged |
| 1 | 0 | Screen Pixel XOR Image Pixel |
| 0 | 1 | Screen Pixel drawn black |
| 1 | 1 | Screen Pixel drawn white |
The mask, applied to the image bitmap, results in the mixing behavior given for the screen pixel.
Note that the block the pointer chunk is stored in must be declared sharable.
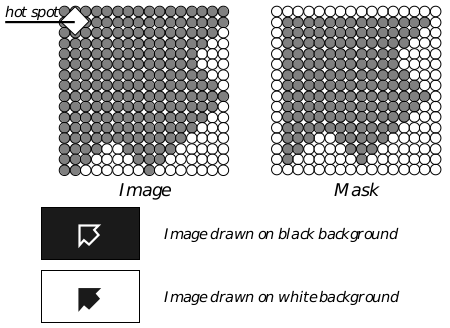
Figure 11-2 A Pointer Image and Its Mask
The mask determines how the image mixes with the background. The outline of the arrow is XORed with the background; the interior of the arrow is always drawn black.
11.2.4.2 Setting the Pointer Image
You can set the pointer’s image in three ways. First, you can send a message to the GenView to set the pointer image whenever the pointer is over the view’s window (see [“GenView,” Chapter 9 of the Object Reference Book] (../Objects.ogenvew.md)). Second, you can set the pointer to a default image type during a quick-transfer operation (see “The Clipboard,” Chapter 7). Third, you can set the pointer image after handling a mouse event. Only the third option is discussed here.
An object may wish to set the pointer image while it is selected, while the pointer is over its bounds, or in any number of other situations. For example, a chess piece currently being moved may set the pointer’s image to the shape of the piece so the user knows exactly what type of piece is being moved.
Every mouse event you handle must return a MouseReturnParams structure, defined in [“Return Values for Mouse Events”] (#11212-return-values-for-mouse-events). Make sure to return the following to set the pointer image:
MRF_SET_POINTER_IMAGE in flags
When the UI sees this flag in the returned structure, it looks for the address of a pointer definition in the ptrImage field. If you do not return this flag, the UI will not try to set the pointer.The optr of the pointer image in ptrImage
This field gives the handle and chunk handle of the PointerDef structure that defines the pointer image to be set. The structure must be in a sharable block; most likely you will have it set in a geode resource.
11.3 Keyboard Input
Keyboard input is scanned by a device driver and passed on to the Input Manager, just as mouse input is. The keyboard driver and Input Manager check the state of the modifier keys (shift, ctrl, alt, num lock, etc.) and parse each keypress as much as possible based on its context. Each keypress is called a keyboard event and is passed in MSG_META_KBD_CHAR.
11.3.1 Keyboard Input Flow
Each time the user presses a character (with or without modifier keys) on the keyboard, the Input Manager generates a single keyboard event and passes it to the GenSystem object. The GenSystem object delivers the event to all the proper objects based on passive grabs (if any) and the current focus hierarchy.
As with mouse events, all keyboard events are passed down the object hierarchy from the GenSystem object through an application’s GenApplication object and on down to a leaf object. When handling keyboard input, you can choose to intercept the events at the GenApplication level or at any node below it where the event should be handled.
Unlike with mouse input, there is no “implied grab” for keyboard input. Keyboard input is always passed to the object that has the focus (for information on the Focus hierarchy, see section 11.5.3). Therefore the focus is the keyboard’s “active grab.”
Objects can, however, set up passive grabs as they can with mouse input. A pre-passive grab allows the visible object to receive keyboard events before the focus object gets them. A post-passive grab delivers events to the visible object after they have been sent to the focus. For more information about gaining and releasing the passive keyboard grabs, see “VisClass,” Chapter 23 of the Object Reference Book.
If you intercept keyboard events, you must be sure to return any events that you don’t use. For example, if you only want to detect when the user hits the “a” key, you must return all keypresses that are not “a.” Otherwise, your MSG_META_KBD_CHAR handler will eat all keypresses, and keyboard menu navigation will not work. If intercepting keyboard events in a generic object, you can simply call the superclass for each unused character. If intercepting keyboard events in a visible object, you must send MSG_META_FUP_KBD_CHAR for each unused character.
To ensure that a particular object (for example, a specific GenText object) automatically will receive keyboard input, you must set HINT_DEFAULT_FOCUS for that object and all its parents up to the GenPrimary containing it. Otherwise, the generic UI does not know which object should gain the default focus.
11.3.2 Keyboard Events
Each keyboard event your application and objects receive has gone through preliminary parsing by the keyboard driver. Keyboard drivers are intelligent enough to know several things about different types of keystrokes depending on the character set and the modifier keys held down.
All keyboard events pass two sets of information: the current character as interpreted by the keyboard driver, and the actual scan code of the character pressed. This allows you to do additional parsing or to ignore any extraneous information about the keypress that may have been included by the driver.
For example, if the user presses ctrl-1, the keyboard driver passes on the character “1” with a flag indicating the control key was pressed. If the user presses shift-1, the keyboard driver passes on the “!” character without a flag indicating the shift key is pressed (the shift key is eaten by the keyboard driver); in this case, it also passes on the scan code of the “1” key. If the user then presses ctrl-shift-1, different keyboard drivers may pass different characters. Whether the driver passes “1” or “!,” however, the scan code for the “1” key will also be passed.
The keyboard driver also understands special “extended” keypresses and “temporary accents”. Some keyboard drivers may use two keystrokes to specify special characters; for example, some keyboard drivers may require the \F6 character to be entered as “ctrl-q o” (this is called an extended keypress), and some may require it to be entered as two separate keys: the “o” and the umlaut (this is called a temporary accent).
In addition to the actual character and the scan code, every keyboard event gives flags indicating the state of the modifier keys (ctrl, alt, shift), the state of the toggle keys (caps lock, num lock, etc.), and what type of event it is (first press, repeated press, release, or first press of an extended sequence).
Standard keyboard events come in MSG_META_KBD_CHAR. This message has the same parameters and return values as its pre-passive and post-passive counterparts, MSG_META_PRE_PASSIVE_KBD_CHAR and MSG_META_POST_PASSIVE_KBD_CHAR. The parameters are listed below:
character
The character value determined by the keyboard driver and Input Manager.
flags
A word value: The high byte is a record of ShiftState detailing the modifier keys pressed, and the low byte is a record of CharFlags giving information about the type of character passed. Both of these records are detailed below.
state
A word value: The high byte is the scan code of the key pressed (without modifiers), and the low byte is a record of ToggleState detailing the state of the toggle keys. ToggleState is detailed below.
Three different records of flags define the keyboard event. The ShiftState record describes which modifier keys are pressed and has the following flags:
SS_LALT
The left Alt key is pressed.
SS_RALT
The right Alt key is pressed.
SS_LCTRL
The left Ctrl key is pressed.
SS_RCTRL
The right Ctrl key is pressed.
SS_LSHIFT
The left Shift key is pressed.
SS_RSHIFT
The right Shift key is pressed.
SS_FIRE_BUTTON_1
The first joystick-style “fire button” (if any) is pressed.
SS_FIRE_BUTTON_2
The second joystick-style “fire button” (if any) is pressed.
The ToggleState record describes which toggle keys are currently active. It has the following flags.
TS_CAPSLOCK
The Caps Lock is set.
TS_NUMLOCK
The Num Lock is set.
TS_SCROLLLOCK
The Scroll Lock is set.
The CharFlags record contains several flags indicating whether this event is a first press, a release, a repeat press, or an extended or temporary character. Its flags are listed below.
CF_STATE_KEY
Set if either a ShiftState key or a ToggleState key is being pressed along with the passed character.
CF_EXTENDED
Set if this event is part of an extended keystroke. This flag is generally only used by the keyboard driver during its parsing; you will not have to use it. (Extended keypresses are passed by the Input Manager to your application as a single event with the resultant character, not as two events.)
CF_TEMP_ACCENT
Set if this event is part of a temporary accent keystroke. Temporary accents are used only by the keyboard driver, like extended keypresses above.
CF_FIRST_PRESS
Set if the event represents the user’s first press of the key. This is akin to a button press event and will, at some point, be followed by a CF_RELEASE event.
CF_REPEAT_PRESS
Set if the event is generated by the user holding down the key (as opposed to a first press, above). If you want the user to hit the key for each individual character, you should ignore this type of event.
CF_RELEASE
Set if the user lets up on a key. Applications typically are not interested in these events for text, and they can automatically be ignored by setting GVA_DONT_SEND_KBD_RELEASES in your GenView’s instance data (this only affects handling keyboard events in visible objects).
A sample handler for MSG_META_KBD_CHAR is shown in Code Display 11-1. It is used by a visible object that simply increments one of its instance fields each time the greater-than key (>) is pressed.
Code Display 11-1 Sample MSG_META_KBD_CHAR Handler
/* This method is used by a visible object of MyVisObjClass. It takes all
 * occurrences of the greater-than (>) key and increments the object's MVOCI_data
 * instance field, ignoring when the user holds down the key. Also, the GenView
 * is set to pass along key releases as well as presses; the method must also
 * ignore releases.
 *
 * Note that the object will only get keyboard input when it has the focus. */

/* The format of this message is
 * void (word character, word flags, word state) */

@method MyVisObjClass, MSG_META_KBD_CHAR {

        /* First, check if the character is the one we want. */
    if (character == `>') {

        /* If it is, make sure the user is not holding the key down and
         * that this is not a release event. Check that CF_REPEAT_PRESS and
         * CF_RELEASE are not set in the low byte of the flags parameter.
         * If either is set, ignore the character and send MSG_META_FUP_KBD_CHAR
         * so the UI may provide default keyboard navigation. */

        if ((flags & CF_REPEAT_PRESS) || (flags & CF_RELEASE)) {
            @call self::MSG_META_FUP_KBD_CHAR(character, flags, state);
        } else {
            /* If we get here, we know the character is what we want. Increment
             * the instance field and return. */

            (pself->MVOCI_data)++;
        }

        /* If the character is not a greater-than, we must send it on to the UI
         * with MSG_META_FUP_KBD_CHAR. If we do not, all other keyboard presses
         * we receive will never be handled; this will cause keyboard
         * accelerators and menu navigation not to work. */
    } else {
        @call self::MSG_META_FUP_KBD_CHAR(character, flags, state);
    }
}
11.4 Pen Input and Ink
GEOS supports pen-based systems and applications by means of the Ink data structure formats. Ink is simply a standard way of representing raw pen input as a data structure.
At the lowest level, individual visible objects can receive Ink input directly, much like they receive mouse input normally. (In addition, the VisText object has some Ink handling and handwriting recognition built into it.)
The Pen Library exports InkClass, a visible object class which accepts and stores pen input. It stores the ink compactly. The ink object allows the pen to act as an eraser, removing part or all of a pen stroke, perhaps splitting some strokes in two. See “Pen Object Library,” Chapter 21 of the Object Reference Book for more information.
If GEOS is running on a pen-based system, it will set a particular flag in its private data. It will also install a special input monitor to alter the events the Input Manager receives from the device driver. The Input Manager and the UI then react to input events in a different manner and do not send them directly as with mouse events.
Because Ink events are not passed on immediately by the UI, the UI actually takes care of drawing them directly to the screen. This provides the user direct, immediate feedback.
11.4.1 Ink Data Structures
Ink input is stored in data blocks. The Input Manager stores up Ink events into a data block and then transfers the block to the proper window or application with MSG_META_NOTIFY_WITH_DATA_BLOCK. (This is a general change notification message.) The type of the data block passed is NT_INK, the manufacturer ID is MANUFACTURER_ID_GEOWORKS.
The data block is headed by an InkHeader structure (defined below). The header is followed by a list of points, all in screen coordinates (not points as with normal graphics commands). The block will contain as many points as are registered during the Ink input sequence.
The InkHeader structure has the following format:
typedef struct {
    word       IH_count;
    Rectangle  IH_bounds;
    optr       IH_destination;
    dword      IH_reserved;
    Point      IH_data;
} InkHeader;
The fields of the structure are listed below with the information they contain.
IH_count
The number of points stored in the data block.
IH_bounds
The bounds of the Ink input on the screen (in document coordinates).
IH_destination
The destination of the Ink input. An object can use this field to see if the Ink was sent directly to it or if it received the Ink simply due to an overlap.
IH_reserved
Internal data; do not use.
IH_data
Actually a label indicating the beginning of the list of points. Following this label will be a number of Point structures, each one detailing a single Ink point.
11.4.2 Ink Input Flow
When the Input Manager receives a button event, it checks to see if that event should be treated as Ink input. It first holds up input, putting the button event in the holdup queue, and then it queries the appropriate application with MSG_META_QUERY_IF_PRESS_IS_INK. Typically the application will pass the message down its object tree to the appropriate visible or generic object that should initially have received the button event.
11.4.2.1 Determining if a Press Is Ink
It is up to the application or its visible object to determine whether the input should be treated as Ink. If you don’t ever handle Ink, you do not need to do anything different. If any of your objects handles Ink, however, you should set up your GenView to pass Ink events on to its content. Depending how you set up your GenView, you may or may not have to write a handler for MSG_META_QUERY_IF_PRESS_IS_INK. The context and details of this message are described below.
To set up your GenView for passing Ink input, set the proper flag in its GVI_inkType instance field. The possible flags are detailed in full in “GenView,” Chapter 9 of the Object Reference Book but are reviewed below for convenience.
GVIT_PRESSES_ARE_NOT_INK
Objects running under this GenView never handle Ink input. This flag is set as the default. Your objects will not have to handle MSG_META_QUERY_IF_PRESS_IS_INK or MSG_VIS_QUERY_IF_OBJECT_HANDLES_INK.
GVIT_PRESSES_ARE_INK
Objects running under this GenView always want Ink input. Your objects will not have to handle the message MSG_META_QUERY_IF_PRESS_IS_INK, but they will have to handle MSG_VIS_QUERY_IF_OBJECT_HANDLES_INK.
GVIT_INK_WITH_STANDARD_OVERRIDE
Objects running under this GenView want Ink, but the user can override it to give mouse events. Your objects will not have to handle MSG_META_QUERY_IF_PRESS_IS_INK, but they will have to handle MSG_VIS_QUERY_IF_OBJECT_HANDLES_INK.
GVIT_QUERY_OUTPUT
The Objects running under this GenView want Ink input, but only under certain circumstances. Your objects will have to handle both MSG_META_QUERY_IF_PRESS_IS_INK and MSG_VIS_QUERY_IF_OBJECT_HANDLES_INK. Note that this option may cause the UI to query across threads, something that could cause performance lags on a busy system. Therefore, whenever possible, you should set one of the other three flags.
Depending on how you set up your GenView, you may need to subclass MSG_META_QUERY_IF_PRESS_IS_INK (see above). This message is sent by the Input Manager to see if the object clicked on can handle Ink input. Objects that handle Ink should return IRV_DESIRES_INK. (There is an analogous MSG_META_LARGE_QUERY_IF_PRESS_IS_INK for objects and contents using large documents.)
If the application sends the query message to a Process object acting as a view’s content, the Process object should not return a value. Instead, it should respond by sending MSG_GEN_APPLICATION_INK_QUERY_REPLY to its GenApplication object; the application object will then pass the appropriate value on to the Input Manager.
Some objects may want both Ink and mouse input; the VisText object is a good example of this-it accepts Ink for handwriting recognition mouse events for cursor movement and text selection. GEOS uses a convention for objects that want both types of input: quick-clicks and click-and-holds in the object are mouse events, but click-and-drags are Ink events.
To use both pen and mouse input, your object should return IRV_INK_WITH_STANDARD_OVERRIDE instead of IRV_DESIRES_INK in its MSG_META_QUERY_IF_PRESS_IS_INK handler. (Or if all objects running in the same GenView want this behavior, you can simply set the GenView’s GVIT_INK_WITH_STANDARD_OVERRIDE flag.)
11.4.2.2 Controlling the Ink
When an object requests Ink input by returning IRV_DESIRES_INK or IRV_INK_WITH_STANDARD_OVERRIDE, it must also specify the eventual destination of the Ink data block. Additionally, it can set any characteristics in a GState for the Ink-clipping area, drawing color, etc.
These specifics are set in an InkDestinationInfo structure set up by your MSG_META_QUERY_IF_PRESS_IS_INK handler (through a call to UserCreateInkDestinationInfo()); the handler for the routine returns the handle of a block containing the structure. Certain default values and behavior are implemented if you return a null handle or if you set the GenView flags to avoid the query (GVIT_PRESSES_ARE_INK or GVIT_INK_WITH_STANDARD_OVERRIDE).
If you choose not to set any of these specifics, Ink will have the following default behaviors:
The destination of the Ink will be the object that would have received the initial click event (typically the implied mouse grab) or the object that fielded the MSG_META_QUERY_IF_PRESS_IS_INK.
The Ink will not be clipped; the user may draw over the entire screen, overlapping generic objects and other windows. (All the Ink will still be sent to the same destination, however.)
The Ink will be drawn in a standard color and brush thickness.
All of the above behavior can be changed in the InkDestinationInfo structure. The structure should be created automatically with the routine UserCreateInkDestinationInfo(); you can then pass the block handle of this structure blindly to routines that demand an InkDestinationInfo structure. Among the four fields of the structure, the following need to be passed to UserCreateInkDestinationInfo():
dest
The optr of the object that will receive the Ink data block after all the Ink has been collected. An object may use this field to force the destination of the Ink to be any particular object.
gs
The handle of a Graphic State (GState) containing clipping, color, or other information about how the Ink should be drawn on the screen. To use the default values, set this to zero. This will allow the user to draw Ink all over the screen. See “Graphics Environment,” Chapter 23 of the Object Reference Book for full information on GStates.
brushSize
The thickness of the brush used when drawing the Ink on the screen. This is the same as the brush thickness for polylines; see “Drawing Graphics,” Chapter 24 of the Object Reference Book for more information on brush thickness.
callback
Virtual fptr to a callback routine to determine whether a stroke is a gesture or not. This callback routine will be passed to ProcCallFixedOrMovable().
11.4.2.3 How Ink Is Stored and Passed On
When the user presses the pen to the screen and the input is determined to be Ink, the Input Manager generates a mouse button press event and begins storing up the subsequent mouse events. The UI then determines whether that press event should be treated as Ink or not (the default behavior is to treat them as normal mouse events).
If the events should not be treated as Ink, they are passed on as normal mouse events. If they are to be treated as Ink, they are stored and are not passed on. Instead, the UI stores them up in a special data block until the Ink input is stopped. Ink input is stopped when the user removes the pen from the screen for a user-specified amount of time.
After the user finishes entering the Ink input, the Input Manager determines which object will receive the data block (it may not be the original object that received the initial press). It first queries the original object with MSG_VIS_QUERY_IF_OBJECT_HANDLES_INK. Any object handling Ink input must subclass this message and make sure that the top Ink point is not above its upper bound; it should then return its upper bound and its optr. GEOS provides a routine that does just this; if your object will always handle Ink input, you can set this routine up as the method to be used as follows:
@method VisObjectHandlesInkReply, YourClassName,
                MSG_VIS_QUERY_IF_OBJECT_HANDLES_INK;
If the object handles Ink, the Input Manager sends the entire data block off to the GenSystem object using MSG_META_NOTIFY_WITH_DATA_BLOCK with the identifier NT_INK. (For information on this and other notification messages, see “General Change Notification,” Chapter 9.)
11.5 Input Hierarchies
As previously mentioned in this chapter, the Input Manager channels input events to particular objects. The objects are chosen based on the current input grabs, the position of the pointer, and the state of the application. Sometimes, though, input events must be sent to a particular object not specified by one of these means. One example is keyboard input: While an object can grab the keyboard exclusive, it should not; instead, it should make itself the focus. The object that has the focus receives all keyboard input (MSG_META_KBD_CHAR).
Similarly, your application or other objects may need to send messages to the object which is currently active. For example, a Text Sizes menu may need to know which of several text objects currently has an active selection. Then, when the user selects a new text size, the menu can send its message to the proper text object. The object that receives these messages is called the target object.
The menu in this case, however, should not have to explicitly name the destination of its message. The menu should be able to specify that its message should go to the current target object; the UI knows which object is the target, and it redirects the message automatically.
The GEOS UI uses three special hierarchical mechanisms to fulfill these two purposes (specialized input flow and specification of destinations). These hierarchical mechanisms are built into the basic structure of GEOS objects and are therefore universal and consistent for all applications and all objects. The three hierarchies used are the focus, the target, and the model. (There is a fourth, the controller, but it is used only internally by GEOS.) These hierarchies all function in the same manner but are used for different purposes.
11.5.1 The Three Hierarchies
As stated above, GEOS offers three hierarchies you can use for input flow and specification of message destinations. These hierarchies, with their basic purposes, are listed below.
Focus
The Focus hierarchy designates which object should currently receive keyboard input. Essentially, the focus object has the active keyboard grab. The text objects (VisText and GenText) manage the focus automatically; if you use only these objects for keyboard input, you will not need to understand the focus. The Focus hierarchy is described in full in section 11.5.3.Target
The Target hierarchy designates the active view, window, and visible selection which may be acted upon. In most cases, the target will be an object the user has selected and now wishes to alter based on menu and dialog selections. For example, a graphic object selected becomes the target object of the application; when the user selects “Rotate” or some other menu function, the menu sends its message to the selected object via the target hierarchy. The Target hierarchy is described in full in section 11.5.4.Model
The Model hierarchy designates the model of the data the user can manipulate. This is provided for highly complex applications that need to extend the Target hierarchy for more specific handling of selections. It extends from the GenSystem through the GenApplication and the document control objects. The Model hierarchy is described in full in section 11.5.5.
11.5.2 Common Hierarchy Basics
All three of the input hierarchies function in a similar manner. Each relies on the basic tree structure of UI objects to build a path from the topmost system UI object (GenSystem) down to a leaf node that has the hierarchical properties (e.g. the target object).
Each composite object can have exactly one child with each hierarchical property. The composite determines which of its children currently has the exclusive of the hierarchy; for example, a composite with ten children may designate the fourth child as the Target node at its level. If that child is a composite with its own children, it will select one of them as the Target node at the next level.

Figure 11-3 A Sample Target Hierarchy
The striped objects represent nodes in the target hierarchy. Each composite designates which of its children has the target exclusive; that child is currently a member of the active target path. Inactive target paths may also be specified; the lightly shaded objects would become the active target path if the top node changed its target child.
Figure 11-3 shows a hierarchical path from the top node of an object tree to the leaf object having the target. A message sent to any object in the path will be passed down the tree until it gets to the active target leaf, the object that actually has the system’s target exclusive.
A special feature of the hierarchical structure is that inactive paths may be maintained. Figure 11-3 also shows an inactive path. The inactive path is stored in the objects themselves. The topmost object in the tree, however, has decided that object on the right has the target exclusive; if later the top object decides the object on the left has the exclusive, the target will automatically be given to the leaf node specified without actually changing the object tree (just the pointer stored in the top node).
Note that the other hierarchies operate in a similar manner. The behavior described is not unique to the target hierarchy.
11.5.2.1 Special Terminology
Before reading the in-depth sections on the individual hierarchies, you should know how several terms are defined and used. These terms are listed below and are diagrammed in Figure 11-4.
Node
Any composite in the object tree that can be part of a path for one of the hierarchies.
Exclusive
The active child of a composite node in the hierarchy is said to have the “exclusive.” Only one child of any composite may have the exclusive at that level.
Level
A group of siblings, all of which can potentially be part of a hierarchical path. All the nodes in a given level will have the same parent. Only one node at each level may have the exclusive for that level.
Grab
When an object grabs a hierarchy (e.g. “grabs the focus”), it notifies its parent that it wants to gain that hierarchy’s exclusive for its level. Any other node at the same level will be forced to give up the exclusive.
Active Path
The path of exclusive nodes from the top object to the leaf having the active exclusive. Only objects which have a complete active path to the top node can exhibit the property of the hierarchy (e.g. a text object in a minimized application can not have the focus because its primary window does not have the focus exclusive).
Inactive Path
Any path of exclusive nodes that is broken from the top node. If the topmost node of an inactive path is given the exclusive at its level, the entire inactive path will automatically become the active path.
11.5.2.2 Modifying the Active Path
Each of the three hierarchies has messages understood by MetaClass that alter the hierarchy’s active path. The Specific UI takes care of most of the modifications to the active path, however, so simple applications will not need to bother with it.
Any node can “grab” a hierarchical exclusive by sending the grab message to its parent. (Outside agents can alter the path by sending the grab message to the child’s parent on behalf of the child.) The grab forces any other node on the child’s level to give up the exclusive. Any node can release the exclusive with the appropriate message (typically done when forced to release because of another node’s grab).
Whenever a node gains the exclusive of a hierarchy, it will be notified via a message. This is to notify objects which already had their level’s exclusive that they now have the active hierarchical exclusive. Similarly, if another node grabs the exclusive at any level equal or above an exclusive node, that node will be notified that it has lost the exclusive at its level. See the discussions of the individual hierarchies for more detail on the messages used.
11.5.2.3 Sending Classed Messages
Any object can easily send messages to the object having the active exclusive of a given hierarchy using MSG_META_SEND_CLASSED_EVENT. This message passes a recorded event (message) to the first object of a specified class encountered within the hierarchy. (If the destination should be a leaf, no class should be specified.)
Figure 11-4 Hierarchy Terminology
Each object in the tree is a node. Each arrow points to the node having the exclusive at its level. The striped path is the active path; the shaded paths are all inactive paths.
To pass events to the active member of a specific hierarchy, you should use a TravelOption with MSG_META_SEND_CLASSED_EVENT. TravelOption is a type which describes the destination for the specified event. There are three types of TravelOption for each hierarchy:
Direct
The “direct” travel options are TO_FOCUS, TO_TARGET, and TO_MODEL. These send the classed event down the hierarchy’s active path, treating the recipient of MSG_META_SEND_CLASSED_EVENT as the active path’s top node.Application-direct
The “application-direct” travel options are TO_APP_FOCUS, TO_APP_TARGET, and TO_APP_MODEL. These send the classed event first to the GenApplication object associated with the recipient of MSG_META_SEND_CLASSED_EVENT; the GenApplication object is taken as the top node, and the event is passed down the active path until it is handled.System-direct
The “system-direct” travel options are TO_SYS_FOCUS, TO_SYS_TARGET, and TO_SYS_MODEL. These send the classed event to the GenSystem object, the topmost object in the entire UI object tree. The classed event will be passed down the active path, using the GenSystem object as the path’s top node.
11.5.3 Using Focus
The specific UI handles most of the manipulation of the focus hierarchy. Most specific UIs interpret keyboard and mouse events and know when to switch the focus from one object to another. For example, in OSF/Motif, clicking on a window will switch the focus to that window from the previous focus window. Before the mouse is clicked, however, the focus exclusive of that window will not change. In other specific UIs which incorporate real-estate cursor behavior, merely moving the cursor over a window will transfer the focus to that window.
By default, an application will come up with certain objects having the focus exclusive within their focus levels. This allows the user to immediately begin typing or operating on data. For an object to grab the default exclusive, it must first be focusable. A focusable object can be any child of a valid focus node. Valid nodes for the focus hierarchy are:
GenSystem
GenField
GenApplication
GenPrimary
GenDisplayControl
GenDisplay
GenView (with GVA_FOCUSABLE bit set)
GenInteraction (independently displayable)
VisContent
Note that a GenView must have the GVA_FOCUSABLE bit set in its GVI_attrs field. If an object you need to act as a focus node is not in the above list (for example, a custom gadget), you must subclass the object and add instance fields and message handlers to handle focus functionality.
If an independently displayable objects is focusable, the focus will be given to the object which is visually “on top” of all other objects. For all other objects within a focus exclusive level, the focus will be granted to the object with HINT_DEFAULT_FOCUS in its instance data. If no objects have this hint at a particular focus level, then the focus will be granted to the first focusable child.
11.5.3.1 Grabbing and Releasing the Focus
To grab the focus exclusive in its level, a node should send itself MSG_META_GRAB_FOCUS_EXCL. The default handler for this message grabs the focus exclusive for the object from its parent and forces any other object on the caller’s level to give the focus up. The active exclusive will not be granted unless the caller is part of the active path after the grab.
When another node grabs the focus exclusive, the node currently having the exclusive on that level must give it up. MSG_META_RELEASE_FOCUS_EXCL releases the focus exclusive for the other node.
Note that these messages only modify the exclusive at a single level. Therefore, they only affect the focus optr of the parent’s node; further up the focus hierarchy there is no effect. Changing the focus exclusive of an object will only change the direction of the focus path if all parents of the new exclusive are also focus exclusives.
MSG_META_GET_FOCUS_EXCL may be sent to any focusable composite node to get the optr of the node’s child having the exclusive. This message may be used even on nodes in the inactive path.
11.5.3.2 Gaining and Losing the Focus
When an object gains the active focus exclusive and is a node in the active path, it receives MSG_META_GAINED_FOCUS_EXCL. This indicates to the object that it will receive all keyboard input as the active keyboard object. At some point later, when the object has lost the focus exclusive, it will receive MSG_META_LOST_FOCUS_EXCL.
11.5.3.3 Sending Classed Events to the Focus
Frequently, you may wish to send messages to objects in the active Focus path. The easiest way to deliver a message to an object in the focus hierarchy is to use MSG_META_SEND_CLASSED_EVENT with the TravelOption TO_APP_FOCUS. To send a message to the leaf node of the active path, send this message with a null class. The message will be sent down the hierarchy until it reaches the leaf object, where it will be processed. (See Code Display 11-2.)
This approach is desirable over using MSG_META_GET_FOCUS_EXCL to return an optr for later use, as the system may have corrupted the optr in the meantime.
Code Display 11-2 Delivering Messages to the Focus
@method MyProcessClass, MSG_SEND_MESSAGE_TO_FOCUS_INTERACTION {
    EventHandle event;

        /* The classed event is recorded to be handled by the first object of class
         * GenInteractionClass. */
    event = @record GenInteractionClass::MSG_TEST_MESSAGE();

        /* This message is then sent to the GenApplication object, from which it
         * will travel down the focus hierarchy until handled at the
         * GenInteraction level. */
    @call MyApplication::MSG_META_SEND_CLASSED_EVENT(event, TO_FOCUS);
}

/* You may also declare an object with the TravelOption TO_APP_FOCUS. This will
 * send the message to the application object and then down the focus hierarchy. */

@object GenTriggerClass MyFocusTrigger = {
    GI_visMoniker = "Send test message to the focus";
    GTI_actionMsg = MSG_TEST_MESSAGE;
    GTI_destination = (TO_APP_FOCUS);
    ATTR_GEN_DESTINATION_CLASS = { (ClassStruc *)&GenInteractionClass };
}

/* To send a message to the focus leaf node, use a null class. */
@method MyProcessClass, MSG_SEND_TEST_TO_FOCUS_LEAF {
    EventHandle event;

        /* A classed event with the class of null is recorded. */
    event = @record null::MSG_TEST_MESSAGE();

        /* This event is sent to the GenApplication, where it will travel down the
         * focus hierarchy to the leaf object, where it will be handled. */
    @call MyApplication::MSG_META_SEND_CLASSED_EVENT(event, TO_FOCUS);
}

/* As an alternative, an object could be set to deliver its message to the
 * leaf focus node of the application. */
@object GenTriggerClass MyFocusLeafTrigger = {
    GI_visMoniker = "Send test message to the focus leaf object";
    GTI_actionMsg = MSG_TEST_MESSAGE;
    GTI_destination = (TO_APP_FOCUS);
    /* An ATTR_GEN_DESTINATION_CLASS of zero specifies a null class. */
    ATTR_GEN_DESTINATION_CLASS = 0;
}
11.5.4 Using Target
The specific UI handles most of the manipulation of the target hierarchy. Most specific UIs interpret keyboard and mouse events and know when to switch the target from one object to another. For example, in OSF/Motif, clicking on a window will switch the target to that window from the previous target window. Before the mouse is clicked, however, the target exclusive of that window will not change. In other specific UIs which incorporate real-estate cursor behavior, merely moving the cursor over a window will transfer the target to that window.
By default, an application will come up with certain objects having the target exclusive within their target levels. This allows the user to immediately begin typing or operating on data. For an object to grab the default exclusive, it must first be targetable. A targetable object can be any child of a valid target node. Valid nodes for the target hierarchy are:
GenSystem
GenField
GenApplication
GenPrimary
GenDisplayControl
GenDisplay
GenView (with GVA_TARGETABLE bit set)
GenInteraction (independently displayable)
VisContent
In addition, however, a generic object must be set GA_TARGETABLE in its GI_attrs field to become a valid target object. This bit is set by default for the following classes:
GenField
GenApplication
GenPrimary
GenDisplayControl
GenDisplay
GenView
If you wish a generic object to be targetable and it does not appear in this list, set it GA_TARGETABLE. If the object does not by default appear as a valid node in the Target hierarchy (such as for a custom gadget), you must subclass the object and add target instance fields and message handlers.
For all targetable objects within a target exclusive level, the target will be granted to the object with HINT_DEFAULT_TARGET in its instance data. If no object has this hint at a particular target level, then the target will be granted to the first targetable object at that level.
11.5.4.1 Grabbing and Releasing the Target
To grab the target exclusive in its level, a node should send itself MSG_META_GRAB_TARGET_EXCL. The default handler for this message grabs the target exclusive for the object from its parent and forces any other object on the caller’s level to give the target up. The active exclusive will not be granted unless the caller is part of the active path after the grab.
When another node grabs the target exclusive, the node currently having the exclusive on that level must give it up. MSG_META_RELEASE_TARGET_EXCL releases the target exclusive for the other node.
Note that these messages only modify the exclusive at a single level. Therefore, they only affect the target optr of the parent’s node; further up the target hierarchy there is no effect. Changing the target exclusive of an object will only change the direction of the target path if all parents of the new exclusive are also target exclusives.
MSG_META_GET_TARGET_EXCL may be sent to any targetable composite node to get the optr of the node’s child having the exclusive. This message may be used even on nodes in the inactive path.
11.5.4.2 Gaining and Losing the Target
When an object gains the active target exclusive and is a node in the active path, it receives MSG_META_GAINED_TARGET_EXCL. This indicates to the object that it will receive all keyboard input as the active keyboard object. At some point later, when the object has lost the target exclusive, it will receive MSG_META_LOST_TARGET_EXCL.
11.5.4.3 Sending Classed Events to the Target
Frequently, you may wish to send messages to objects in the active Target path. The easiest way to deliver a message to an object in the target hierarchy is to use MSG_META_SEND_CLASSED_EVENT with the TravelOption TO_TARGET. To send a message to the leaf node of the active path, send this message with a null class. The message will be sent down the hierarchy until it reaches the leaf object, where it will be processed. (See Code Display 11-3.)
This approach is desirable over using MSG_META_GET_TARGET_EXCL to return an optr for later use, as the system may have corrupted the optr in the meantime.
Code Display 11-3 Delivering Messages to the Target
@method MyProcessClass, MSG_SEND_MESSAGE_TO_TARGET_INTERACTION {
    EventHandle event;

        /* The classed event is recorded to be handled by the first object of class
         * GenInteractionClass. */
    event = @record GenTextClass::MSG_TEST_MESSAGE();

        /* This message is then sent to the GenApplication object, from which it
         * will travel down the target hierarchy until handled at the
         * GenInteraction level. */
    @call MyApplication::MSG_META_SEND_CLASSED_EVENT(event, TO_TARGET);
}

/* You may also declare an object with the TravelOption TO_APP_TARGET. This will
 * send the message to the application object and then down the target hierarchy.
*/

@object GenTriggerClass MyTargetTrigger = {
    GI_visMoniker = "Send test message to the target";
    GTI_actionMsg = MSG_TEST_MESSAGE;
    GTI_destination = (TO_APP_TARGET);
    ATTR_GEN_DESTINATION_CLASS = { (ClassStruc *)&GenTextClass };
}

/* To send a message to the target leaf node, use a null class. */

@method MyProcessClass, MSG_SEND_TEST_TO_TARGET_LEAF {
    EventHandle event;

        /* A classed event with the class of null is recorded. */
    event = @record null::MSG_TEST_MESSAGE();

        /* This event is sent to the GenApplication, where it will travel down the
         * target hierarchy to the leaf object, where it will be handled. */
    @call MyApplication::MSG_META_SEND_CLASSED_EVENT(event, TO_TARGET);
}

/* As an alternative, an object could be set to deliver its message to the
 * leaf target node of the application. */
@object GenTriggerClass MyTargetLeafTrigger = {
    GI_visMoniker = "Send test message to the target leaf object";
    GTI_actionMsg = MSG_TEST_MESSAGE;
    GTI_destination = (TO_APP_TARGET);
    /* An ATTR_GEN_DESTINATION_CLASS of zero specifies a null class. */
    ATTR_GEN_DESTINATION_CLASS = 0;
}
11.5.5 Using Model
In some cases, you may need to send or receive information from some object other than the focus or target. The Model hierarchy is provided as an alternative. In most cases, the model provides a means of pointing to data selections other than that pointed to by the Target hierarchy. Only use it if the target hierarchy cannot serve your needs.
The model of an application is used to identify objects that represent the actual data that can be selected by the user. Typically, these selections are either secondary selections or are not visible. The selections are frequently operated on with the use of menus, dialog boxes, or other UI gadgetry. Only one object at each model level may have the model “exclusive,” and for an object to “have the Model” of an application, that object must have a continuous path of model exclusives up to the application object.
Only GenSystem, GenApplication, and the document control objects can be directly used in the Model hierarchy without any modifications. To use other objects in the Model hierarchy, you must first subclass those objects’ classes and add an instance field and several message handlers pertaining to the Model hierarchy. Any object which is a valid target node can be subclassed in this manner.
By default, an application will come up with certain objects having the model exclusive within their model levels. This allows the user to immediately begin operating on data. For an object to grab the default exclusive, it must first be modelable. Only objects which are modelable may have the model exclusive. A modelable object can be any child of a valid model node. Valid nodes for the Model hierarchy are the same as for the Target hierarchy. However, a document control object must also be set GDCA_MODELABLE to grab the model exclusive. Remember that just because an object is a valid node does not mean it can exhibit the behavior of the Model hierarchy; you must subclass most objects for this to occur.
For objects within a model level, the model will be granted first to any object with HINT_DEFAULT_MODEL in its instance data. If no object has this hint at a particular model level, then the model will be granted to the first modelable object at that level.
The easiest way to deliver a message to an object in the active Model hierarchy is to use MSG_META_SEND_CLASSED_EVENT with the TravelOption TO_MODEL. To send a message to the leaf node in the Model hierarchy, send this message with a class of null. The message will be sent down the hierarchy until it reaches the leaf object, where it will be processed.
This approach is desirable over using MSG_META_GET_MODEL_EXCL to return an optr for later use as the system may have corrupted the optr in the meantime.
11.5.5.1 Changing the Model Exclusive
To modify the Model hierarchy, use MSG_META_GRAB_MODEL_EXCL. To remove the model exclusive from an object without setting it to another object, use MSG_META_RELEASE_MODEL_EXCL. Note that these messages only modify the model exclusive of a single object. Therefore, they only affect the model pointer of the parent; further up the Model hierarchy there is no effect. Changing the model exclusive of an object will only change the direction of the model path if all ancestors of the new model exclusive are also model exclusives.
To check which model exclusive a composite points to, send it a MSG_META_GET_MODEL_EXCL. This message will return the optr of the model child. The returned object may not have the model properties, though, for the reasons above. Never send a message directly to the object returned by this method as it may have been changed in the meantime. Use MSG_META_SEND_CLASSED_EVENT with the TravelOption TO_MODEL instead.
11.5.5.2 Intercepting the Model
Your application may also wish to be notified when an object either gains or loses its model properties. Whenever an object in GEOS gains the model of the application-not just the model exclusive-it sends a MSG_META_GAINED_MODEL_EXCL to that object. Similarly, if an object loses the model of an application-not just the model exclusive-the system sends a MSG_META_LOST_MODEL_EXCL to that object.
If your application needs to know when an object either gains or loses its model properties, intercept MSG_META_GAINED_MODEL_EXCL and MSG_META_LOST_MODEL_EXCL. Be sure to pass these messages on to the superclass, however, to perform necessary default functionality. Within your message handlers for these messages, you may add whatever additional behavior you require.
11.5.6 Extending the Hierarchies
You may also extend or modify the hierarchies to add other objects that are not active nodes by default. If custom objects wish to use the hierarchies, you will need to add instance data and message handlers for their classes. The following steps must be taken to add a new node in a hierarchy:
Add a hierarchical instance field of type HierarchicalGrab.
Add a handler for MSG_META_MUP_ALTER_FTVMC_EXCL. This method alters the custom instance field for the grab and release messages for all hierarchies. You must call the superclass in your handler.
Add methods to handle the GAINED and LOST messages pertaining to the particular hierarchy you are extending. These methods should call FlowUpdateHierarchicalGrab(). You can also add behavior exhibited when the object gains or loses the exclusive. Depending on what you are subclassing, your default behavior may already take care of this. For instance subclasses of VisClass automatically handle losing and gaining the target exclusive.
Add a method to handle the GET message for the particular hierarchy you are extending. This method returns the optr of the object set in the new instance field. The method should return true to signal that it is capable of gaining the exclusive.
Add the capability to handle the MSG_META_SEND_CLASSED_EVENT with the TravelOption of the particular hierarchy you are extending. The way you handle this message depends on the hierarchy affected, as discussed below.
TO_FOCUS and TO_TARGET requests should only travel down hierarchies of the same name. If no further travel is possible, the method should pass the event on to the superclass for handling. TO_MODEL requests should only travel down the Model hierarchy if it exists and the next optr is non-null.
The GEOS User Interface <– table of contents –> Managing UI Geometry