13 Sound Library
GEOS includes a powerful sound library. The library allows users to play individual notes, sequences of notes, and sampled sounds. It also provides support for those sound devices which allow the sampling and playback of digitized sounds.
13.1 Goals and Motives
The sound library provides multiple tiers of support for a variety of devices. You may program multiple-voice compositions (musical pieces which require playing more than one note at a time), and the sound driver will determine how to best play the sounds if the device does not have enough voices.
The sound library also shows the advantage of a preemptive multithreading system like GEOS. The library sets up queues of sounds and arranges for the kernel’s thread to call the sound driver functions at appropriate times. An application can thus arrange ten seconds of music then continue operation as the music plays in the background.
The system provides a routine to play standard sounds. By using these, the programmer can keep his interface consistent with that of existing programs. When the standard system sounds are inappropriate, the programmer can use other routines to completely specify the sound’s pitch and duration.
13.2 Playing UI Sounds
UserStandardSound()
When a program needs to create a UI-related sound, it should call the routine UserStandardSound(). This routine plays a sound, silencing any other sounds which may have been playing. The program may specify either a system-standard sound, a custom sound, or a sequence of custom sounds.
Note that if the user has disabled UI sound (via the Preference Manager application), UserStandardSound() will not play the sound. The sound will be played at a high priority-the UI sound will take over the speakers in spite of any sound that some other program is generating.
To play one of the standard UI sounds, call UserStandardSound() with a single argument-a member of the StandardSoundType enumerated type. StandardSoundType has the following members:
SST_ERROR
The sound produced when an error box appears.
SST_WARNING
General-purpose warning tone.
SST_NOTIFY
General-purpose tone to notify the user of some occurrence.
SST_NO_INPUT
Sound produced when the user is making mouse-clicks or keypresses that are not going anywhere-the user is clicking outside of a modal dialog box, etc.
SST_KEY_CLICK
Sound produced when the user types on a real or virtual keyboard.
SST_CUSTOM_SOUND
SST_CUSTOM_NOTE
SST_CUSTOM_BUFFER
These are not actually standard sound values, but in fact act as signals that you wish to provide a custom sound buffer. SST_CUSTOM_BUFFER means that you will provide a pointer to a buffer containing the music data. SST_CUSTOM_SOUND signals that you are providing a handle to a pre-allocated sampled sound. SST_CUSTOM_NOTE signals that you wish to play a single note. To learn more about creating custom notes and music buffers, see below.
13.3 Representing Tones
Tones are defined by the following characteristics:
Frequency (i.e. pitch), expressed in terms of cycles/second (Hertz or Hz). The higher the frequency, the higher the pitch.
Duration, which may be measured in milliseconds, sixtieth of a second ticks, or by means of a “tempo.”
Volume, a relative measure of loudness.
Instrument, which instructs sound cards which are capable of imitating certain musical instruments to do so.
The sound library expects sounds to be specified in terms of cycles/second. However, constants have been defined which associate three octaves of tones with their values in Hz. As a benchmark, middle A is defined as 880 Hz. Doubling the frequency of a pitch is equivalent to raising it by one octave. Since there are twelve equal half-steps in an octave, multiplying the frequency of a tone by is equivalent to raising the pitch by a single half-step. The constants are defined with the formats
octave_note
octave_note_accidental
where octave is “LOW,” “MIDDLE,” or “HIGH”; note is one of “A” through “G”; and accidental, if present, is either “SH” (for sharp) or “b” (for flat). The lowest constant defined is LOW_C, approximated as 262 Hz; the highest is HIGH_B, approximately 1,976 Hz.
You may use a frequency that is beyond the range of human hearing (which extends from about 20Hz-20,000Hz). Thus, keep in mind that if you can’t hear a note, the problem may not be that you’ve set the volume too low.
Duration may be specified in a number of units, by means of the SoundStreamDeltaTimeType enumerated type.
#define SSDTT_MSEC 8
#define SSDTT_TICKS 10
#define SSDTT_TEMPO 12
Duration may be expressed in milliseconds, timer ticks (each tick is one sixtieth of a second), or fractions of notes. Of course, there is no set length for a note, but when you actually play the note, you will provide a tempo value which will be used to compute the actual sound length. This tempo is just the number of milliseconds to play a one-hundred-and-twenty-eighth note. A number of constants have been set up to aid you in computing note lengths:
#define WHOLE               128
#define HALF                64
#define QUARTER             32
#define EIGHTH              16
#define SIXTEENTH           8
#define THIRTYSECOND        4
#define SIXTYFOURTH         2
#define ONE_HUNDRED_TWENTY_EIGTH   1
#define DOUBLE_DOT_WHOLE     (WHOLE + HALF + QUARTER)
#define DOUBLE_DOT_HALF      (HALF + QUARTER + EIGHTH)
#define DOUBLE_DOT_QUARTER   (QUARTER + EIGHTH + SIXTEENTH)
#define DOUBLE_DOT_EIGHTH    (EIGHTH + SIXTEENTH + THIRTYSECOND)
#define DOUBLE_DOT_SIXTEENTH (SIXTEENTH + THIRTYSECOND + SIXTYFOURTH)
#define DOTTED_WHOLE         (WHOLE + HALF)
#define DOTTED_HALF          (HALF + QUARTER)
#define DOTTED_QUARTER       (QUARTER + EIGHTH)
#define DOTTED_EIGHTH        (EIGHTH + SIXTEENTH)
#define DOTTED_SIXTEENTH     (SIXTEENTH + THIRTYSECOND)
#define DOTTED_THIRTYSECOND  (THIRTYSECOND + SIXTYFOURTH)
If you’re not familiar with the terms “double-dotted eighth note” and “tempo,” don’t worry. Basically, tempo allows you specify your notes’ durations in units when defining your sound buffer, but delay specifying the length of those units until playing time. Thus, you might specify that a note should be 16 units long when composing your sound buffer. You could then play that note with a tempo of 100 milliseconds and the note would sound for 1.600 seconds. You might play the sound again later with tempo 50, and that note would last only 0.800 seconds. You would not have to do anything to the musical composition itself to change this time-scale.
Volume is a relative value, depending on the strength of the machine’s speakers. You may specify the volume with a word-length value. The following constants have been set up to aid you in specifying a volume:
#define DYNAMIC_FFFF      0xffff /* very loud */
#define DYNAMIC_FFF       0xdfff /* fortississimo */
#define DYNAMIC_FF        0xbfff /* fortissimo */
#define DYNAMIC_F         0x9fff /* forte */
#define DYNAMIC_MF        0x8fff /* mezzo forte */
#define DYNAMIC_MP        0x6fff /* mezzo piano */
#define DYNAMIC_P         0x5fff /* piano */
#define DYNAMIC_PP        0x3fff /* pianissimo */
#define DYNAMIC_PPP       0x1fff /* pianississimo */
#define DYNAMIC_PPPP      0x01ff /* is it playing? */
By way of comparison, a typical alert beep plays with DYNAMIC_FFF (sometimes called “fortissimo,” or even “fortississimo”) volume.
Some sound devices emulate musical instruments. You may ask that notes be played using one of these instruments or even define your own instrument. You will specify what sort of instrument you wish to use by means of a segment:offset pointer. If the segment is non-null, the pointer should point to the instrument’s data (for information about setting up this data, see section 13.10.3); if the segment is NULL, then the “offset” will be interpreted as a standard instrument value. The standard instrument “patches” are listed in sound.h; they have names like IP_ACOUSTIC_GRAND_PIANO and IP_ELECTRIC_SNARE.
Note that many simulated percussion instruments have been set up so that they sound most realistic when playing notes of a particular frequency. If there is a frequency constant with a name derived from the name of the instrument, you should probably play notes of that frequency. For example, to simulate an “electric snare,” you would use IP_ELECTRIC_SNARE to play a note of frequency FR_ELECTRIC_SNARE.
13.4 Single Notes
SoundAllocMusicNote(), SoundPlayMusicNote(), SoundStopMusicNote(), SoundReallocMusicNote(), SoundFreeMusicNote()
The simplest way to play a note is by using UserStandardSound() with the SST_CUSTOM_NOTE sound type. In this mode, the routine takes a frequency and a duration in ticks. The sound will be played immediately, played using the instrument patch IP_REED_ORGAN if the sound device supports simulated instruments. The note will play with medium loudness.
To play a note at a lower priority (so it won’t neccessarily interrupt other sounds), or with a different loudness, or as if by an instrument other than a reed organ, you will create and play a custom note.
The task of playing a custom note breaks down as follows:
Allocate the note with SoundAllocMusicNote().
Play it with SoundPlayMusicNote() or UserStandardSound().
Free it with SoundStopMusicNote() and SoundFreeMusicNote().
First, you must set up the data structure containing the note’s data. SoundAllocMusicNote() takes a frequency, a duration, a volume, and an instrument and returns the handle to a data structure which the sound library will understand. See Code Display 13-1 for an example.
Code Display 13-1 Allocating Single Music Notes
/* BigBlatt is a Cb (C flat) Half-note, which will sound as if played by a trumpet.
 *  This means a tone of 494Hz with duration (128 * playing tempo). */
SoundErr = SoundAllocMusicNote ( IP_TRUMPET, 0, /* Play as if with a trumpet */
                MIDDLE_C_b,    /* C flat, 494 Hz. */
                DYNAMIC_FFF,   /* Play it rather loudly */
                SSDTT_TEMPO,   /* Length based on 128th notes */
                WHOLE,         /* Duration = 128/128 notes */
                &BigBlatt);

/* SubliminalTone is an A note lasting 0.3 sec which will sound as if it was being
 *  played very quietly on an electric piano. It will play at 880Hz. */
SoundAllocMusicNote( IP_ELECTRIC_PIANO_1, 0, /* As if on piano */
                MIDDLE_A,      /* Middle A, 880 Hz. */
                DYNAMIC_PP,    /* Play it rather quietly. */
                SSDTT_MSEC,    /* Length based on milliseconds */
                300,           /* Duration = 0.300 seconds */
                &SubliminalTone);
There are two ways to play a note. The first is to call UserStandardSound() with the SST_CUSTOM_SOUNDS sound type, passing the handle returned by SoundAllocMusicNote(). The other is to call SoundPlayMusicNote(), supplying the proper tempo and priority level. UserStandardSound() uses a tempo of 8 millisecond per one-hundred-and-twenty-eighth note; this is somewhat fast; tempo-based notes are not normally used with UserStandardSound().
When playing a note or sound buffer, you must provide a sound priority level. Sounds may interrupt one another, so if you ask to play a sound more important than that which is presently playing, your sound will take precedence and will play immediately. The following sound priority levels are available:
SP_SYSTEM_LEVEL
SP_ALARM
SP_STANDARD
SP_GAME
SP_BACKGROUND
SP_IMMEDIATE
SP_THEME
The lower the priority’s numerical value, the more important the sound. The SP_SYSTEM_LEVEL_IMMEDIATE constant is the most important of those listed above and has the lowest numerical value.
The SP_IMMEDIATE and SP_THEME values are a bit unusual in that they are meant to be combined with the other priorities, as modifiers of base priority. Thus a sound whose priority was (SP_STANDARD + SP_IMMEDIATE) would edge out a sound which was just SP_STANDARD. A sound which had priority (SP_STANDARD + SP_THEME) would be edged out by the SP_STANDARD_SOUND. And all of these sounds would take precedence over a sound whose base priority was SP_GAME or SP_BACKGROUND.
Code Display 13-2 Playing Single Music Notes
/* UserStandardSound() with note:
 * We will play a quick high E note for 0.020 seconds. */
UserStandardSound(SST_CUSTOM_NOTE, HIGH_E, 20);

/* UserStandardSound() with allocated note:
 * We will play the Subliminal tone immediately. */
UserStandardSound(SST_CUSTOM_SOUND, SubliminalTone, 0);

/* SoundPlayNote():
 * Total playing time of BigBlatt will be (WHOLE*62)=(128*8)=1024 msec = 1+ sec. */
SoundPlayMusicNote(BigBlatt, SP_STANDARD + SP_IMMEDIATE, 8, EOSF_UNLOCK);
You may stop a note from playing at any time by invoking SoundStopMusicNote().
To free the note’s data structure, call SoundFreeMusicNote(). You should make sure that the note has stopped playing first (call SoundStopMusicNote() if you are not sure).
To change any of the characteristics of a note, call SoundReallocMusicNote(). You should make sure that the note has stopped playing first (call SoundStopMusicNote() if you are not sure).
Code Display 13-3 Stopping and Freeing a Note
/* Stop the SubliminalTone if we're playing it, then change the stored note */
SoundStopMusicNote(SubliminalTone);
SoundReallocMusicNote(SubliminalTone, LOW_C, DYNAMIC_PPP,
                    SSDTT_MSEC, 500, IP_TINKLE_BELL, 0);

/* Stop the BigBlatt if we're playing it, then discard it */
SoundStopMusicNote(BigBlatt);
SoundFreeMusicNote(BigBlatt);
13.5 Declaring Music Buffers
You may set up a buffer of notes to be played. This buffer may include information for several voices. If you are familiar with constructing MIDI streams, you will find that setting up GEOS music buffers is a similar process.
Sound buffers are made up of events and timer ticks. The various event types are defined in the enumerated type SoundStreamEvent-each event is signalled by one of the values listed below and includes one or more words of data describing the event specifics:
SSE_VOICE_ON Start a note. The next words of data contain the note’s characteristics:
voice The voice on which the note should play. If your composition has notes playing on more voices at a time than the device can handle, then some will not be played.
frequency The note’s frequency (e.g. MIDDLE_C).
volume The note’s loudness (e.g. DYNAMIC_MF).
SSE_VOICE_OFF End a note. This does not necessarily mean that the voice will stop making sound-this corresponds to releasing the key of a piano, and some sound may linger on. Ending the note also signifies that the voice is “free”; if another sound on the queue wants to appropriate that voice, then it can. There is one word of data:
- voice The voice which should stop playing.
SSE_CHANGE Change a voice’s instrument. There are three words of data:
voice The voice to be changed.
pointer Pointer (two words) to new instrument structure to use (or standard InstrumentPatch value such as IP_CLARINET followed by the IP_STANDARD_TABLE word constant to signal that a standard instrument is being used).
SSE_GENERAL A miscellaneous event (some possible values are discussed below). The number and meaning of data words will depend on the event.
Time is expressed as a unit and a duration. The unit is one of the SoundStreamDeltaTimeType values; the duration specifies how many of these units should be allowed to pass.
Code Display 13-4 Simple Sound Buffer Example
#define MELODY 0
#define PERC 1
static const word themeSongBuf[] = {
    SSE_CHANGE,     MELODY, IP_FLUTE,   /* We want voice 0 to
                                         * play like a flute. */

    SSE_CHANGE,     PERC, IP_ACOUSTIC_SNARE,  /* voice 1 should play
                                               * like a drum. */

    SSE_GENERAL,    GE_SET_PRIORITY, SP_GAME, /*Set priority of sound */

    SSE_VOICE_ON,   PERC, FR_ACOUSTIC_SNARE, DYNAMIC_F, /* Hit the drum. We are
                                                         * hitting it hard (forte)
                                                         * with a C note. */

    SSDTT_TEMPO,    QUARTER,                            /*A quarter note passes-*/

    SSE_VOICE_OFF,  PERC,                               /* Pick up drumstick- */

    SSE_VOICE_ON,   PERC, FR_ACOUSTIC_SNARE, DYNAMIC_F, /* hit the drum */

    SSDTT_TEMPO,    EIGHTH,
    SSE_VOICE_OFF,  PERC,                                 /* Pick up drumstick */

    SSDTT_TEMPO,    EIGHTH,                               /* For one eighth-note, no
                                                           * instruments playing */

    SSE_VOICE_ON,   PERC, FR_ACOUSTIC_SNARE, DYNAMIC_F,   /* Tap the drum- */

    SSE_VOICE_ON,   MELODY, LOW_C, DYNAMIC_MP,            /* -and start the flute */

    SSDTT_TEMPO,    QUARTER,                              /* Advance a quarter-note
                                                           * of time. */

    SSE_VOICE_OFF,  PERC,                                 /* Pick up the drum stick
                                                           * (but we'll continue
                                                           * the flute) */

    SSE_CHANGE,     PERC, IP_COWBELL,                     /* Switch instruments */

    SSE_VOICE_ON,   PERC, FR_COWBELL, DYNAMIC_F,          /* Hit bell */
    SSDTT_TEMPO,    EIGHTH,                               /* Advance eighth note */
    SSE_VOICE_OFF,  PERC,                                 /* Stop hitting bell */
    SSDTT_TEMPO,    EIGHTH,                               /* Advance one more eighth- */

    SSE_VOICE_OFF,  MELODY,                               /* -and stop blowing on flute */

    SSDTT_TICKS,    120,                                  /* Let sound die out
                                                           * for two seconds */

    SSE_GENERAL,    GE_END_OF_SONG};                      /* We`re done */

Figure 13-1 Sheet Music Excerpt for Example
Percussion will play two notes then rest. Next, melody will play a long note, while percussion plays a note, switches instruments, plays another note, and rests.
The song buffer must end with a GE_END_OF_SONG event.
The following general events may be incorporated into any sound buffer:
GE_NO_EVENT
No event at this time. This event may be sandwiched between other events when a long duration is necessary.
GE_END_OF_SONG
Signals the end of the sound buffer. Every song buffer must end with this event.
GE_SET_PRIORITY
Change the sound’s priority. It has one word of data:
- priority New priority level to use.
GE_SET_TEMPO
Change the sound’s tempo. It has one word of data:
- tempo New tempo to use, as measured by the number of milliseconds to apportion a one-hundred-and-twenty-eighth note.
GE_SEND_NOTIFICATION
Send a message to an object upon reaching this point in the sound buffer. It has three words of data, consisting of a Message and an optr:
message This is a Message value, the message to send to the object. Note that this message should not require any arguments. This message will be sent as if with the forceQueue message flag.
object This is an optr, the message’s intended recipient. This object may be disabled.
GE_V_SEMAPHORE
Release a semaphore. There is one word of data:
- semaphore The handle of the semaphore to release (“V”).
13.6 Playing Music Buffers
SoundAllocMusic(), SoundInitMusic(), SoundPlayMusic(), SoundStopMusic(), SoundReallocMusic(), SoundFreeMusic()
If your sound buffer is stored in a movable resource, and you only want that resource to be locked down while the music is playing, call SoundInitMusic() and pass the handle of a block containing the music. The block should contain a SimpleSoundHeader structure which specifies the number of voices in the buffer, followed by a music buffer as described above.
If your sound buffer is in fixed or locked memory, you must allocate space in the area accessible to the sound library by calling SoundAllocMusic(). This returns a handle to a sound block which you will be passing to other sound routines. You may pass a flag requesting that the data from which the sound was allocated be automatically unlocked and/or freed. Note that since sound buffers often become rather large, it is normally a bad idea to leave them in fixed memory, and normally inadvisable to make them fixed for very long. If you use SoundAllocMusic(), the sound buffer will have to remain locked for as long as the music is playing.
To play the sound, call SoundPlayMusic(). You must provide the handle returned from the sound allocation, a tempo, and a priority.
Code Display 13-5 Preparing and Playing Sound Buffers
SoundInitMusic(MySongResource, 1);

SoundErr = SoundAllocMusic( &themeSongBuf,
                2,      /* themeSongBuf has two voices,
                         * MELODY and PERC. */
                &theSong);

SoundPlayMusic(theSong, SP_STANDARD, 125, EOSF_UNLOCK);

UserStandardSound(SST_CUSTOM_SOUND, MySongResource, 33);
To stop playing the sound, call SoundStopMusic(). This routine will not affect songs which are not playing.
To free up the sound handle and data associated with the sound, call SoundFreeMusic(). You should never free a sound which is playing; if you think that a sound may be playing, call SoundStopMusic() before freeing it.
To reuse a sound handle with a new sound buffer, call SoundReallocMusic(). The number of voices may not be changed by reallocation. You should never reallocate a sound which is playing; if you think that a sound may be playing, call SoundStopMusic().
Code Display 13-6 Stopping and Freeing a Sound
/* We are done with the theme song and want to play our ending song. Instead of
 * allocating a new song handle, we'll just reallocate the one we were using to
 * store the data taken from the themeSongBuf, and use the data from
 * endingSongBuf. The endingSongBuf had better only contain data for two
 * voices (or fewer). */
SoundStopMusic(theSong);
SoundReallocMusic(theSong, (_far)&endingSongBuffer, FREE_ON_EOS);
SoundPlayMusic(theSong, SP_STANDARD, 125);

/* If we're done with "theSong" handle, then we can free it, after making sure
 * it has stopped playing. */
SoundStopMusic(theSong);
SoundFreeMusic(theSong);
13.7 Playing Very Large Music Buffers
SoundAllocMusicStream(), SoundPlayToMusicStream(), SoundStopMusicStream(), SoundFreeMusicStream()
You may wish to play a sound which takes up a great deal of memory. If you wish to play an extremely long music buffer, you can play parts of it to a music stream. For instance, to play a 1 Megabyte music buffer (requiring too large a block of memory for the routines described in the above sections), you would play 4K of it at a time to a music stream, which would concatenate the music together. Normally, these “music stream” commands are the best to use when playing a music buffer whose sound resides on a disk. To allocate a special stream which will accept music data, call SoundAllocMusicStream(). To play music into the stream, call SoundPlayToMusicStream(), passing a pointer to the buffer of music to play. To stop the passage of music through the stream and flush the buffer, call SoundStopMusicStream(). To free up the music stream, call SoundFreeMusicStream(). Make sure that there is no music playing through the stream when you free it; be sure to call SoundStopMusicStream() if you are not otherwise sure.
13.8 Playing Sampled Sounds
Once you have your sound data structure set up, the basic steps to playing the sound are
Allocate a DAC stream.
Enable the DAC stream.
Play your sampled sound data into the enabled stream. Play the sound as many times as you like. You may play other sampled sounds to the same stream.
Disable the DAC stream when you’re finished with it.
To allocate a DAC stream, call SoundAllocSampleStream(). This will return a memory handle which you will use to identify the sound stream as you manipulate it with other routines.
When you are ready to start playing sounds to the stream, call SoundEnableSampleStream(). This routine grabs access to a physical DAC player device. Note that you will specify a SoundPriority for the stream, and that you will not be able to change this priority from sample to sample. Also note that if a sound is playing on the stream and you queue another sound to the stream, then the second sound will be queued behind the first. Thus, if your application wishes to play simultaneous sounds capable of interrupting one another, it should allocate more than one sound stream.
If there are more DAC streams than the sound device has DAC outputs, then the sound system will have to decide which sounds to play when too many play at once.
Sounds with a higher priority will oust those with lower priority. Note that the lower priority sound will not come back when the more important sound is finished-thus, a short alert noise might cause a few seconds of sampled speech not to play at all. If your application will be playing sampled sounds at more than one priority, you may thus want to make sure that the lower-priority sounds are broken up into small pieces.
If a sound wants to play, but all the available DAC outputs are playing higher-priority sounds, then the sound will not play.
To actually play a sound to your enabled sound stream, call SoundPlayToSampleStream(). This routine takes a pointer to the sound data, (which should be in a locked area of memory). The sound data will be copied to the DAC stream’s buffer, and you may thus free the sound data after you have played it to the DAC stream. The sound will be queued at the end of the stream’s data. The sound device’s sound driver will read from the stream and will eventually play the sound.
When you are done playing sounds to a stream, you should free up the stream by calling SoundDisableSampleStream().
If you wish to enable a new DAC stream with the same sound token, but with a different SoundPriority, you may do so using SoundEnableSampleStream() (You should call SoundDisableSampleStream() on the token before enabling it in this way). You should eventually call SoundDisableSampleStream() again in this case.
Once the DAC stream has been disabled, you may free up the sound token by calling SoundFreeSampleStream(). You should call this with all sound tokens before your application exits.
13.9 Grabbing the Sound Exclusive
SoundGetExclusive(), SoundGetExclusiveNB(), SoundReleaseExclusive()
If your sound device has multiple voices and/or DAC outputs, then more than one application may play sound at a time. If the highest priority sound does not use all of the card’s voices, then the next priority sound will be allowed to use them.
Most of the time, this is the behavior you want. This allows you to have sounds going on in the background and foreground at the same time. However, if your application will be creating some sound so important that no other application should be allowed to interrupt it, you may grab exclusive access to the sound routines.
SoundGetExclusive() grabs a semaphore associated with the sound library (performs a “P” operation). Your thread thus makes it known that it wants sole access to the sound library, and will wait, if necessary, for any other thread which has grabbed sole access to finish. It will then grab exclusive access to the sound library’s low level routines. Until you release the exclusive, no other thread will be able to use the SoundAllocMusic(), SoundAllocMusicStream(), SoundAllocMusicNote(), SoundPlayMusic(), SoundPlayToMusicStream(), SoundStopMusic(), SoundStopMusicStream(), SoundReallocMusic(), SoundReallocMusicNote(), SoundAllocSampleStream(), SoundEnableSampleStream(), or SoundPlayToSampleStream() routines.
The SoundGetExclusiveNB() routine also locks the sound library for exclusive access. However, if any other thread has already grabbed the exclusive, SoundGetExclusiveNB() won’t wait; it will just grab the exclusive away anyhow.
To release the exclusive, call SoundReleaseExclusive(). This will allow sounds to enter the queue and will allow another thread which has called SoundGetExclusive() to grab the exclusive.
13.10 Simulating Musical Instruments
In addition to the standard instruments provided by the system, you may define instruments of your own. To do so, you must first find out what sort of instrument format the user’s sound driver expects. You will then pass a pointer to the appropriate data structure.
To find out what sort of data structure the sound driver expects, call SoundSynthDriverInfo() and note the value returned at the format pointer argument.
13.10.1 Acoustics In Brief
Sound may be thought of in terms of waves. A pure tone manifests as a sine wave. The higher the frequency of the wave (as measured in Hertz), the higher the pitch of the generated sound. A piccolo would generate a wave with a high frequency; a tuba would generate a low frequency. The amplitude of the wave translates to the sound’s volume, or loudness. Cannons generate sound waves with great amplitude.
A tone consists of a sound of one frequency. Full, rich sounds are created by making sound at more than one frequency. If you generate sound at multiples of the base frequency, you get a good broad, rich sound and the frequencies beyond that of the note itself are known as “harmonic” frequencies. However, the volume levels should be lower at these harmonic frequencies than at that of the note itself. Together, these frequencies can form the sounds of chords. A rich instrument such as an organ will make sounds on many frequencies other than that of the main note. A violin, with a very pure tone, will generate almost no sound on frequencies other than that of the note being played.
13.10.2 Simple Instrument Description
The simple instrument description allows you to specify a way for less powerful devices to emulate different musical instruments. You describe three volume levels, each of which can be between 0 and 255. The fundamental tone will play at the first volume level; the second volume will be used for playing the first harmonic frequency; the third volume for playing the second harmonic.
Simple instruments have another characteristic: you can specify a noise component. By means of noise, you impart sibilance to the sound, giving it a “breathy,” sometimes hissing quality. A sound without noise will seem crisp by comparison. At this time, the simple sound format supports three kinds of noise:
NO_NOISE
The lack of noise. Use for crisp, acute sounds. This value is guaranteed to be zero.
WHITE_NOISE
Noise evenly distributed across all frequencies.
METAL_NOISE
Noise only at the lower frequencies-you may think of this as standard white noise which has gone through a low-pass filter. Noise generated will have a lower tone, and have a less hiss-like quality than those with white noise. If cymbals have white noise, then drums have metal noise.
To describe an instrument with no noise component, specify the three volume levels and leave the noise component as zero.
CTIEnvelopeFormat BrokenTuba =
    {255,       /* Primary: full strength */
     64,        /* First harmonic: 25% strength */
     10,        /* 2nd harmonic: 10% strength */
     0};        /* No noise */
To describe an instrument with noise, you must specify a type and a degree of noise (encoded as two bits describing what sort of noise OR’d together with six bits describing the degree of noise, if any):
CTIEnvelopeFormat FunkyPiano =
    { 255, 32, 17, ((NT_WHITE_NOISE << 6) | 10) };

CTIEnvelopeFormat NoisyDrum =
    { 0, 0, 0, ((NT_METAL_NOISE << 6) | 63 ) };
13.10.3 Advanced Description
The advanced instrument description data structures were set up with the SoundBlaster card in mind; for detailed information (i.e. timing numbers) about these fields, you should purchase a copy of the SoundBlaster Development Kit and read the chapter about Programming the FM Chip. However, you may first want to read the documentation below for an introduction to some of the involved concepts:
As with the simple instrument format, you’ll specify the richness of your instrument, how its sound shows up at frequencies other than the base frequency. This is done using a technique known as “Frequency Modulation.”
You will also work with the instrument’s loudness, or sound level. You may specify that some instruments are louder than others. You may also specify how the sound level changes over time.
Frequency Modulation
Frequency modulation allows you to specify how an instrument’s sounds will appear at its harmonic frequencies. You can even use it to set up sound at frequencies other than the harmonics. The sound device does this by means of a “modulating” frequency.
The sound device actually keeps track of two frequencies. The carrier frequency, corresponding to the note being played, can be thought of as constant for a given note being played. This frequency may be input to a sound wave generator, and the resulting wave to a speaker, resulting in a pure tone. A frequency modulating (FM) system does not just use a constant frequency, but actually adds a wave signal to the carrier frequency to achieve a frequency which changes over time. Consider a siren-its frequency changes over time. However, in an FM system, these changes come much more quickly.
The wave signal which gets added to the carrier frequency is known as the modulating signal, and you may change the nature of your instrument’s harmonics by changing the characteristics (amplitude, frequency) of this modulating signal.
The input to the speaker-this wave which is constantly changing frequency, thanks to the modulating signal-is called the output signal.
The net effect of this is that the carrier signal will contain several frequencies. In fact, those frequencies will be spaced apart by a constant distance-the frequency of the modulating signal. If the modulating frequency is the same as the frequency of the note being played, then this means that the carrier will contain sounds at the note and its harmonic frequencies.
Thus, you may use the modulating signal to set up sound on the harmonic frequencies, just as you did with the simple instrument description. The FM system is a bit more adaptable in that by making the modulating signal some multiple of the main note, you can create sound at every other harmonic frequency, or possibly at each harmonic and any number of frequencies between each harmonic.
Furthermore, you can change the strength of the sound at the various frequencies by changing the amplitude, or level, of the modulating signal.
Changing Sound Levels
Notes in a sound buffer have a single volume, or loudness. However, when you play a note on a musical instrument, the volume level is not constant. When you hit a drum, the sound is instantaneous-it doesn’t matter if you pull the drumstick back a moment or a minute later, all the sound is generated in a single instant. When you press a piano key, a string inside the piano will start vibrating, producing sound. This string will continue to produce sound (though it will grow gradually quieter). Thus, to truly differentiate instruments, we need a model for an instrument’s loudness over time. This change over time is known as an instrument’s envelope.
The advanced instrument description uses a standard ADSR model of an instrument’s envelope. That means it breaks a sound’s life time into four parts: an Attack, Decay, Sustain, and Release. Each instrument has a value for each stage of its envelope, and will determine the length of that stage of the life-span. Also, you may use an envelope type to specify whether the sound should continue for as long as the voice is on (like an organ), or should die off automatically (like a drum). In the GEOS model, attack, decay, and release are all slopes; sustain is a sound level, expressed as a fraction of the note’s volume.
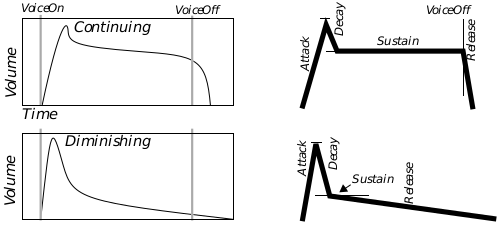
Figure 13-2 Modeling with the ADSR envelope.
For a continuing (organ-like) instrument, the sound level will progress thus:
Attack
The sound level will build up to that specified for the note (e.g. DYNAMIC_MF). The higher the attack value, the more quickly this will occur. Note that if the voice is turned off during this stage, the sound will go immediately to the release stage (This simulates that the instrument was never allowed to reach peak volume, as if an organist had tapped an organ key instead of keeping it depressed.
Decay
The sound level will decrease at a rate determined by the decay value. The higher the decay, the more quickly the sound level will fall off. If the voice is turned off during this stage, the sound will immediately enter the release stage.
Sustain Level
The sound level will fall off at the decay rate until it has fallen to the sustain level. This sustain level is expressed as a fraction of the note level, so you might, for example, specify that the sound level should stop decaying once it has fallen 25 percent. The sound level will remain at the sustain level until that note ends (i.e. the voice is turned off).
Release
The voice will then decrease at a rate determined by the release value. The higher the release, the more quickly the sound level will fall off. The sound will continue to fall until inaudible.
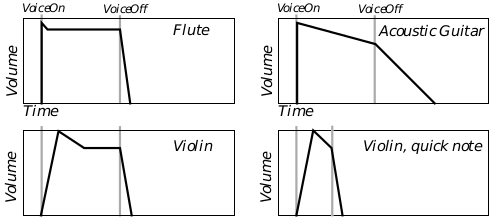
Figure 13-3 Continuing Instrument Envelopes
The flute shows a typical continuing instrument envelope, made up of four segments. The guitar has a small decay value, and thus the volume has not fallen to the sustain level when the voice goes off, and the volume starts falling at the release rate. You can see how the Violin can be similar to either of these patterns, depending on when the voice is turned off.
For a diminishing (drum-like) instrument, the sound level progresses:
Attack
The sound level will build up to that specified for the note (e.g. DYNAMIC_FF). The higher the attack value, the more quickly this will occur. If the voice is turned off partway through the attack the sound will immediately enter release, never reaching full volume, and skipping the decay stage.
Decay
The sound level will decrease at a rate determined by the decay value. The higher the decay, the more quickly the sound level will fall off. If the voice is turned off during this time, the sound will go into release without waiting to reach the sustain level.
Sustain Level
The sound level will fall off at the decay rate until it has fallen to the sustain level. This sustain level is expressed as a fraction of the note level, so you might, for example, specify that the sound level should stop decaying once it has fallen 25 percent. Unlike a continuing instrument, the sound level will immediately move on to the release stage, regardless of whether the voice has been turned off.
Release
The voice will decrease at a rate determined by the release value. The higher the release, the more quickly the sound level will fall off. The sound will continue to fall until inaudible.
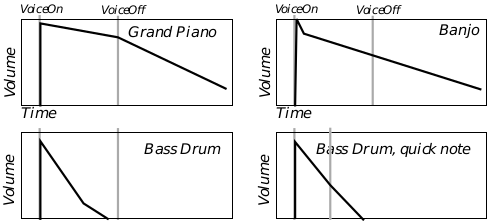
Figure 13-4 Diminishing Instrument Envelopes
The piano demonstrates the envelope of a typical diminishing instrument envelope.
In case that isn’t enough to keep track of, consider the following: You may also specify an ADSR envelope for your modulating signal. This actually comes in handy-many instruments attack with a rather broad sound, but will sharpen to a single tone while sustaining or releasing. By setting up a modulator envelope so that the modulator signal is strong while the main signal is attacking but weak when the modulator is passed this point, you may simulate this behavior.
Pieces of the Advanced Instrument Format
Now that you understand the main forces governing how your sound will be modeled, you are ready to use the SBIEnvelopeFormat data structure. This structure has fields for the following values:
SBIEF_carTimbre: Carrier Timbre
This field contains several effects which may be applied to the carrier wave.
Amplitude Tremolo
This flag requests that a wave signal be added to the carrier’s sound level, producing a sort of “tremolo” effect.Frequency Vibrato
This flag requests that a wave signal be added to the carrier’s frequency, producing a “vibrato” effect. Note that the modulating signal adds a wave to the carrier’s base frequency, but vibrato is separate and different: The modulating frequency is dependent on the note frequency, but the vibrato wave’s frequency is a constant; that is, you may control the modulating amplitude, but the vibrato’s amplitude is fixed.Envelope Type
This flag specifies the envelope type of the instrument-continuing or diminishing.Key Scaling Rate
Some instruments, especially stringed instruments, tend to produce shorter notes at the higher frequencies. This flag allows you to simulate this type of instrument-at the higher frequencies, the carrier’s ADSR values will be boosted, so that the note’s life span will be shorter.Frequency Multiplier
You may apply a multiplying factor to the carrier frequency. If this factor is greater than one, then the instrument will tend to play notes at a higher pitch-if the factor is two, for example, the instrument will play one octave higher than normal. If the factor is one-half, then the instrument will play one octave lower than normal.
SBIEF_carScaling: Carrier Scaling
This field contains information about the carrier’s basic scaling-its basic loudness, before the effects of the ADSR envelope are applied.
Key Scaling Level
Some instruments tend to play high-pitch notes quietly. You may set this value to specify how much the sound level should decrease when playing high frequencies: the higher the number, the faster the decrease. Zero means you want no decrease.Total Level
This is the base loudness of your instrument, but be careful-the higher the number, the quieter the instrument. If this value is zero, then you want your instrument to sound as loud as possible.
SBIEF_carAttack: Carrier Attack/Decay
This field contains the attack and decay portions of the carrier’s ADSR envelope.
Attack
This is the instrument’s “attack,” its rate of sound level increase from none to the note’s sound level. This time could range from something measured in seconds to nearly instantaneous. Increasing the attack level by one effectively doubles the attack rate. Percussive instruments tend to have high attacks, bowed and wind instruments tend to have medium to low attacks. Not many instruments have attack levels towards the bottom of the scale, and the higher attack levels are almost exclusively the province of special effects.Decay This is the instrument’s “decay,” its rate of decrease from the note’s sound level to the sustain level. This rate of decay is about one fifteenth of an Attack of the same level (i.e. decays are on a slower scale than attacks). Instruments which get quiet soon after being activated will have high attacks (especially diminishing-type instruments of this nature). A chime would have almost no decay, while a drum would have a medium-level decay-almost no instruments will have a decay more than halfway up the scale.
SBIEF_carSustain: Carrier Sustain/Release
This field contains the sustain and release portions of the carrier’s ADSR envelope.
Sustain
This is the instrument’s “sustain.” It is a fraction, which will be multiplied by the note level to find the true sustain level. Continuing-type instruments will stay at this sound level until they encounter a voice-off command. Diminishing instruments will not (proceeding immediately to release).Release
This is the instrument’s “release,” its rate of decrease from the sustain level to silence. This rate will be the same as a decay of the same level (i.e. decays and releases happen at the same rate). In a piano, a damper hits the string when you release the key, stopping sound quickly; a piano has a high release. Bells, which continue vibrating for a long time after being hit, have a low release rate.
SBIEF_carWave: Carrier Wave
Most natural sounds correspond to a sine wave. However, you may request another type of wave.
Wave Type There are four choices of wave:
Sine wave. The standard y = sin(x) curve.
Truncated sine wave: y = MAX(0, sin(x)). This results in something like a square wave.
Absolute value sine wave: y = |sin(x)|. This results in something approaching a triangle wave. This results in a somewhat “tinny” sound.
Chopped sine wave: { 0 \A3 x \A3 90, 180 \A3 x \A3 270: y = |sin(x)|; 90 \A3 x \A3 180, 270 \A3 x \A3 360: y = 0}. This wave is similar to a sawtooth wave.
SBIEF_modTimbre: Modulator Timbre
This field contains a number of effects which you may apply to the modulator signal. Thus, applying a tremolo effect results in a sound which wobbles in breadth over time-the amplitude of the modulator is being changed, not that of the final signal.
Amplitude Tremolo
This flag adds a sine wave signal to the modulator’s amplitude. You will recall that the modulator’s amplitude determines the “breadth” of the sound-how far it will extend into other frequencies. Applying a tremolo effect to this value will cause the sound to vary in breadth over time.Frequency Vibrato
This flag adds a sine wave signal to the modulator’s frequency. You will recall that the frequency determines the distance between frequencies at which the carrier signal will have sound. If you have set up the modulating signal to have sound appear at the harmonics, then applying this effect will cause the supplement sounds to warble around the harmony level.Envelope Type
This flag specifies the envelope type of the modulator signal’s envelope (continuing or diminishing).Key Scaling Rate
This flag boosts the ADSR values of the modulator signal when the note is at a high pitch. You would apply this factor if an instrument’s breadth dissipated faster at high frequencies.Frequency Multiplier
This is the field which gives you your main control over the modulating signal’s frequency. You may apply a multiplying factor to the modulating signal’s frequency. If the modulating signal’s frequency is the same as the carrier frequency, then it will create harmonic frequencies. If the modulating frequency is a multiple of the carrier frequency, then it will generate harmonic frequencies, and others in between. If the modulating frequency is a fraction of the carrier frequency, then it will generate some but not all harmonic frequencies. Percussion instruments, whose sounds tend to manifest as quick bursts of noise, tend to have very high modulator frequency multipliers.
SBIEF_modScaling: Modulator Scaling
These fields allow you to control the amplitude of the modulating signal, and thus the breadth of the carrier signal.
Key Scaling Level
This field specifies that the amplitude should be lower when a high-pitch note is played. This means that higher notes will seem sharper, more piercing. The greater the value of this field, the more quickly the amplitude will fall off; if this value is zero, then the amplitude will be unaffected.Total Level
This field allows you to directly change the amplitude of the modulator signal-but be careful: the higher the value of this field, the lower the amplitude. The lower the value of this field, the broader the sound.
SBIEF_modAttack: Modulator Attack/Decay
These fields allow you to control the attack and decay portions of the modulating signal’s ADSR envelope.
Attack
This field determines how quickly the modulating signal will go to full amplitude-creating the broadest sound. This is often one or two levels higher than the carrier signal’s attack level (resulting in an actual attack rate two to four times faster), resulting in a sound broadest during the carrier’s attack period, characteristic of many instruments. Wind instruments tend to have a slow modulating attack.Decay
This field determines the rate at which the modulating amplitude will decrease until it reaches the sustain level. This value is normally kept low to maintain the instrument’s breadth during and beyond the instrument’s attack.
SBIEF_modSustain: Modulator Sustain/Release
These fields control the sustain and release portions of the modulating signal’s ADSR envelope.
Sustain
This determines the level to which the amplitude will be allowed to decay. If the modulating signal is continuing-type, it will remain at this sustain level until the voice is turned off.Release
This determines the rate at which the amplitude will decrease from the sustain level. The higher the value, the faster the sound will reduce to a pure tone.
SBIEF_modWave: Modulator Wave
You may apply any supported wave type in place of a sine wave for the modulator signal. This allows you to change the distribution of sounds over other frequencies.
Wave Type There are four choices of wave:
Sine wave. The standard y = sin(x) curve.
Truncated sine wave: y = MAX(0, sin(x)). This results in something like a square wave.
Absolute value sine wave: y = |sin(x)|. This results in something approaching a triangle wave.
Chopped sine wave: { 0 \A3 x \A3 90, 180 \A3 x \A3 270: y = |sin(x)|; 90 \A3 x \A3 180, 270 \A3 x \A3 360: y = 0}. This wave is similar to a sawtooth wave.
SBIEF_feedback: Feedback
This field allows you to change the way the modulator and carrier signals are combined.
Feedback Type
Instead of adding the modulating signal to the note frequency, you can bypass all frequency modulation and just add the outputs of the “modulator” and “carrier” signals. If you set this flag, then both signals become, in effect “carrier” signals-both will generate a note, not a breadth.Feedback Level
Whether it’s being used as a modulator signal, or just as another “carrier,” the modulator can feed back to itself. This means that some fraction of its output in a given tick may be added to its frequency input.